Loading Images to Exported Koru Scenes
With Koru you usually setup a scene, then export it and then show it as a read-only 3D model. However, using some JavaScript code and Koru API you can let your visitors upload their own graphics to your model or change its color the way they want. Let them customize a design, or make a 3D configurator out of it - sky is the limit!
Let’s make an export template that uploads images to a selected material and lets you change its color. You will need some HTML and JavaScript knowledge for further reading.
Creating a Template
When Koru exports a scene, it wraps it up in some HTML called “template”. Template decides whether the scene will be fullscreen or not, template customizes snapshot buttons and can do some other scene control. Finally, template may simply add your logotype to the caption of the page. Any time you need a custom HTML output in Koru, you make a template.
You can read more about templates here, but best of all you don’t really need to start from scratch. Koru comes with a couple of pre-defined templates that you can use to kick-start your own. Let’s clone one of the existing ones now.
Start Koru and click its File menu. In the drop-down list select Open Templates Library item. You will see a folder on your disk where Koru stores its templates. Find a folder called mini-widget and make a clone of it. On Mac you need to right-click it and select Duplicate, on Windows you can simply copy and paste it. Rename the new folder to image-uploader and enter that folder.
You will see three files inside:
- _preview.png - the preview image displayed when you select this template in export window, you can leave it as is for now;
- _readme.txt - contains the text description of the template. You will need to edit it a bit;
- _template.html - the template itself, here we’ll be adding the screenshot button.
Open _readme.txt with your text editor and modify its first line, so it contains just two words “Image Uploader”, then replace the rest of the file with a brief description of what this template is for. The end result should look like this:
Image Uploader
This template lets your users configure material named "Image".
They can upload their own images there and change its color.
Save the file, then switch back to Koru and make a simple scene. Then try to export it to disk. You should see your new preset in the list:
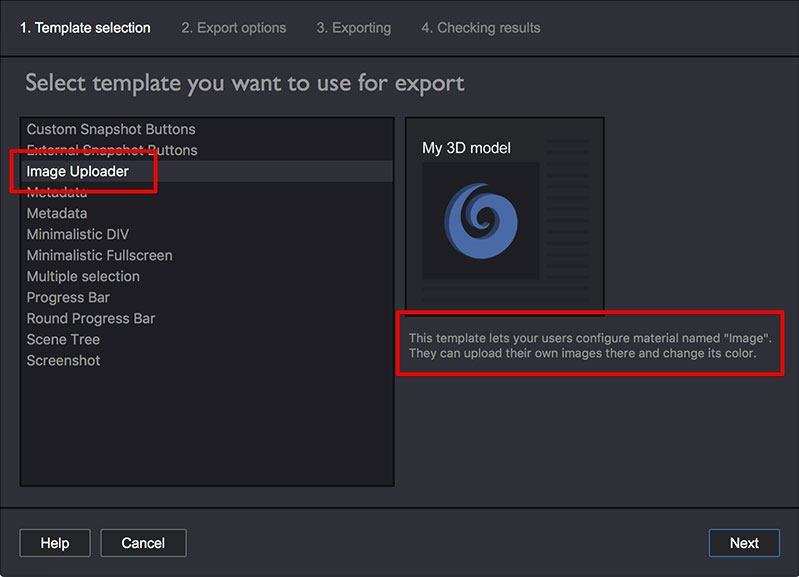
Note that the first line of the text file you edited became the name of the preset in the list, and the rest of the text file is now displayed at the right as a description. We didn’t change the preview image, so it is the same as for “Minimalistic DIV” template that we initially cloned, but you can later replace it with any square image you want.
Let’s Add Buttons
If you export the scene with your new template, you’ll notice no differences with the standard “Minimalistic DIV” template we used as a source. In order to make it different you need to modify _template.html file that Koru uses to wrap up the scene. Open it in your HTML/JavaScript editor and let’s start.
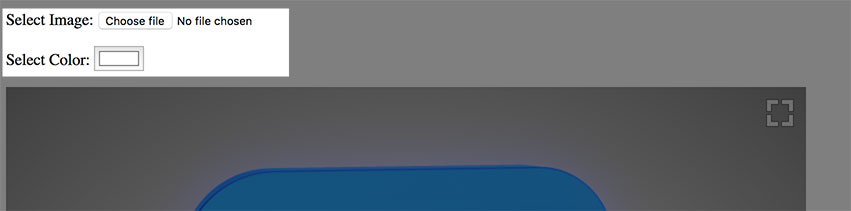
Once again, you can read more about the contents of this file here, we will not focus on that in this tutorial. What we need is to add two controls that let your users upload images and change color. Locate the line:
<h1>{{KORU_TITLE}}</h1>
And add the following lines right below that line:
<p>
	<label>Select Image:</label> <input type="file" accept="image/*" id="file-picker"/>
</p>
<p>
	<label>Select Color:</label> <input type="color" value="#fff" id="color-picker"/>
</p>
If you export a scene with this template now, you will see file and color pickers above the 3D model:
You can style them up with CSS, but this runs out of scope of this tutorial. The next step is to add handlers to these buttons, so clicking them changes the scene.
Let’s Add Some Code
Locate these two lines at the end of the template:
{{KORU_EXTRA_SCRIPT}}

</html>
Add some empty lines between these two and put the following code there:
<script type="text/javascript">
function koruInit(koru) {
	koru.addEventListener('loadend', onLoadEnd);
}

function onLoadEnd(event) {
	var koru = event.koru;

	var mtlImage = koru.materials["Image"];
	if (!mtlImage) return; // no Image material
	if (mtlImage.layers.length == 0) return; // no layers

	var layer = mtlImage.layers[0]; // the first layer of "Image" material

	var filePicker = document.getElementById("file-picker");
	filePicker.onchange = function(event) {
		var image = new Image();
		image.onload = function() {
			layer.diffuseMap = image;
		}
		image.src = URL.createObjectURL(event.target.files[0]);
	};

	var colorPicker = document.getElementById("color-picker");
	colorPicker.onchange = function(event) {
		layer.diffuseColor = parseInt(event.target.value.substr(1), 16) | 0xFF000000
		layer.update();
	};
}
</script>
This looks quite big and complex unless you have some JavaScript experience. Get some JavaScript lessons if you want to use the most features or Koru. Below we briefly explain what is going on here.
The code defines two functions: koruInit() and onLoadEnd(). The first gets called when the Koru engine has loaded, but the scene itself is not loaded yet. It is too early to look for our material yet, so we ask Koru to let us know when the scene is loaded. To do that we add a listener for “loadend” event that Koru sends after loading the scene.
When the scene is loaded Koru calls our onLoadEnd() function that gets the Koru engine from the event parameter. Then it looks for material named “Image” and fails if it doesn’t find it or if it has no layers. Finally, it gets the layey variable that we’ll be changing later.
After that it gets file and color pickers and assign handlers for their “onchange” events. The handlers will be called when user changes color or selects a file. In both handlers we assign image and color to layer’s properties, update the layer and ask Koru to redraw the scene.
Important: in order for the code above to work you need a material named “Image” in the scene, this material needs to have at least one layer, its first layer needs to be enabled, its diffuse block needs to be enabled and it needs to have a default diffuse texture. The first part is obvious, as the code looks for the material by name and accesses its very first layer. The default texture may not be that obvious, but as Koru tries to optimizes exported scenes, it exports slightly different code if there is no default texture to speed up the rendering. Because of that, Koru expects that if there was no texture at export time, there will be no texture in run time. To avoid this, you need to export scene with default textures for the properties you are going to change.
For the Lazy Ones
Here is a zip-file with the template described above. Unpack it to your templates folder to get the same result without typing a word.
That’s All!
It wasn’t that difficult, right? Combine this with a screenshot button from another tutorial below and get a simple online 3D mockup tool!
- Decals — how to place images on objects as decals;
- Lightmaps — how to compute scene lightmaps and configure them;
- Floor reflection — how to add and configure floor reflection;
- Watermarks — adding 2D image overlays;
- Taking Screenshots — how to add "Take Screenshot" button to your Koru exports;
- Loading Images — how to upload your own images to exported Koru scenes;
- Automatic Rotation — how to make your scene automatically rotates when idle;
- Customizing Snapshot Buttons — how to customize snapshot buttons with CSS;
- Creating Snapshot Buttons — when CSS is not enough you can create snapshot buttons yourself;
- Drop–Down Snapshots Menus — convert snapshots to configurable options;
- Manual Snapshots Control — how to activate a specific snapshot;
- Customizing Background — replace that gray gradient for scenes with transparent background;
- Non-Interactive Scenes — can exported scenes ignore mouse clicks?
- Fullscreen Button — how to change the fullscreen button look?
- Materials — Koru materials explained;
- Partial Snapshots — making snapshots that affect just some scene elements;
- Using Metadata — add extra information to nodes and use it in browser.