Using Snapshots for Options
Koru lets you create snapshots that affect only selected elements of the scene. This way you can replace a specific element, say a door handle type by leaving the whole scene as is.
However, when you have multiple options to configure, like door handle type, color and position you can quickly end up with too many snapshot buttons which may not be convenient to the end user. It would be better to display such options in a more convenient way, like a combo box or a drop–down menus.
Koru doesn’t have this feature out of the box, but you can do it yourself with some javascript code. This tutorial provides a sample implementation that you can adapt to your needs.
Creating a New Template
We will not start from scratch. As with the Javascript Snapshot Buttons tutorial, we’ll be using one of the templates that come with Koru. Start Koru and click File → Open Templates Library… in the main menu. You should see the templates folder.
Locate the snapshots folder there and create a copy of that folder named snapshots-options. Then open that folder and edit the _readme.txt to have this text:
Snapshot-based options
This template displays snapshots as drop-down menu items.
You can also modify the _preview.png to visually reflect the drop–down menu elements, if you like. We will not do this here and focus on the code instead.
Editing the Template
Now open the _template.html file in your favorite code editor and modify the <body> section of the template to look this way:
<body>
	<div class="parent">
		<h1>{{KORU_TITLE}}</h1>
		<div id="snapshots-row"></div>
		<div class="koru-viewport" {{KORU_DATA_SCENE_ATTRIBUTE}}>
			{{KORU_NOSCRIPT_HTML}}
		</div>
	</div>
</body>
The main difference is that the snapshot-row div is now located above the viewport, so the snapshot buttons and drop–down lists are displayed on top of the scene for convenience.
Once done, scroll the template down to the <script> section and replace it completely with the code below:
<script type="text/javascript">

function koruInit(koru) {
	koru.createSnapshotButtons = false;
	koru.addEventListener('loadend', onLoadEnd);
}

function onLoadEnd(event) {
	const koru = event.koru;
	const row = document.getElementById('snapshots-row');
	let groups = {};
	for (let i in koru.snapshots) {
		const snapshot = koru.snapshots[i];
		if (!snapshot.visible) continue;

		const metadata = snapshot.metadata;
		if ("group" in metadata) { // group
			const group = metadata["group"];
			let gid;
			if (group in groups) { // group already exists
				gid = groups[group];
			} else { // make a new group and add a combo box for it
				gid = "group" + Object.keys(groups).length;
				groups[group] = gid; // save it

				const span = document.createElement("span");
				span.classList.add("drop-down");
				const label = document.createElement("label");
				label.innerText = group;
				span.appendChild(label);
				const combo = document.createElement("select");
				combo.id = gid;
				combo.onchange = function(event) {
					combo.selectedOptions[0].snapshot.apply();
				};
				span.appendChild(combo);
				row.appendChild(span);
			}
			const combo = document.getElementById(gid);
			const option = document.createElement("option");
			option.innerText = snapshot.name;
			option.snapshot = snapshot;
			combo.appendChild(option);
		} else { // button
			const btn = document.createElement("button");
			btn.snapshot = snapshot;
			btn.onclick = function(event) {
				this.snapshot.apply();
			};
			btn.innerText = snapshot.name;
			row.appendChild(btn);
		}
	}
}
</script>
The code is quite long, but pretty simple. The idea is to run through the snapshots, skip the hidden ones and then check the metadata of each snapshot. If there is a metadata element called group in a snapshot it is considered a part of the drop–down list. The code then gets the metadata value of that group element which is considered the name of the group.
The code then checks if there is a group like that already in the row and either uses it or adds a new one. Then it adds an option to that group with the snapshot name. Once the option is selected, the combo box gets its onchange event called and the snapshot is activated.
If there is no group element in the snapshot’s metadata, it is added as a simple button and acts as a standard snapshot when pressed.
Finally, scroll the template code up to the <style> section and replace it with this:
<style>
	.parent {
		width: 800px;
		height: 600px;
	}
	h1, #snapshots-row {
		margin-top: 10px;
		text-align: center;
	}
	#snapshots-row {
		margin-bottom: 10px;
	}
	#snapshots-row button, #snapshots-row .drop-down {
		margin-right: 20px;
	}
	.drop-down label {
		margin-right: 5px;
	}
	{{KORU_NOSCRIPT_CSS}}
</style>
This adds a minimal styling to the combo boxes and buttons, so they look better. You can add more styling to match your needs.
Once done, save the template code and restart Koru, so it gets all the changes.
You can download the template in ZIP format here: snapshots-options.zip
Editing the Scene
When Koru is restarted you can open your scene and for each snapshot you need to adjust the metadata.
To do so, click the snapshots one by one, click the Metadata editor button in the snapshot’s properties panel and insert a group entry with the value of your group name.
You should get something like this:
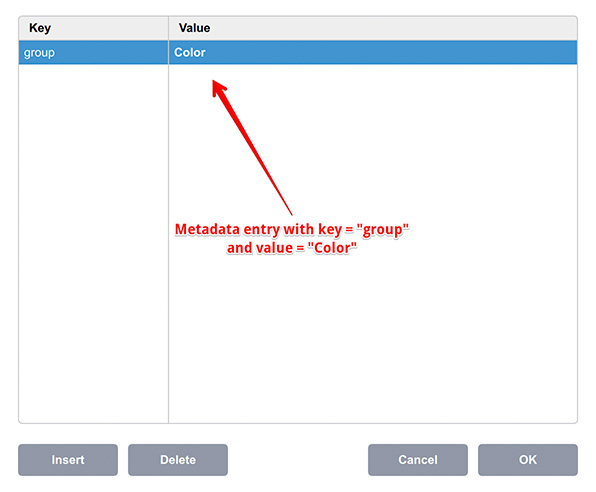
Click OK to save the changes and repeat this for all the snapshots you want to group up.
Once done, save the scene and export it to HTML using the new template you’ve just created. You should see the drop–down elements for all the snapshots that have a group configured in the metadata.
Further Improvements
That’s a pretty basic implementation showing what can be done with the snapshots. There are plenty of ready–to–use HTML menus on the Internet, mostly based on lists (<ul> and <li> HTML tags). You can easily adapt the code above to that by replacing combo box (<select> and <option> tags) with the list items and adjusting the click handler accordingly. We will not cover this in the tutorial.
You also don’t have to use the metadata. Instead you can bake the group information into the snapshot names or order and work from there.
- Decals — how to place images on objects as decals;
- Lightmaps — how to compute scene lightmaps and configure them;
- Floor reflection — how to add and configure floor reflection;
- Watermarks — adding 2D image overlays;
- Taking Screenshots — how to add "Take Screenshot" button to your Koru exports;
- Loading Images — how to upload your own images to exported Koru scenes;
- Automatic Rotation — how to make your scene automatically rotates when idle;
- Customizing Snapshot Buttons — how to customize snapshot buttons with CSS;
- Creating Snapshot Buttons — when CSS is not enough you can create snapshot buttons yourself;
- Drop–Down Snapshots Menus — convert snapshots to configurable options;
- Manual Snapshots Control — how to activate a specific snapshot;
- Customizing Background — replace that gray gradient for scenes with transparent background;
- Non-Interactive Scenes — can exported scenes ignore mouse clicks?
- Fullscreen Button — how to change the fullscreen button look?
- Materials — Koru materials explained;
- Partial Snapshots — making snapshots that affect just some scene elements;
- Using Metadata — add extra information to nodes and use it in browser.