Z-Fighting in Koru Scenes
Sometimes when you import 3D model to Koru you get visual glitches like this:
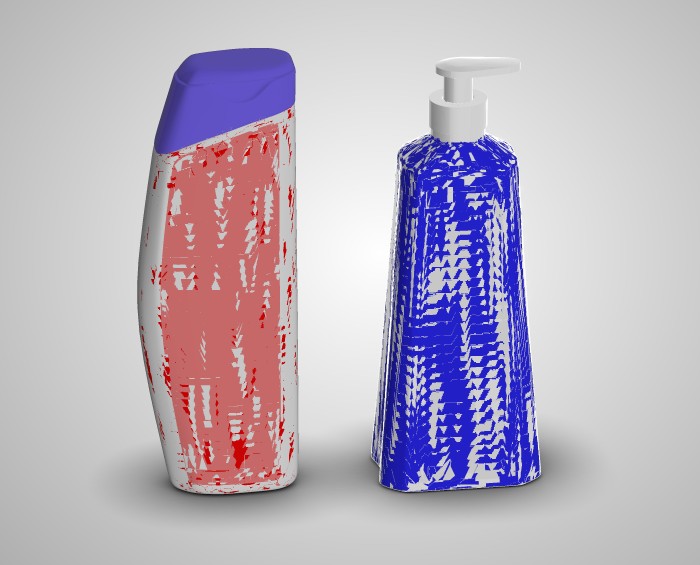
It looks like the labels “conflict” with the bottles and “fight” each other when you move the camera.
This tutorial explains the reasons of this effect and shows how to fix it.
Why It Happens?
When Koru (or any other 3D software running on GPU) renders a scene, it splits it to many triangles and sends them to GPU for rendering. Some triangles are closer to the camera, others are farther and GPU needs to decide the order of drawing, so the closer triangles cover the farther ones. In order to do so, GPU uses so called “z-buffer”. Here’s how it works:
- GPU gets a new triangle to draw. It computes its coordinates on the screen and draws it pixel by pixel, applying all the materials and effects you set up;
- for each pixel GPU needs to answer a simple question: are there any other triangles at this exactly pixel that are closer to the camera, than this one?
- to answer the question GPU checks its z-buffer, or depth buffer which has the same size as the screen and stores the distance between the camera and the triangle that is displayed by this pixel;
- GPU computes the distance between the camera and the triangle it draws at that exactly pixel and compares it with the distance stored in z-buffer;
- if the new distance is smaller than the stored one, the new triangle is closer than the one which is currently on the screen. Otherwise, the new triangle is farther;
- if the new triangle is farther, GPU doesn’t draw this pixel and goes to another one. If the new triangle is closer, GPU draws the pixel and updates z-buffer with the new depth.
This way GPU can easily check the order of triangles and avoid drawing of the hidden surfaces. You can read more about this here.
It works just fine until you get two triangles that are really close to each other, so their depth values are pretty much the same and here z-buffer may fail. The reason is that the stored depth values are not precise, they are rounded. Because of this rounding GPU can’t really tell what triangle is closer to the camera, as both of them are at the same distance for it, and here comes the z-fighting.
The reason of the rounding is the precision of z-buffer itself. It is like a standard JPEG versus RAW photo formats. Common (low range) image formats have just 256 levels for each channel, while RAW formats offer up to 65536 levels per channel. The more levels offered, the smaller difference in colors is visible. However, if the difference is smaller than the gap between two levels, you will not be able to see that. The same with z-buffers: if the distance between two triangles is smaller than the single “step” of the buffer, you may get z-fighting at that exactly place.
In photography you need to fit all the shades from “black” to “white” into the number of levels you have. For 256 levels you get pretty big steps, for 65536 levels in RAW files you get smaller steps and better precision. The same with z-buffer, but instead of “black” and “white” you get “z near” and “z far”. “Z near” is the minimal distance from the camera where you can see something, “Z far” is the maximum distance from the camera, where you can still see the scene. The range between near and far Z is “mapped” onto your z-buffer, so the smaller the range, the better will be precision. So the answer to z-fighting is basically the adjustment of the Z range.
You can read more about Z-fighting here.
So How To Fix It?
Let’s come back to our scene (click the images to see them in higher resolution):
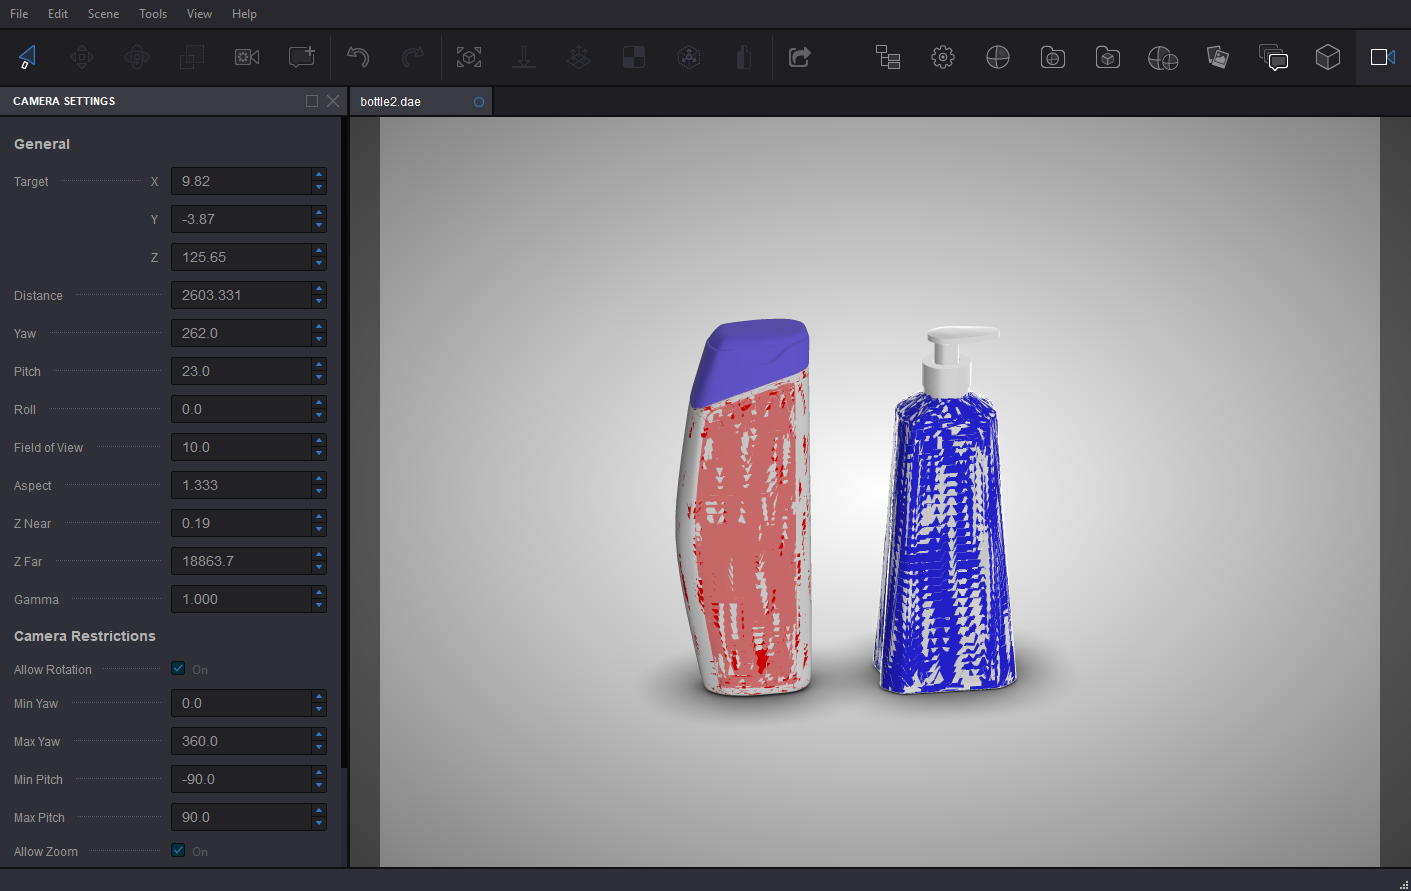
As you may see, the Z Near is 0.19, while Z Far is about 19000. Koru measures everything in centimeters and the bottles in the scene are about 3 meters tall, so the maximum visible distance is about 190 meters, while the minimum visible distance is just 2 millimiters. Note that the camera distance is about 26 meters.
When you look at 3 meters tall objects from the distance of 26 meters, you hardly need to see the objects just 2 millimeters away from the camera. As explained above, you need to reduce the visible range along the Z axis to prevent z-fighting, so let’s set Z Near value to 10 centimeters:
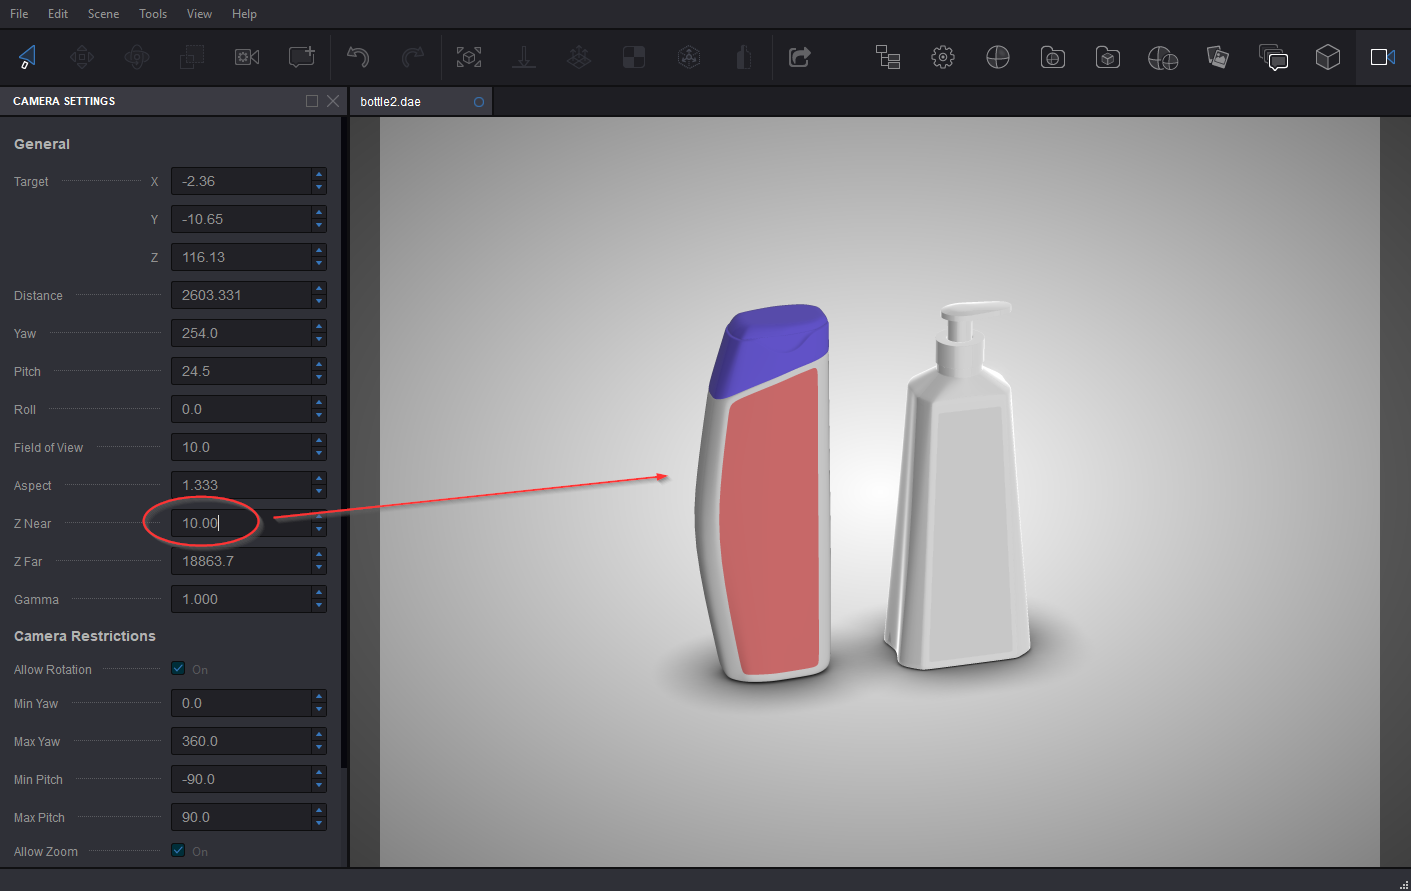
As you may see, this immediately fixes the scene! For this scene, when camera is 20 meters away from the scene, you can even set Z Near to 15 meters, but it is better to keep Z range big enough to let the user rotate and move the camera around the scene. It is all about finding a balance.
The other possible solution is to adjust Z Far parameter instead. When Koru imports a 3D model, it tries to make sure you have enough free space for your camera to fly around the scene and make the Z range quite big. You can reduce it from both ends, depending on your needs and the scene.
Additional Notes
There is a Camera Restrictions section in the Camera panel:

Note that it also has “Min Distance” and “Max Distance” parameters. These parameters limit the camera movement distance, not the visibility range. However, if you set quite a strict Z range, it might be a good idea to adjust these parameters, as well. This prevents user from “losing” your scene while navigating around.
That’s All!
Z-fighting is quite a difficult topic, so if something is still not clear after reading this tutorial, please feel free to Google for z-buffer and z-fighting theory, there is plenty of information about both topics in the Internet.
- Exported File Is Too Big — how to reduce the size of exported files;
- Artwork Quality — how to improve the quality of exported textures;