Realistic Lighting Option
By default Boxshot uses a physically–correct approach to scene rendering and computes all the light bounces to make sure the output image looks real. This is a very time consuming task and sometimes the result is not really worth the waiting time. Some scenes simply don’t benefit enough from the advanced lighting tracing and skipping this part may speed the rendering up.
Boxshot has an option for this which is called Realistic lighting and located at the bottom of the scene settings page on the left.
What Is The Difference?
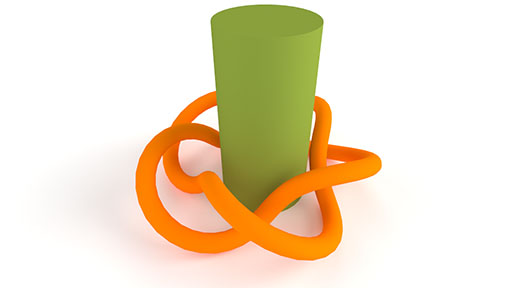
Here is the scene rendered with realistic lighting enabled:

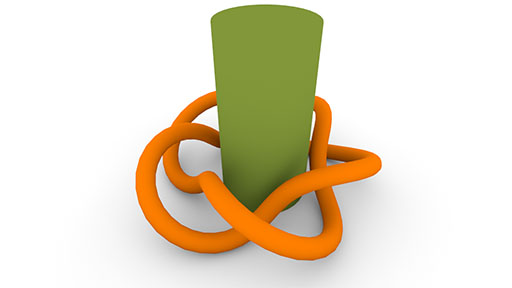
And the same scene rendered with realistic lighting disabled:

As you may see, the main differences are that there is no orange and green tints on the floor, the cylinder is somewhat flat and all the shadows became gray.
On the other hand, the second image took 10 times less to render!
What Exactly Is Different?
When the realistic lighting is disabled, Boxshot doesn’t do the following:
- It doesn’t compute lighting bounces between surfaces. This means for instance an orange object will not cast orange tint on the nearby white object;
- It doesn’t do precise environment lighting. This means the scene will not be lit according to the environment texture you provided;
- It doesn’t do proper environment shadows, just the local ones, making sure the corners are darker;
- It uses a subtractive shadows model instead of the additive lighting one. This means everything is considered lit by default and gets darker only if some light sources are not visible from there.
The rest is pretty much the same and all the reflections and transmissions are processed similarly regardless of the realistic lighting option state.
Note that due to the differences in lighting algorithms being used, switching the option affects the overall scene lighting. You might need to re–adjust the light sources after switching the option.
What Is The Expected Speedup?
The speedup highly depends on the scene itself. Our tests show 1.5 to 10 times faster rendering for simpler lighting, depending on the scene. The most speedup is achieved for scenes with diffuse surfaces, as this is where the most computation time is spent when the realistic lighting is enabled.
Give the option a try in draft mode and see the rendering speed difference for your particular scene.
Another way to speed up rendering, is to use gpu rendering if available. For instance, our tests show 3x speedup for the scene above.
So, Should I Disable Realistic Lighting?
If you don’t see the difference — sure!
Otherwise do a draft rendering with the option disabled and see if it still looks nice for you. If it does — go with it, as it will save you some rendering time.
Have a look at time–based rendering notes if you want to use it with time–based rendering.
More Tutorials
Rendering
- Realistic Rendering — improving scenes visual appearance;
- Lighting — control environment and directional lighting;
- Saturated Reflection — make "rich" colorful reflections;
- Floor Reflection — reflecting scene objects in the floor;
- Job Manager — rendering jobs later;
- GPU Rendering — rendering scenes faster on GPU;
- Rendering Time and Quality — getting more control on rendering;
- Simple and Realistic Lighting — speeding up scene rendering.
Materials
- Texture Slots — how to use texture slots in Boxshot;
- Glass Materials — how to make semi–transparent objects look attractive;
- UV–Spot — how to make a UV–spot effect easily;
- Foil Effect — how to add foil–finishing to your shapes;
- Bump — adding relief to your materials;
- Copying Materials — how to copy materials to other shapes;
- Custom Materials — extend the materials library with your own ones;
- Semi–Transparent Labels — making semi–transparent and partial labels;
- Boxshot Materials — more details about Boxshot materials.
Features
- Decals — applying decals and configuring them;
- Bump Decals — applying bump where it is needed;
- Depth Of Field — adding more realism to your renderings;
- Tools — read more about Boxshot tools;
- Managing Images — how to manage image files used by Boxshot projects;
- Shapes Instances — creating lightweight copies of other shapes;
- Model Editor — edit embedded models in many ways;
- Shrink Wrap — heat–shrink film simulation for objects wrapping;
- Physics Simulation — applying gravity to your scene;
- Palletize — arrange scene objects for the pallet;
- Snapshots — save scene state to re–use it later;
- Translation — teach Boxshot to speak your language;
- Vector Artwork — how to maintain the quality of vector artwork.
Shapes
- Lathe Objects — making symmetrical objects using revolving curves;
- Loft Objects — making custom objects with 2D cross–sections;
- 3D Text — making 3D text objects in Boxshot;
- Extruded Objects — how to make thick 3D object of your flat 2D curve;
- Conical Labels — making conical labels with distorted artwork;
- Dieline Box — a very realistic dieline–based box;
- Custom Shapes — adding custom shapes to the left panel;
- Third Party Shapes — importing third party shapes to Boxshot.