Shrink Wrap
Boxshot supports shrink wrap packaging simulation with multiple adjustable parameters. In order to start the simulation, select the object(s) you want to wrap, then right click it and select Tools → Shrink Wrap… from the context menu.
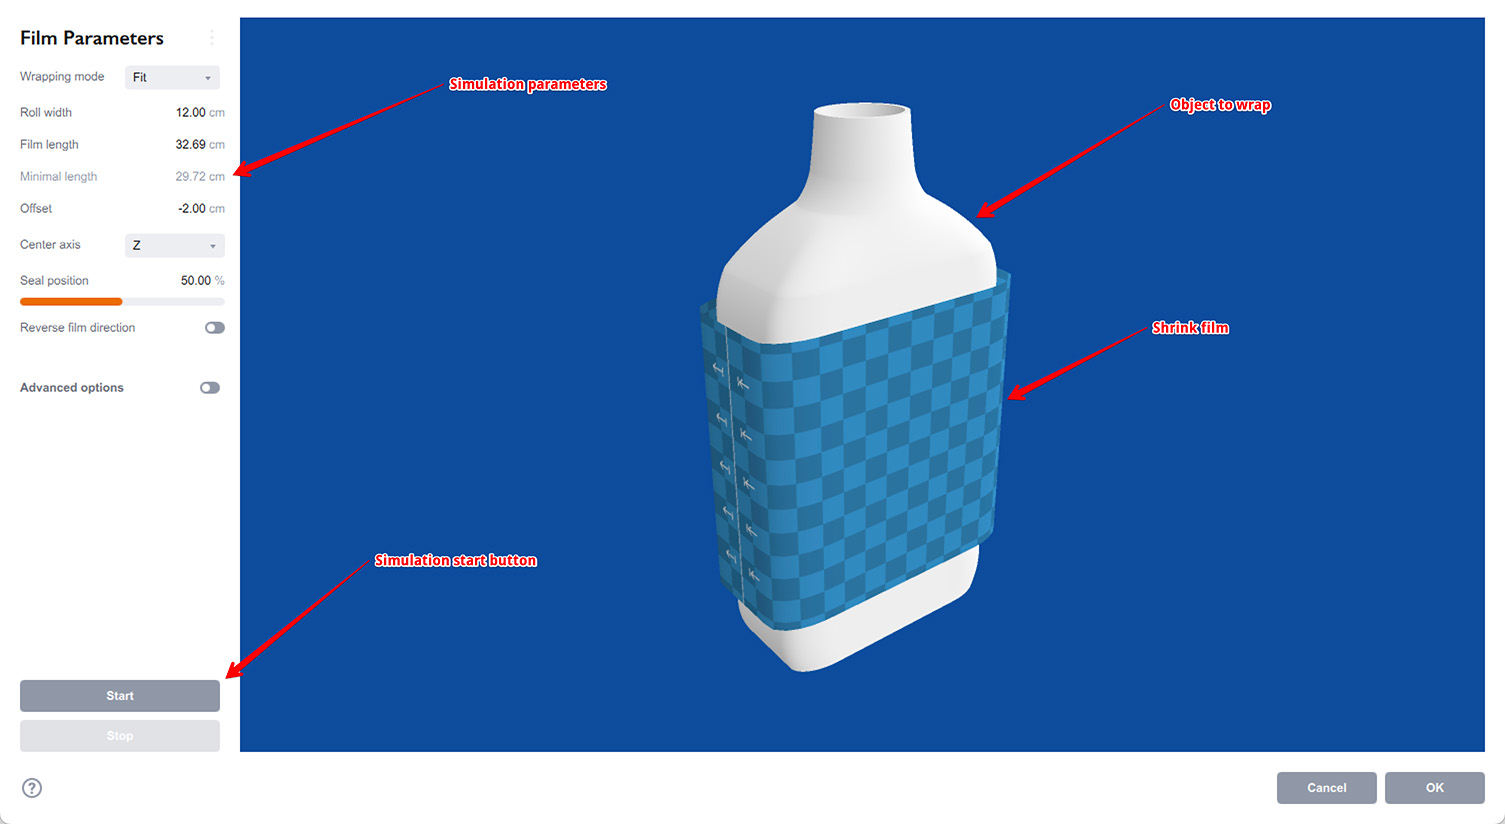
On the left there is a simulation parameters panel, where you can configure the film and other simulation options and start the simulation itself. On the right there is a simulation scene preview with the wrapped object painted white and film painted blue. You can rotate the preview by dragging it with a mouse, pan it by dragging with a right mouse button pressed and zoom using the mouse wheel.
Film Parameters
The first Wrapping mode parameter defines the way the film is initially positioned around the object. Boxshot supports three wrapping modes: Fit, Box and Flat.
Fit Wrapping Mode
When the “Fit” mode is selected, Boxshot tries to place the film as close to the contour of the shape as possible. Exactly as you do in real life when apply the heat sink film.

The parameters are:
- Roll width — the width of the film roll to use;
- Film length — the length of the film to wrap around the object;
- Minimal length — (read only) the indicator of the minimal film length required to wrap the whole object;
- Offset — lets you shift the film along the axis (useful when you wrap just a part of the shape);
- Center axis – the axis to wrap the film around. Could be X, Y or Z which defines the orientation of the film.
You basically configure the normal film parameters like the roll width and the length of the film to use. If you wrap just a part of the object, you can use the Offset parameter to adjust the film position along the selected axis.
The Minimal length parameter shows the length of the film required to tightly wrap the object. It is recommended to use a little more than that. Boxshot does not prevent you from using a shorter film, which might be needed if you wrap just a part of the object, but it will highlight the minimal length with red if you use a shorter film. When you use a longer film Boxshot scales it up proportionally, effectively moving the initial film position away of the object.
Box Wrapping Mode
In “Box” wrapping mode, Boxshot shapes the film as a box with rounded corners. You can adjust the box dimensions and corner radius and also rotate it around the selected axis. This way you can precisely place the film around the object you want to wrap.
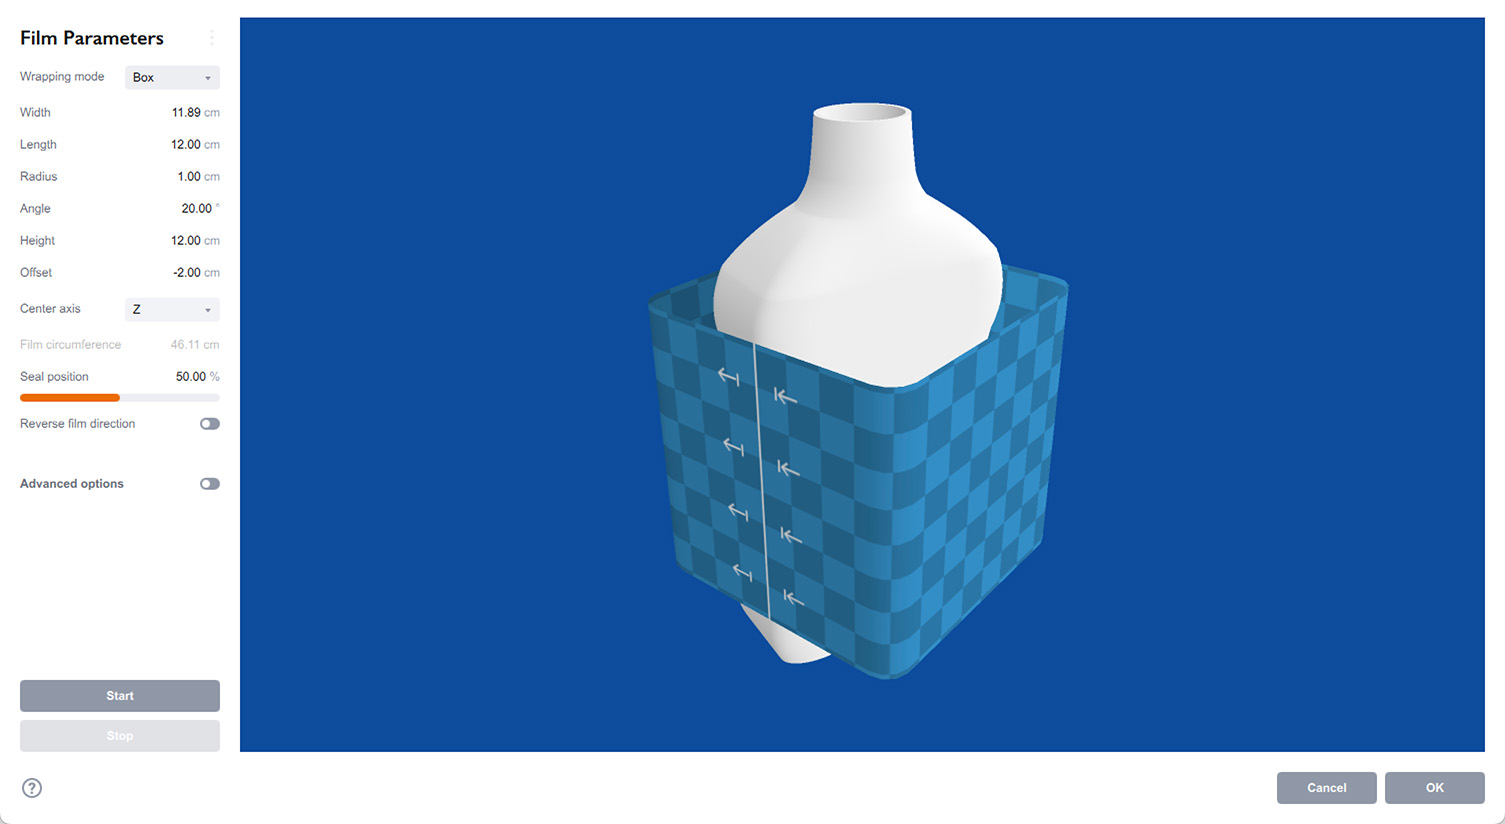
This is not how the film is usually applied in real life, but this mode lets you try different options and see what works best. In this mode the Height parameter works as a film roll width and the film length is computed using the Width, Length and Radius parameters of the box. Boxshot displays it as the Film circumference parameter.
Here is the full list of parameters of this mode:
- Width, Length — the size of the film box;
- Radius — the radius of the box corners, this lets you make the box square or round;
- Angle — lets you rotate the box around its axis to better fit the wrapped object;
- Height — the length of the box along its axis;
- Offset — the offset of the box along its axis;
- Center axis — lets you configure the main axis of the box;
- Film circumference — a hint of the total length of the film wrapped around the object.
Flat Wrapping Mode
In this mode the film is not wrapped around the object. Instead, it is placed flat above the object, so you can use the Gravity parameter from the advanced option to let the film fall onto the shape. You may find it convenient to simulate various types of covers etc.
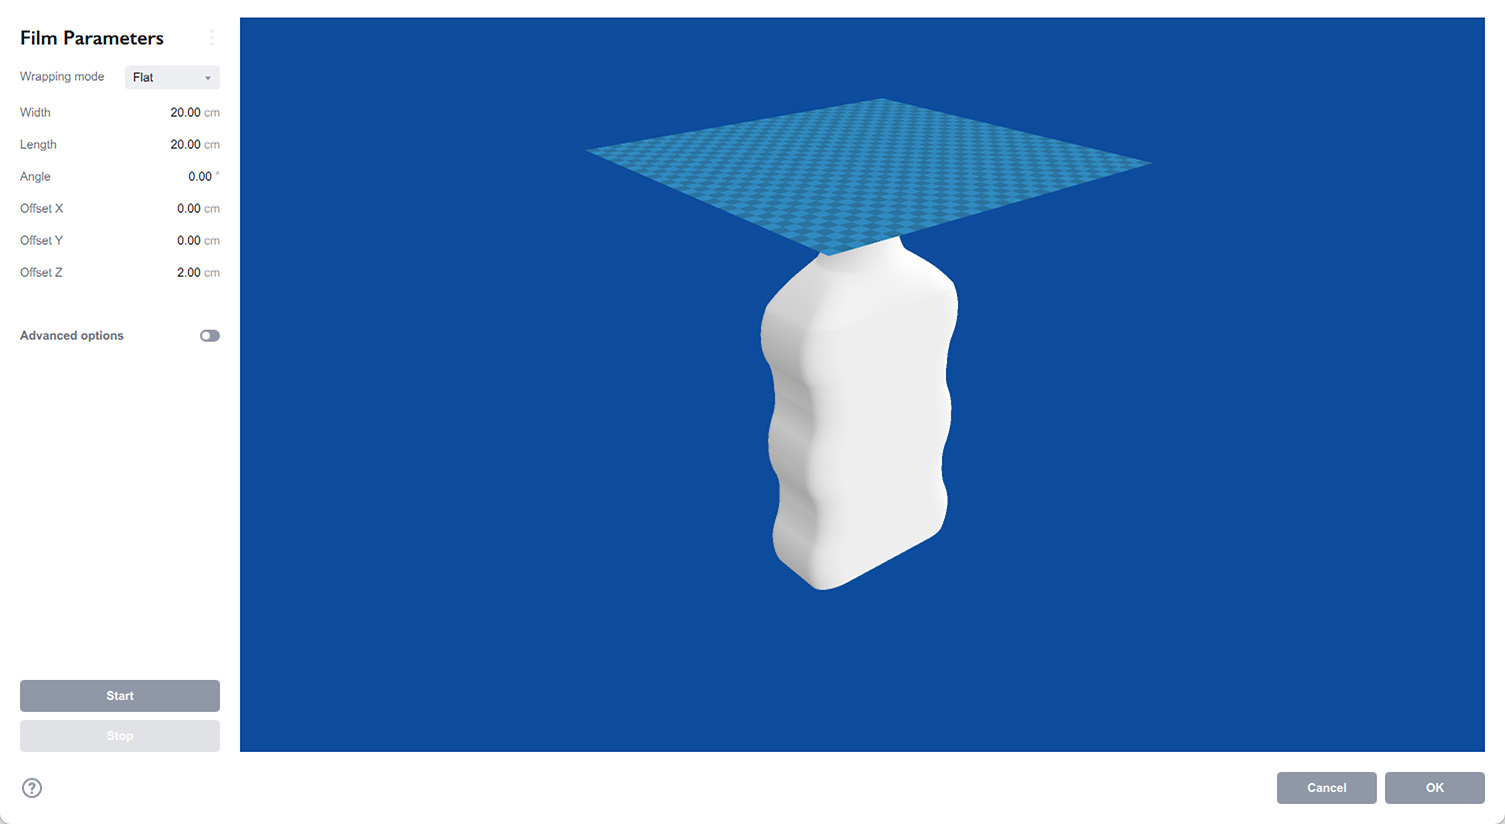
The parameters of the “Flat” wrapping mode are:
- Width, Length — the dimensions of the film;
- Angle — rotation of the film around the vertical axis;
- Offset X/Y/Z — the offsets of the film along the axes, so you can position it better.
Make sure you set the Gravity parameter to a non-zero value when you use this mode, as otherwise the film will stay above the shape, which is probably not what you need in this mode.
Seal and Film Direction
In “Fit” and “Box” modes, when the film makes a loop around the object, there are two more parameters: Seal position and Reverse film direction.
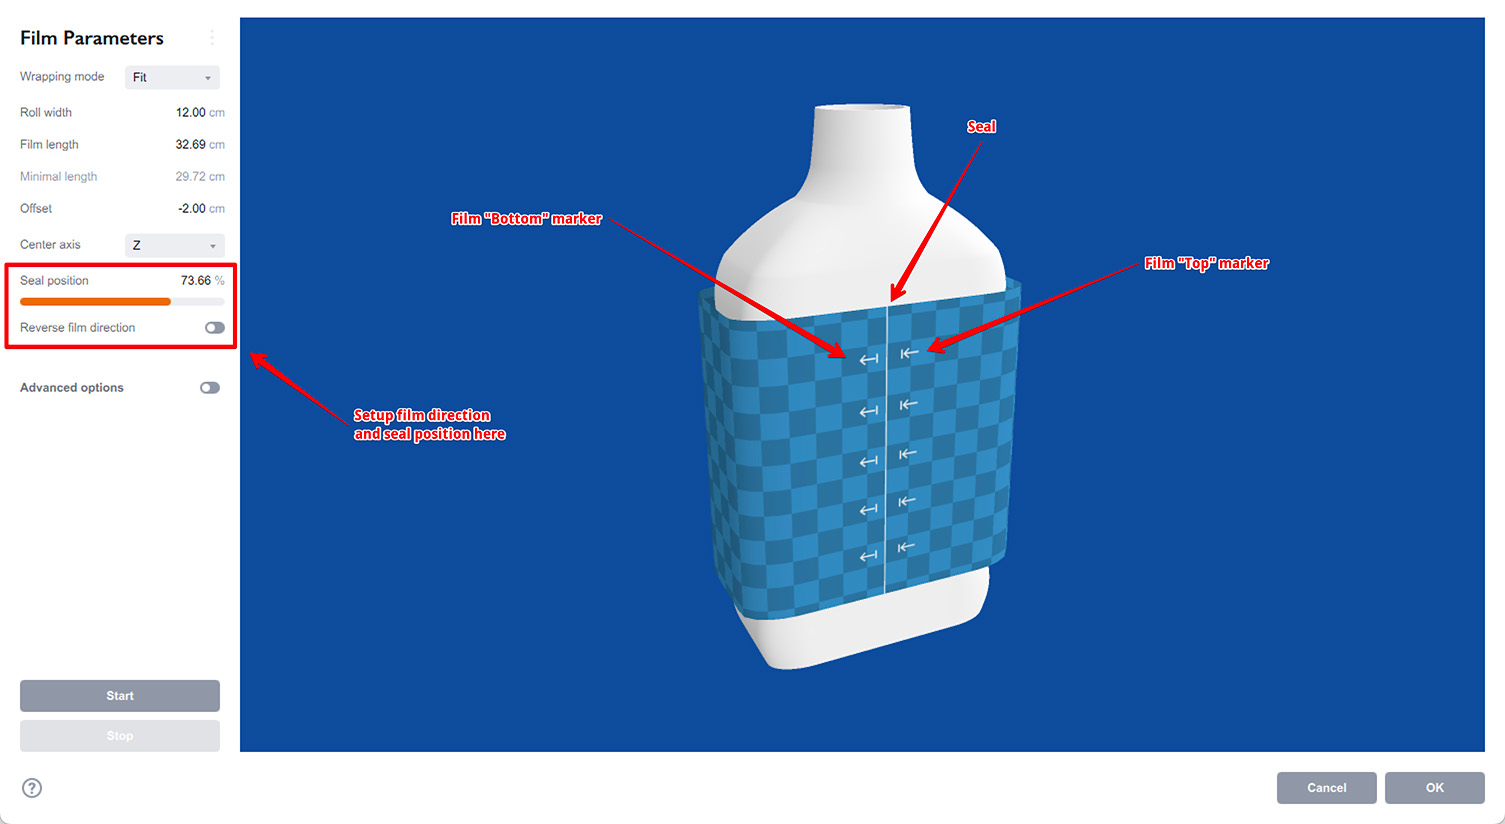
In order to properly place the artwork onto the generated film, Boxshot needs to understand where the film actually wraps or where the seal is. In Boxshot (and in the real life as well) the seal is the place where the film ends touch each over. You probably want it happen at the bottom and by default Boxshot does exactly that, but you can adjust the seal location using the Seal position parameter.
Boxshot displays the seal using the white line on the film. Besides that it shows the top and bottom part of the film with the arrow-shaped markers. You can change the film direction using the Reverse film direction parameter.
Shrink Film Simulation
Once the film is configured, you can start the simulation by clicking the Start button at the bottom of the left panel. Boxshot will run the simulation and you will see the film slowly shrinks and wraps the object:
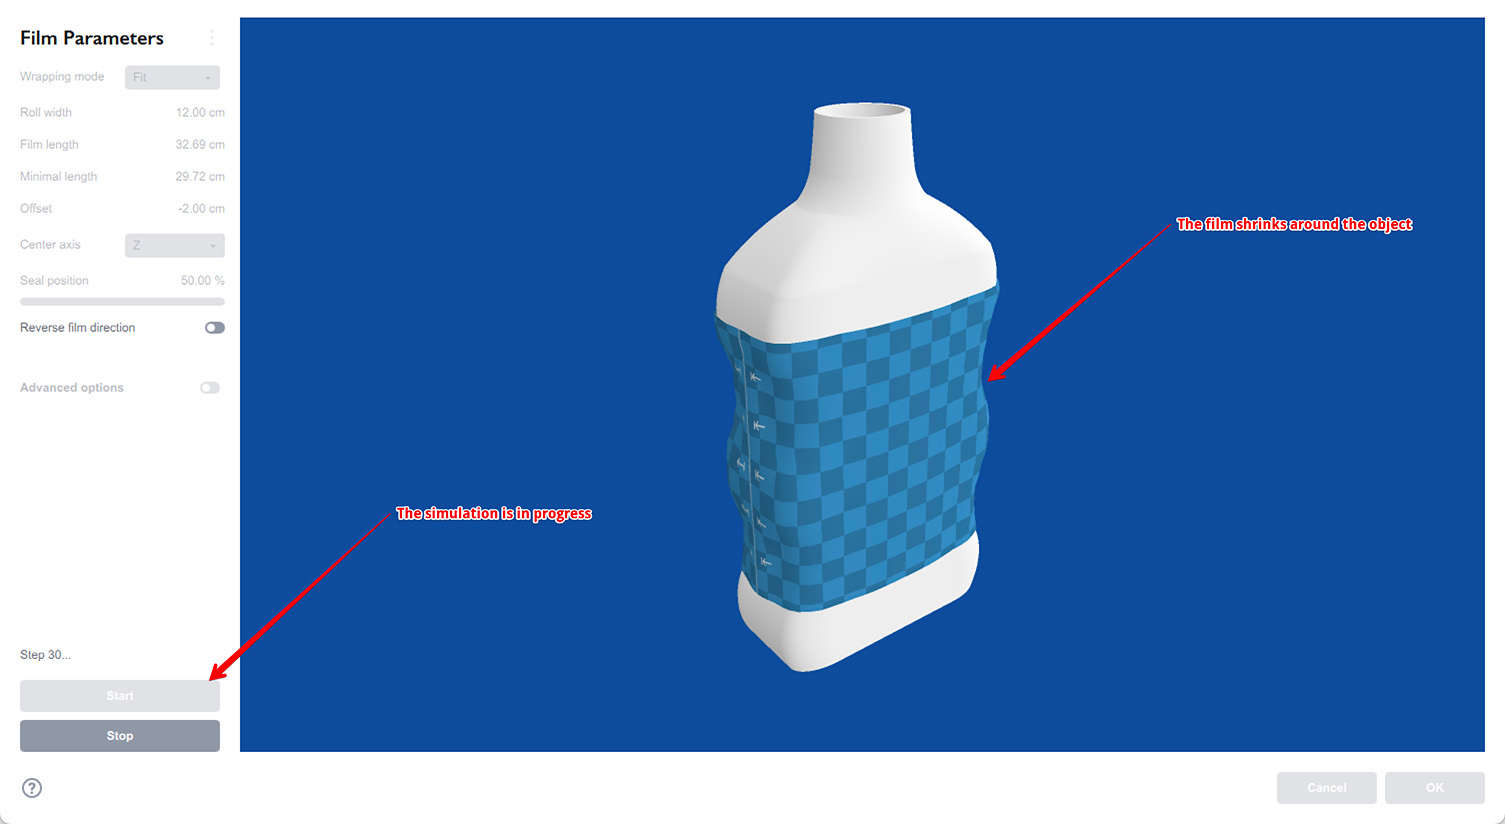
The simulation speed depends on many parameters and may take a while for some scenes. Give it time and wait until you are happy with the film shape you see in preview. Then click the Stop button to end the simulation. Have another look at the film and click the OK button to add the simulated film to the scene.
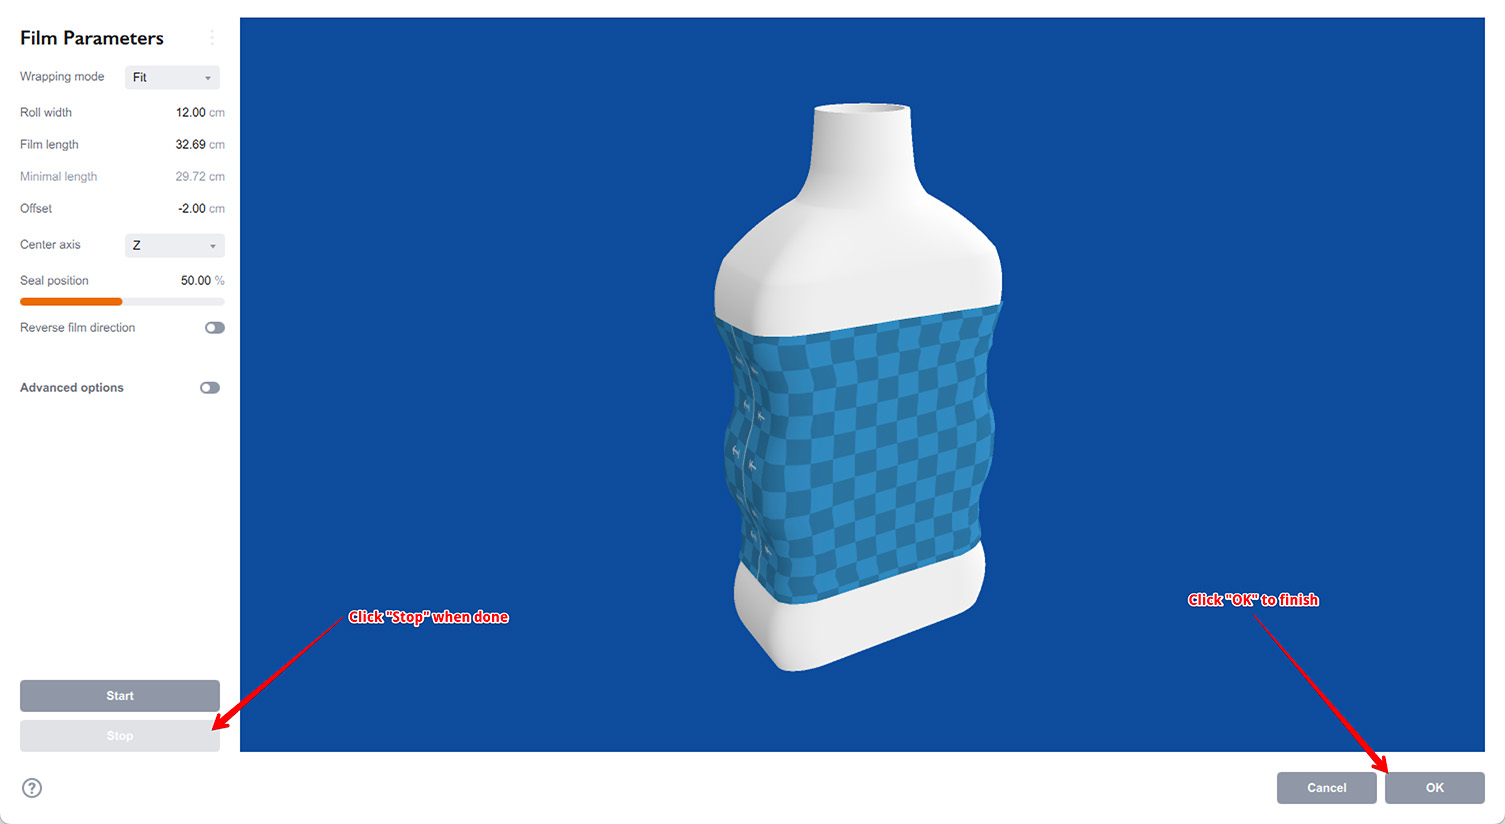
If for some reasons you are not happy with the simulation results, you can stop it, re–configure the simulation parameters and run it again using the Start button. You can do this as many times as you need until you get the results you want. Then you can click OK to add the film to the scene.
Advanced Options
There’s more simulation options for the brave ones. Note that some of them are pretty nerdy and you should use them on your own risk. Boxshot remembers the last simulation options you used for a project, so you might need a new project for checking the default values if something is messed up.
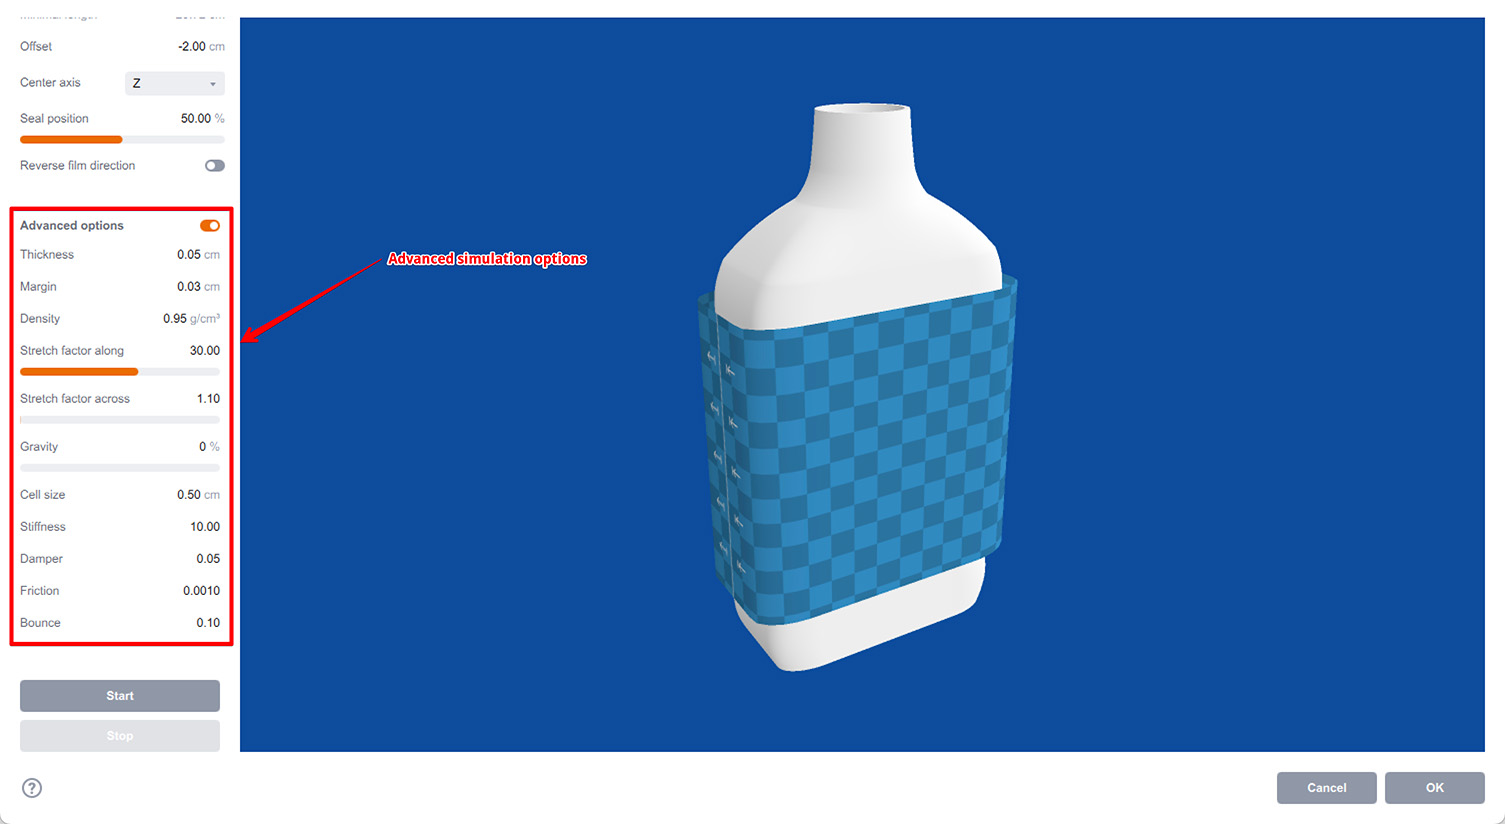
The advanced parameters are:
- Thickness — the thickness of the film;
- Margin — the distance to keep between the object surface and the film. This helps to avoid z–fighting effects where the film touches the object;
- Density — the density of the film. The normal density of the plastic is about 0.95 g/cm3, but you can change it if needed;
- Stretch factor along/across — how much is the original film stretched and so can shrink down (see below);
- Gravity — defines if the film falls down under its own weight during the simulation;
- Cell size — the size of the simulation cell of the film (see below);
- Stiffness — controls the stiffness/elasticity of the film;
- Damper — controls the damper coefficient of the film;
- Friction — defines the friction between the film and the object surface. Low friction means that film can slide on the object surface, high friction makes the film stuck when it touches the surface;
- Bounce — controls the bounce–back effect on the film when it touches the object during the simulation.
Some of the parameters, especially the last ones are very low–level and we don’t recommend adjusting them without a good reason. Below are some details on the parameters you might want to change:
Stretch factor
The shrink film is pre–stretched and when it is heated up it tries to shrink down to its normal state. The pre–stretching might depend on the direction, so the film can shrink along its width, but not length. This way you can make the tube shrinking in diameter, but keep its length intact. The Stretch factor parameters configure exactly that. By default the Shrink factor along is set to 30, which means the film wants to shrink down by 30 times when heated. This gives enough shrink to wrap the object tight. On the other hand, the Shrink factor across is set to 1.01, which means that the film will almost not shrink down along its length, keeping the height of the tube intact.
Cell size
Boxshot simulates the film by dividing it to cells of a given size. The film effectively becomes a net of nodes with elastic “springs” between them. That net then shrinks down around the shape, wrapping it up closely. The Cell size parameter configures the distance between the nodes of the net. Obviously, the smaller the cell size is, the more precise is the simulation. The backside is that the smaller the cell size is, the more nodes needs to be simulated and the more time the process takes. This is pretty similar to rendering, where the time may rise significantly when you increase the resolution. The rule of thumb here is to keep the cell size as big as possible, while it doesn’t affect the visual appearance of the film. This is especially important if you wrap a big object, like a pallet with some boxes on top. It is safe to make the cell size of 1–2cm in that case.
Simulation Speed
The time it takes the film to wrap around the object depends on many factors. One of them is described above: the cell size. The smaller is the cell, the more cells is needed, the more CPU power is required to process all the elements of the mesh. Try keeping the number of cells smaller and the cell size bigger, if possible.
The other factor is the time step used during the simulation. For each simulation step, Boxshot needs to shrink the film to some extent and check if it touches the object somewhere. If the step is too big, the film may go too deep into the object, so the artifacts will be visible. In order to avoid that, Boxshot tries smaller steps and this directly affects the simulation time. The smaller the step, the longer it takes to shrink the film down to the object size.
The step size depends on film thickness, density and stiffness. Thickness and density define the film mass. The heavier is the film, the larger steps can be used, and the simulation can run faster. The stiffness works the opposite way. The higher it is, the smaller steps are needed and the slower is the simulation. As we don’t recommend changing stiffness without a good reason, and as the film density is rarely changed, the only parameter which is worth configuring is the film thickness. It is 0.05cm (0.5mm) by default and if you wrap something big, it is worth making the film thicker to speed the things up.
So, the conclusion is: to make the simulation faster, try keeping Cell size and Thickness parameters as large as possible, while it doesn’t affect the simulated film appearance.
Film Presets
Boxshot stores the last parameters you used for the film in project, so you will most likely return to what you need when you open the simulator again. However, you might want to have a few different options there or return everything to the default state. Boxshot has shrink wrap presets for that.
Click the “Presets” button at the top of the left panel to open the presets panel:
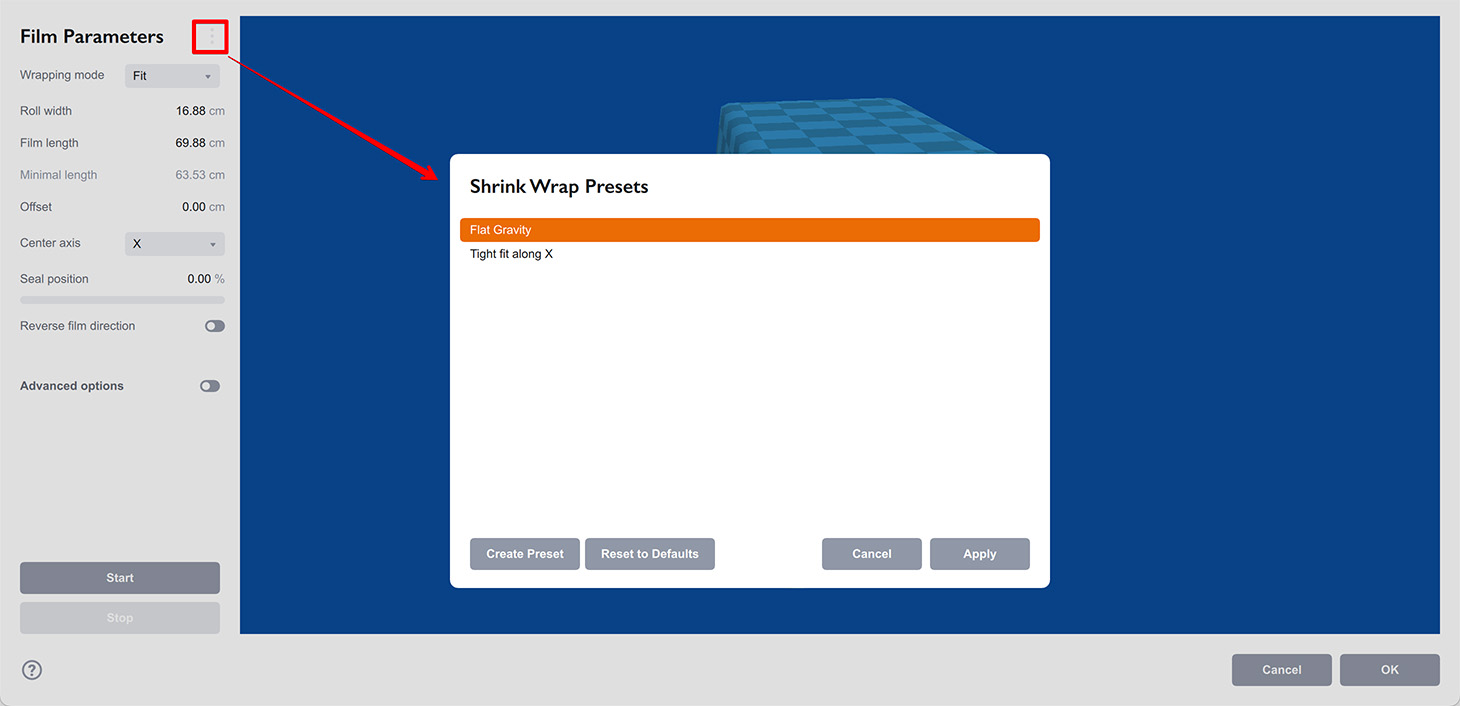
Here you can create a preset using the current film parameters, apply an old preset or reset everything to defaults. You can also rename and delete presets using the right-click menu.
The popup menu also lets you show the preset file in Finder or Explorer, so you can back them up or copy to a different computer, if needed.
Possible Issues
In some (rare) cases you might see simulation artifacts, like the object elements coming through the film or slightly visible through it. That’s acceptable as the film is simulated with the finite number of triangles and cannot perfectly wrap the object of any shape. We try our best to adjust the algorithm to avoid those issues, but they still could happen. Here’s what you can do.
Adjust the wrapped object shape
Check if you can avoid long hard edges in the wrapped object. Try using bevels, soft corners, rounded edges etc. This adds tiny details to the wrapped objects which are better wrapped by the film.
Adjust the film margin and thickness
The margin option lets you effectively push the film out of the object surface. If the film comes too tight to the object, it may create z–fighting artifacts at rendering. Increasing the margin could easily fix most of the issues of this type. Note that increasing the margin too much makes the film flying on top of the object which might look weird. Same for the film thickness. Increasing it might hide some minor object element that come through the film.
Adjusting cell size
Sometimes it helps to make the film a little bit more or less detailed. Changing the film structure might end up with a different simulation results and the problem goes away.
Adjusting the film parameters
You might also want to change the initial film size, radius, angle or other parameters to affect the simulation result.
Finally, if nothing above helps and the result still looks way too bad, please feel free to contact us with your scene and film parameters, so we can have a look.
More Tutorials
Rendering
- Realistic Rendering — improving scenes visual appearance;
- Lighting — control environment and directional lighting;
- Saturated Reflection — make "rich" colorful reflections;
- Floor Reflection — reflecting scene objects in the floor;
- Job Manager — rendering jobs later;
- GPU Rendering — rendering scenes faster on GPU;
- Rendering Time and Quality — getting more control on rendering;
- Simple and Realistic Lighting — speeding up scene rendering.
Materials
- Texture Slots — how to use texture slots in Boxshot;
- Glass Materials — how to make semi–transparent objects look attractive;
- UV–Spot — how to make a UV–spot effect easily;
- Foil Effect — how to add foil–finishing to your shapes;
- Bump — adding relief to your materials;
- Copying Materials — how to copy materials to other shapes;
- Custom Materials — extend the materials library with your own ones;
- Semi–Transparent Labels — making semi–transparent and partial labels;
- Boxshot Materials — more details about Boxshot materials.
Features
- Boolean Operations — combining and subtracting shapes, making holes;
- Decals — applying decals and configuring them;
- Bump Decals — applying bump where it is needed;
- Depth Of Field — adding more realism to your renderings;
- Tools — read more about Boxshot tools;
- Managing Images — how to manage image files used by Boxshot projects;
- Shapes Instances — creating lightweight copies of other shapes;
- Model Editor — edit embedded models in many ways;
- Shrink Wrap — heat–shrink film simulation for objects wrapping;
- Physics Simulation — applying gravity to your scene;
- Palletize — arrange scene objects for the pallet;
- Snapshots — save scene state to re–use it later;
- Translation — teach Boxshot to speak your language;
- Vector Artwork — how to maintain the quality of vector artwork.
Shapes
- Lathe Objects — making symmetrical objects using revolving curves;
- Loft Objects — making custom objects with 2D cross–sections;
- 3D Text — making 3D text objects in Boxshot;
- Extruded Objects — how to make thick 3D object of your flat 2D curve;
- Conical Labels — making conical labels with distorted artwork;
- Dieline Box — a very realistic dieline–based box;
- Custom Shapes — adding custom shapes to the left panel;
- Solid Shapes — create boolean-friendly shapes;
- Script-Based Solids — create complex solid shapes with code;
- Third Party Shapes — importing third party shapes to Boxshot.