Rendering Time vs Quality
You always have to choose between those two: time or quality. This also applies to rendering in Boxshot. To make the decision easier, Boxshot offers some options that let you tailor the rendering process to better fits your needs.
Rendering Passes
Boxshot renders scenes in passes. At each pass Boxshot computes a color of each pixel of the output scene and merges it with the previous color of that pixel.
Each pass provides a very noisy result, for instance here is the scene rendered with just one pass:
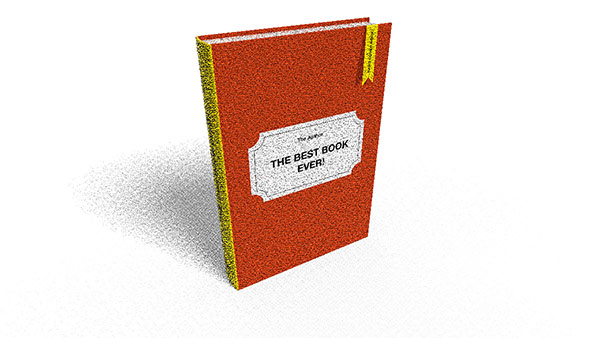
However, combined together multiple passes make a nice and smooth image without much noise. Here is the same scene rendered with 50 passes:
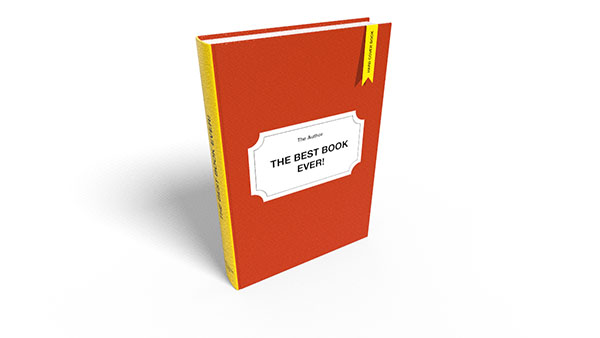
Notice the shadow is much more smooth and overall noise level is lower. By default, Boxshot uses 100 passes for draft previews and 2000 passes for production images.
So far it is pretty simple: the more passes you render, the better is the image. But here comes the downside: each pass takes time. If a simple draft rendering takes 10 seconds, the production rendering of the same resolution will take 20 times longer: 200 seconds or 3 plus something minutes. The numbers get even worse for higher resolutions and you may well expect an hour or two of rendering for a complex high–resolution scene.
It sounds like that some form of control is required…
Rendering Quality Modes
Boxshot offers four rendering modes:
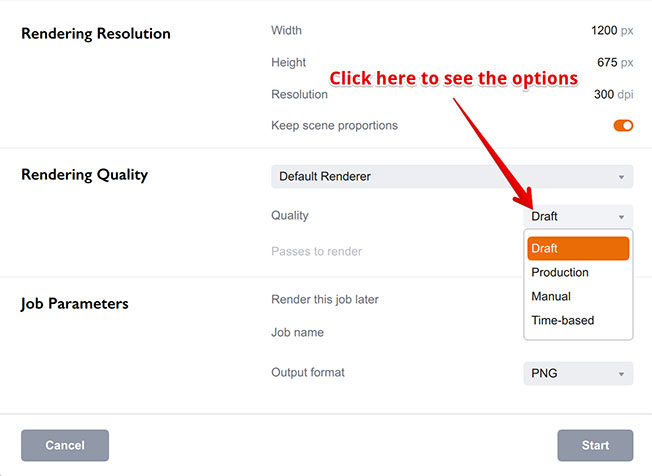
The modes are:
- Draft — render 100 passes;
- Production — render 2000 passes;
- Manual — you manually configure the number of passes to render;
- Time–based — you configure the desired rendering time.
The first two modes are basically presets with pre–configured number of passes to render. You can change the defaults in the application’s settings.
The Manual mode lets you render as many passes as you want. The noisy images above were rendered using the manual mode with 1 and 50 passes configured.
Time–Based Mode
The time–based mode is different. Instead of rendering the specified number of passes, it renders as many passes as possible until the time runs out. This gives you more control on rendering duration at the price of possible quality issues. However, with enough rendering time Boxshot will most likely deliver a quality enough image anyway.
Do not expect the time–based mode to do magic and render a 8K image in 2–3 minutes, though. Boxshot still renders the same passes as in other modes, it is just limited by time now. Consider giving at least 15 minutes for 4K image and 30–60 minutes for 8K image for better results.
It might also be a good idea to use the render later option for queueing up long jobs and doing them later when the computer is not used.
Note on GPU Rendering
Boxshot GPU renderer performs multiple passes at once and sometimes does more than a single pixel in one pass. Because of that it is better to use it with the time–based mode in production, instead of configuring the number of passes to render. This way you will likely get better results, compared to the same time spent on CPU rendering.
Again, as Boxshot performs multiple passes in blocks in GPU rendering mode, it may take some time to finish the block for high–resolution output. When the GPU renderer is used in time–based mode, Boxshot won’t stop until it finishes the current block of passes. This means it may take a little longer to finish the scene, but usually not more than 2–3 minutes for high–resolution images.
Note On Realistic Lighting Option
The realistic lighting option lets you speed up rendering by cutting some computationally–heavy corners. If combined with time–based rendering option, consider using lower rendering time there.
Manual rendering mode with the specific number of passes might work even better for non–realistic lighting.
More Tutorials
Rendering
- Realistic Rendering — improving scenes visual appearance;
- Lighting — control environment and directional lighting;
- Saturated Reflection — make "rich" colorful reflections;
- Floor Reflection — reflecting scene objects in the floor;
- Job Manager — rendering jobs later;
- GPU Rendering — rendering scenes faster on GPU;
- Rendering Time and Quality — getting more control on rendering;
- Simple and Realistic Lighting — speeding up scene rendering.
Materials
- Texture Slots — how to use texture slots in Boxshot;
- Glass Materials — how to make semi–transparent objects look attractive;
- UV–Spot — how to make a UV–spot effect easily;
- Foil Effect — how to add foil–finishing to your shapes;
- Bump — adding relief to your materials;
- Copying Materials — how to copy materials to other shapes;
- Custom Materials — extend the materials library with your own ones;
- Semi–Transparent Labels — making semi–transparent and partial labels;
- Boxshot Materials — more details about Boxshot materials.
Features
- Boolean Operations — combining and subtracting shapes, making holes;
- Decals — applying decals and configuring them;
- Bump Decals — applying bump where it is needed;
- Depth Of Field — adding more realism to your renderings;
- Tools — read more about Boxshot tools;
- Managing Images — how to manage image files used by Boxshot projects;
- Shapes Instances — creating lightweight copies of other shapes;
- Model Editor — edit embedded models in many ways;
- Shrink Wrap — heat–shrink film simulation for objects wrapping;
- Physics Simulation — applying gravity to your scene;
- Palletize — arrange scene objects for the pallet;
- Snapshots — save scene state to re–use it later;
- Translation — teach Boxshot to speak your language;
- Vector Artwork — how to maintain the quality of vector artwork.
Shapes
- Lathe Objects — making symmetrical objects using revolving curves;
- Loft Objects — making custom objects with 2D cross–sections;
- 3D Text — making 3D text objects in Boxshot;
- Extruded Objects — how to make thick 3D object of your flat 2D curve;
- Conical Labels — making conical labels with distorted artwork;
- Dieline Box — a very realistic dieline–based box;
- Custom Shapes — adding custom shapes to the left panel;
- Solid Shapes — create boolean-friendly shapes;
- Script-Based Solids — create complex solid shapes with code;
- Third Party Shapes — importing third party shapes to Boxshot.