Model Editor
Boxshot lets you edit the internals of embedded models by using the model editor. Embedded models are usually 3rd–party models you imported to the scene, but you can also convert any built–in object into embedded model by right–clicking it and selecting Tools → Convert to Embedded Model… from the context menu.
When the embedded model is selected, there is a Edit model button on the right:
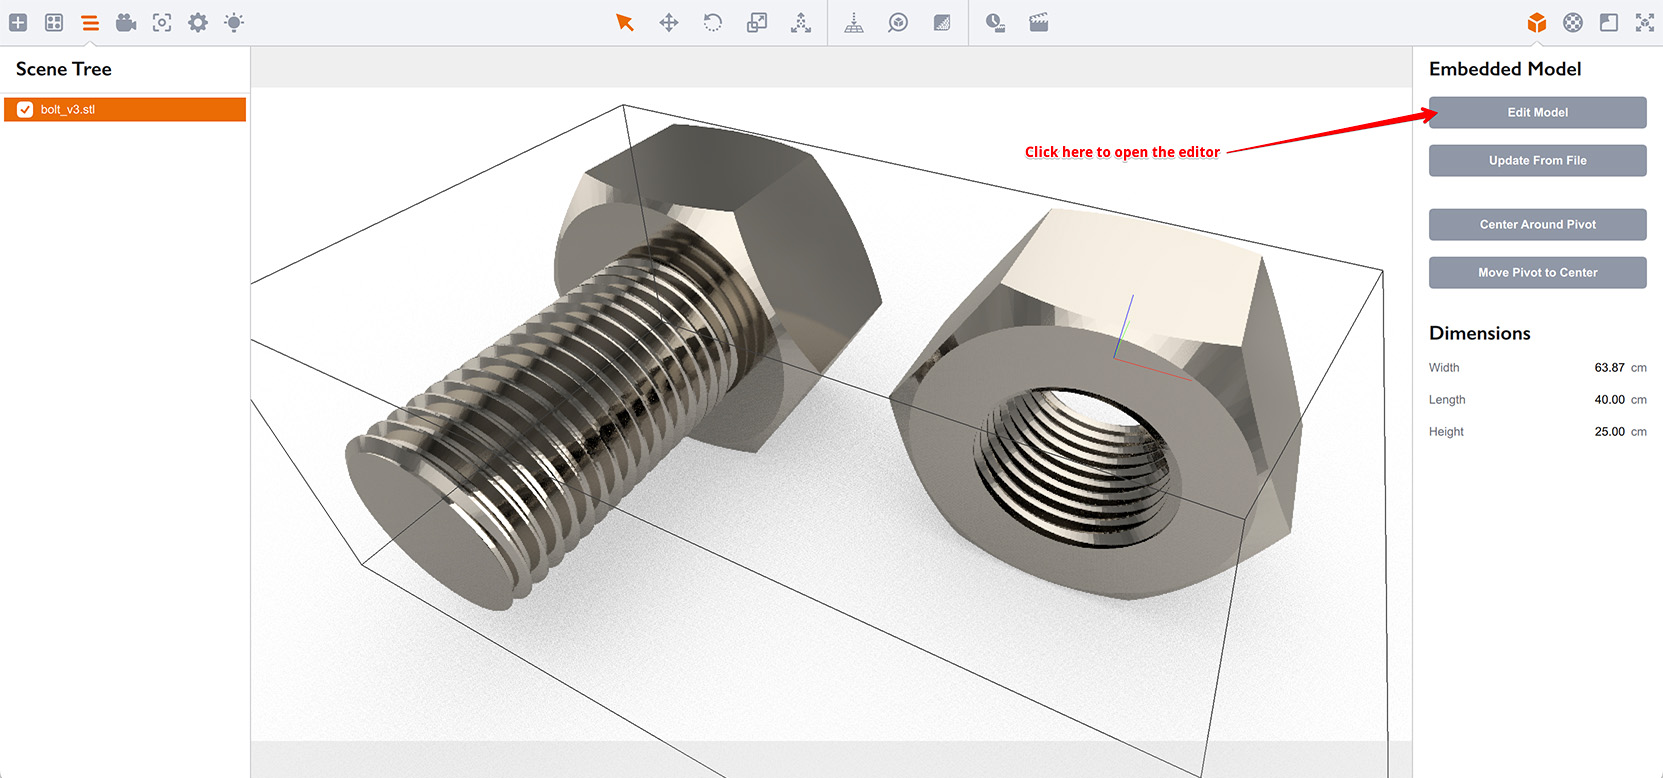
Click the Edit model button to open the model editor for the selected object:
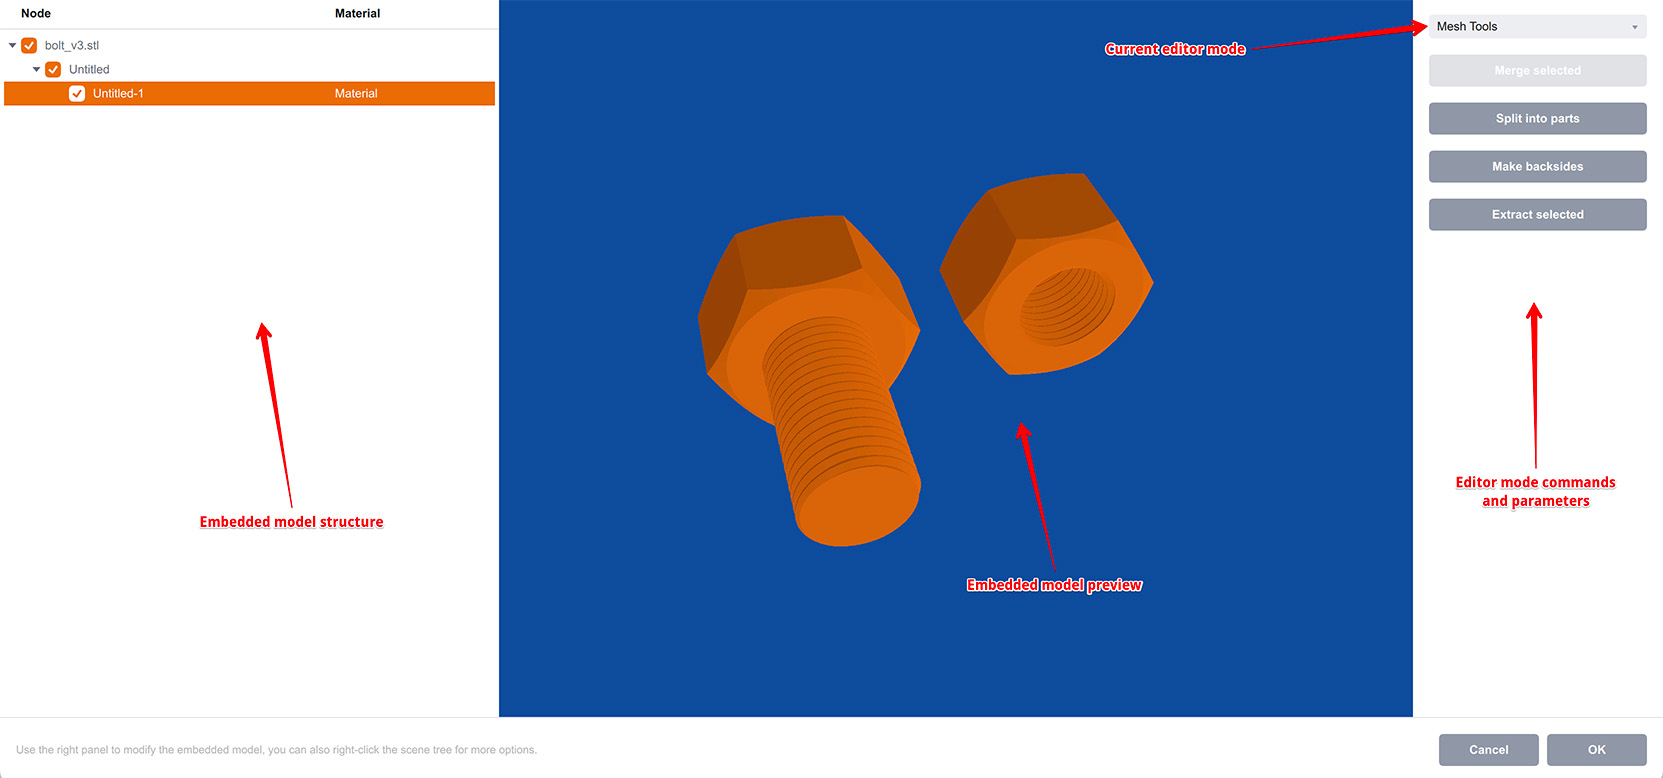
Here you can adjust parameters of the embedded model. On the left there is a model hierarchy. As a normal Boxshot scene, the embedded model can contain nodes and meshes. Each mesh is a geometric element with name and material. You can show and hide those elements using the hierarchy tree. The hidden elements are not shown in Boxshot scene, so this is a convenient way to hide something that you don’t want to see in a 3rd–party shape.
You can rename elements and their materials by double–clicking them in the scene tree, or by right–clicking them and using the context menu. You can also delete the elements you don’t need.
Everything you did can be reverted by pressing normal undo keyboard shortcut (Control–Z on Windows, Command–Z on Mac). Clicking the Cancel button at the bottom right corner cancels everything you did to the shape, reverting it to the initial state before the editor was started. Clicking OK confirms the current changes and applies them to the scene.
The panel on the right displays the command for the current editing mode. The editing mode is selected using the drop-down list at the top right corner of the window. There are four editing modes:
- Mesh — make changes at the meshes level;
- UV Mapping — apply or change texture mapping;
- Normals — make or fix normals and faces orientation;
- Faces — make changes at the faces level.
Below you can find more information about each mode.
Mesh Editing Mode
This mode lets you make changes to the meshes of the embedded model:
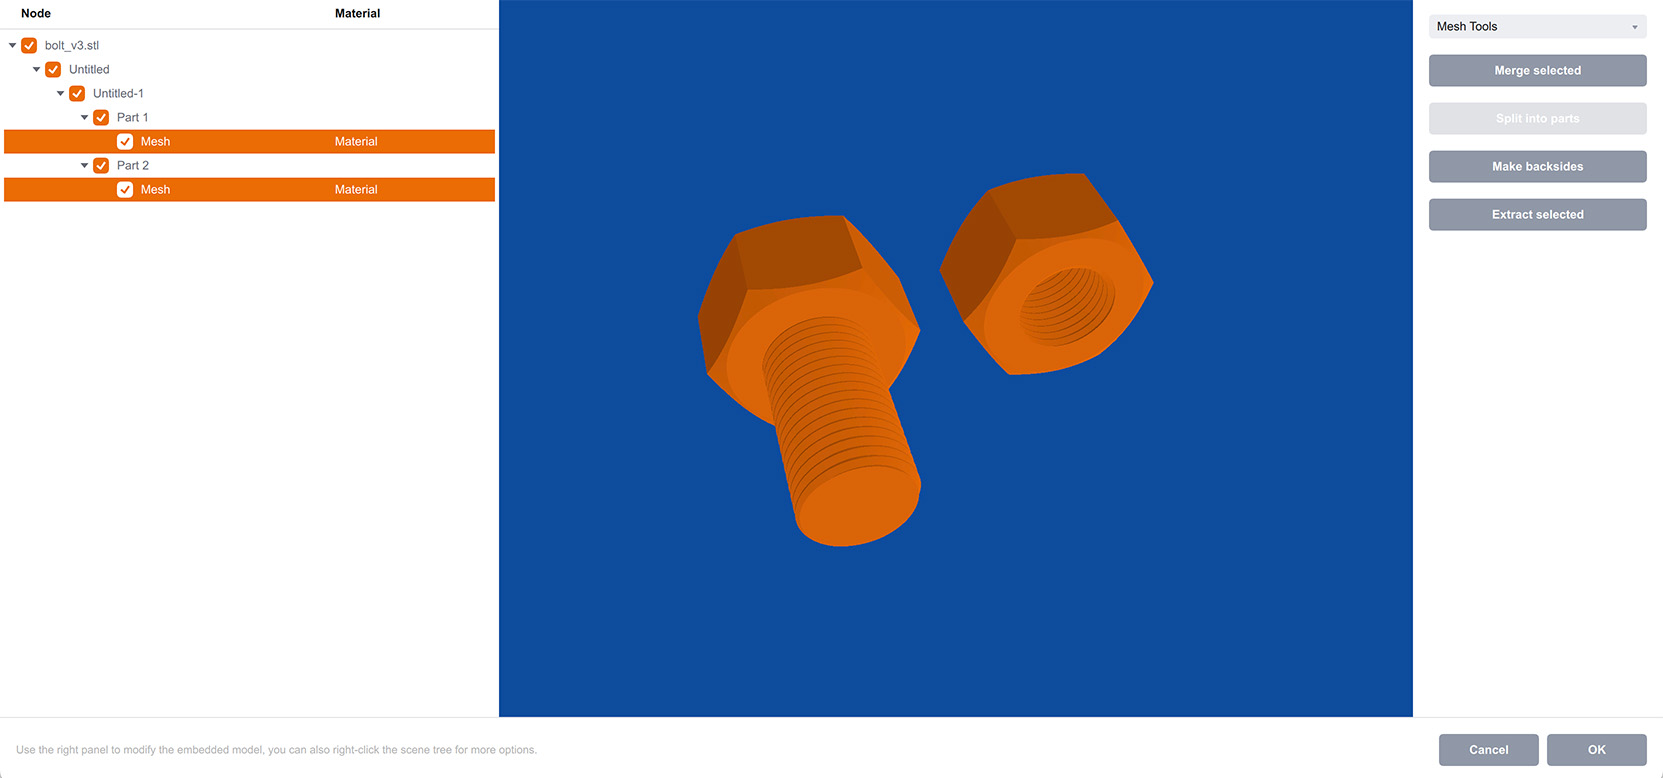
The buttons at the right panel are:
- Merge selected — combines the selected meshes into one;
- Split into parts — detects separate non–connected part in the selected mesh and make separate meshes for each part;
- Make backsides — generates back–side geometry for selected mesh. Use that if the mesh is visible from only one side;
- Extract selected — removes the selected meshes from the embedded model and makes another embedded model with the selected meshes.
Overall, these tools are good for cleaning up a poorly–constructed third–party mesh: you can easily split it into parts and remove the un–needed elements.
UV Mapping Mode
The UV Mapping mode lets you apply the texture mapping if it is missing. Boxshot needs UV mapping in order to place artwork on the shapes, so if it essential to have it for all the shapes in the scene. It is usually the best to keep the original mapping of the model, but sometimes it is missing or broken and here the UV Mapping mode can help.
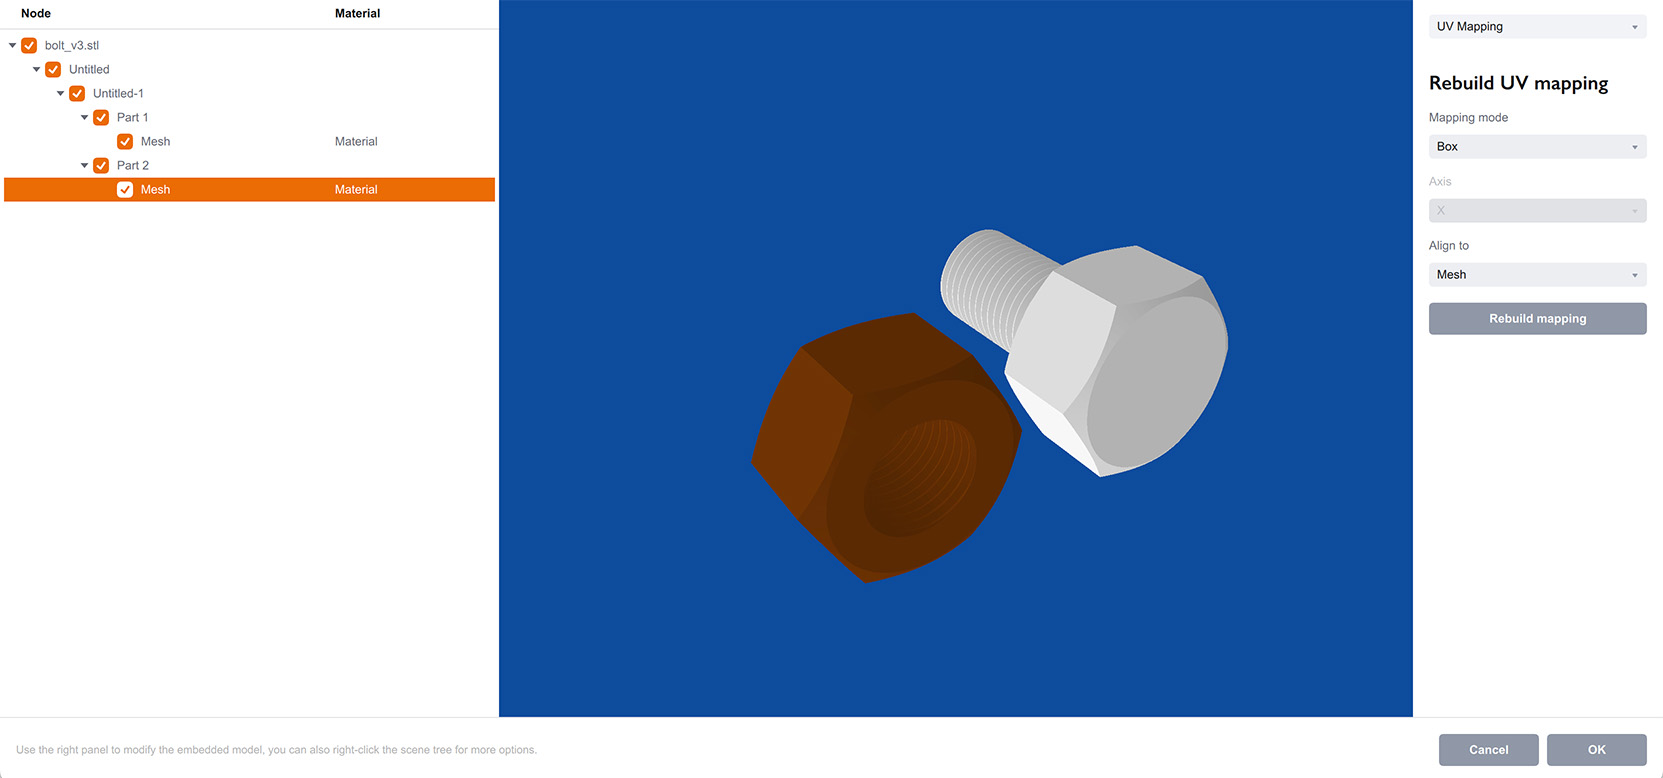
Here we switched to the UV Mapping mode and the nut looks dark brown. Boxshot applies a special “UV–texture” to selected elements in this mode, so you can see the current mapping. As the object looks solid, this means it doesn’t have texture mapping at all. That’s where the UV Mapping mode helps.
See the right panel for the options you can use:
- Mapping mode — lets you choose between the UV mapping generation modes: box, planar, cylindrical and spherical — they define how the new mapping is generated for the object;
- Axis — defines the axis to run the new mapping along. Works for planar, cylindrical and spherical mapping modes;
- Align to — controls the boundaries to compute the mapping. Can be Mesh (the mesh dimensions are used) or Model (the whole model dimensions are used).
Leave all the options intact and click the Rebuild mapping button to generate a new texture mapping for the selected object:
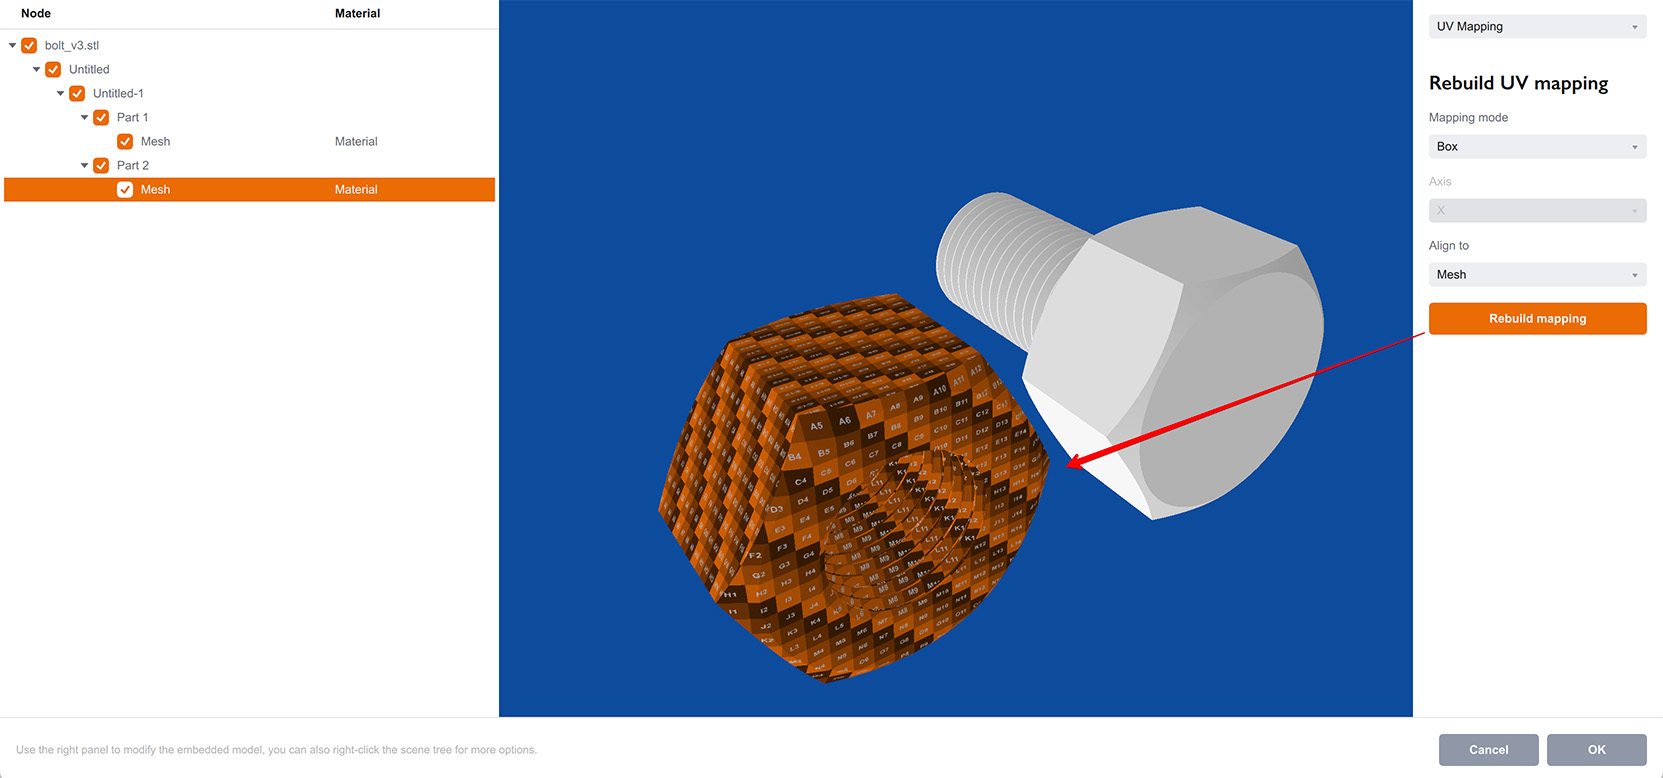
Now you can see the object has a nice texture applied, so the mapping is there and can be used by Boxshot.
Normals Mode
In normals editing mode Boxshot displays the normals of the selected element:
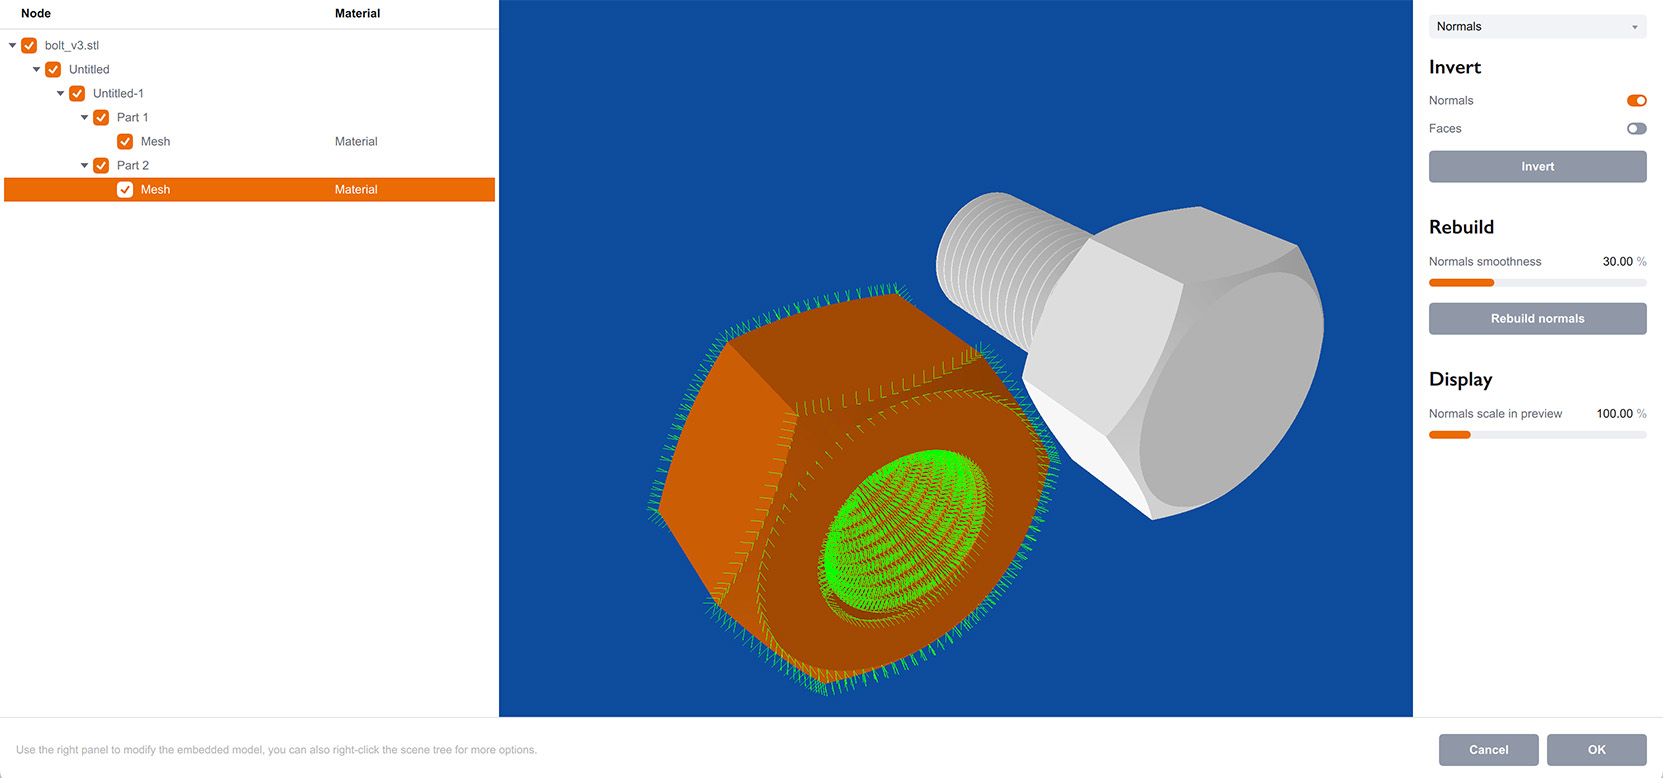
This helps checking if the mesh is flipped or have wrong normals. The parameters on the right let you fix the problems, if any:
- Invert normals — flip the normals of the selected elements;
- Invert faces — flip the faces of the selected elements;
- Invert — this buttons performs the options defined by the two check–boxes above;
- Normal smoothness — configures the maximum angle between two elements to still consider the edge between them as “smooth”;
- Rebuild normals — rebuild normals of the selected element using the normal smoothness parameter above;
- Normals scale in preview — lets you scale the length of the green lines showing normals in preview. This makes no changes to the model, it just affects the preview for your convenience.
Faces Mode
In faces editing mode Boxshot highlights the wireframe of the currently selected element. This mode does not support multiple elements selected at once, so if two or more elements are selected, only one will show its wireframe.
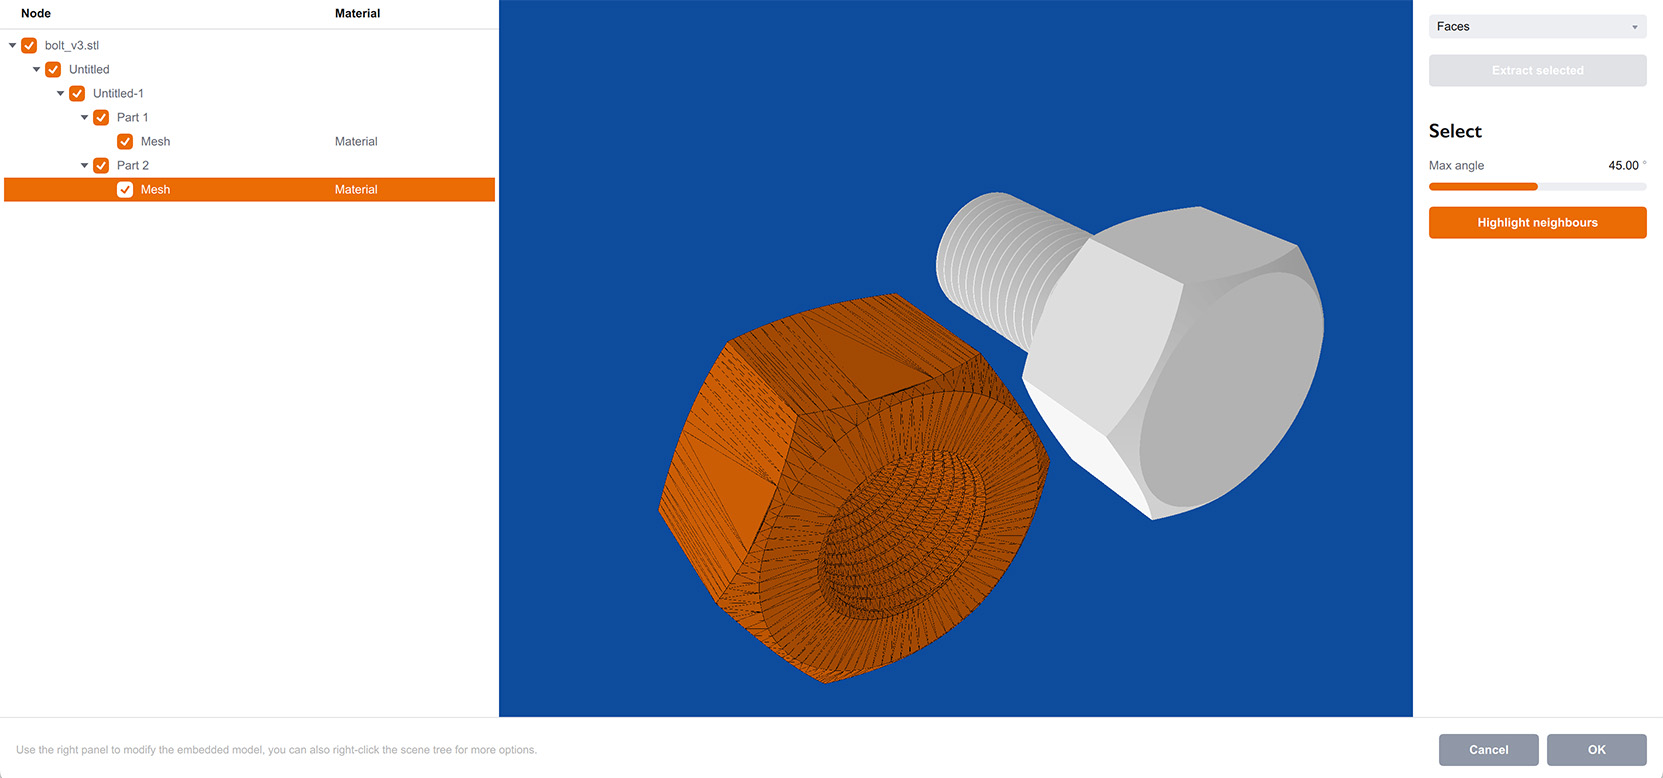
You can see the structure of the selected mesh and select its faces by clicking them. Clicking the face with Shift or Control/Command keys pressed will add the face to the selected list. This way you can select multiple faces at once. Clicking the face with Alt key removes the face from the selection.
You can extend the selection by defining the maximum angle between the faces to keep considering them similar and clicking the Highlight neighbours button. Boxshot will detect all the sibling faces that have a similar angle to the ones you selected and highlights them.
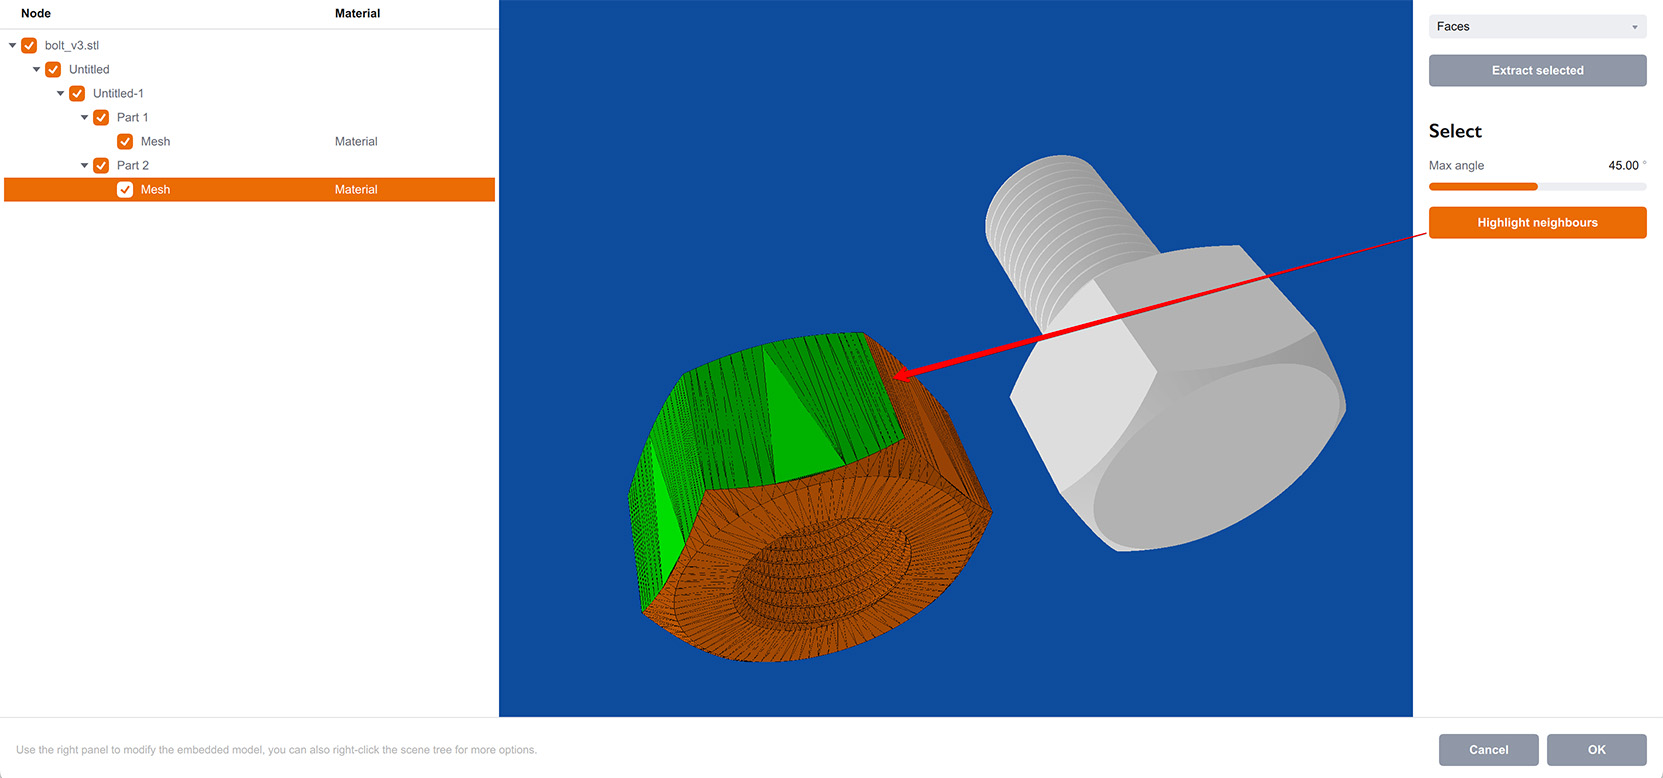
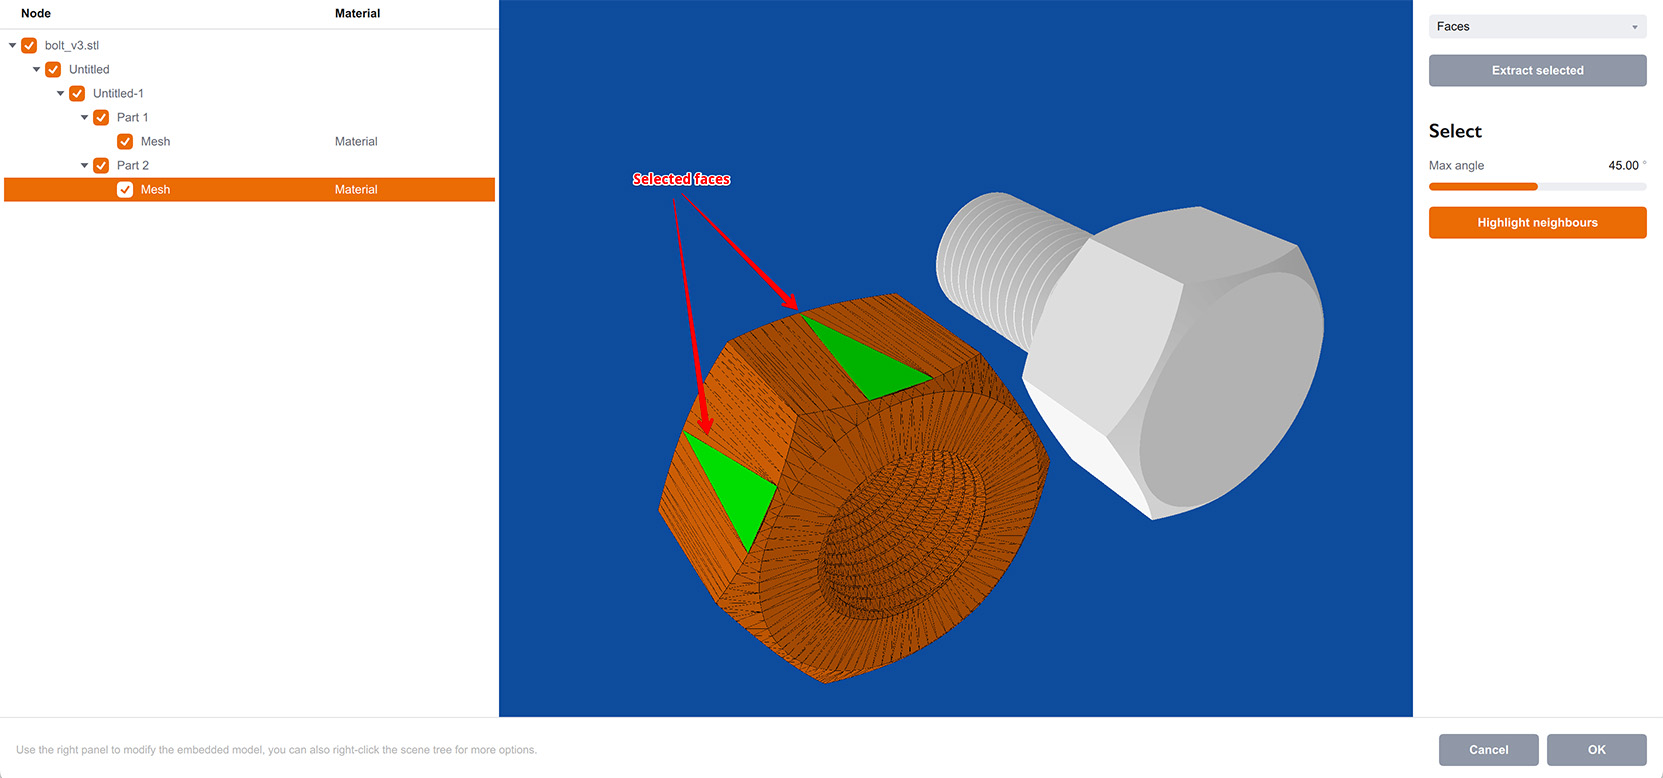
Boxshot shows manually selected faces with light green and automatically highlighted faces with dark green. You can adjust the maximum angle and click the Highlight neighbours button again to adjust the selection.
Once done you can click the Extract selected button to cut the selected faces and make a new mesh with them.
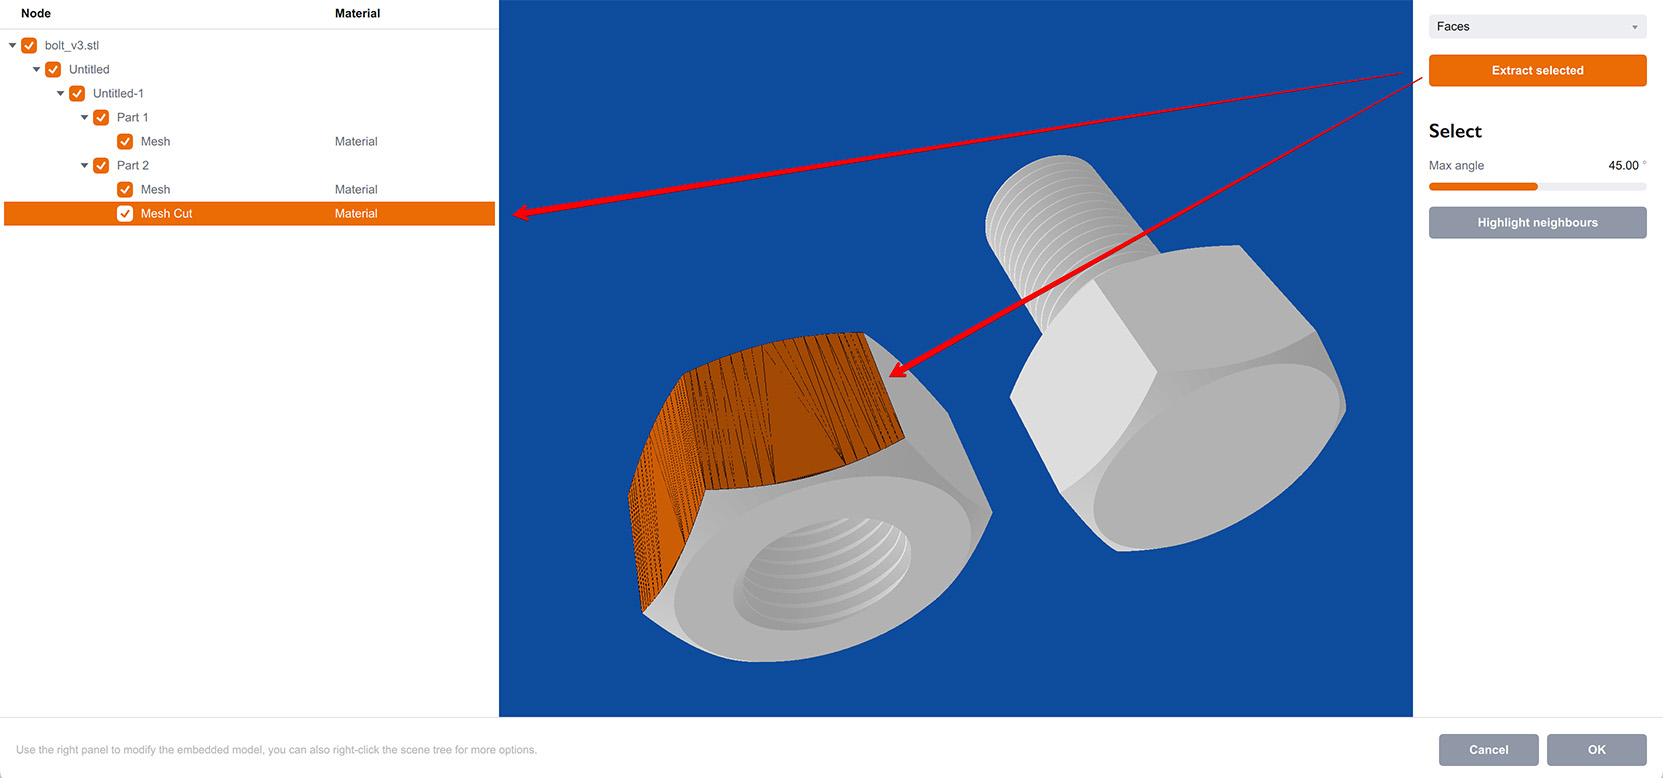
Here the two highlighted sides of the nut were moved to a separate mesh called “Mesh Cut”.
This tool is useful to cut a 3rd–party shape into pieces for further adjustment, hiding or applying the texture mapping.
Another handy scenario is splitting the double–sided mesh into front and back ones. Select the face on one side of the double–sided mesh, set the Max angle to 90° or something similar depending on the mesh, then click Highlight neighbours. Boxshot will select the whole front side of the mesh, leaving the back side unselected. Adjust the Max angle parameter if it selects too much or doesn’t select the whole front mesh. Once done you can click Extract selected and get front and back meshes separated. You can then hide or delete the unneeded one, or apply a different material or mapping to them, depending on your needs.
More Tutorials
Rendering
- Realistic Rendering — improving scenes visual appearance;
- Lighting — control environment and directional lighting;
- Saturated Reflection — make "rich" colorful reflections;
- Floor Reflection — reflecting scene objects in the floor;
- Job Manager — rendering jobs later;
- GPU Rendering — rendering scenes faster on GPU;
- Rendering Time and Quality — getting more control on rendering;
- Simple and Realistic Lighting — speeding up scene rendering.
Materials
- Texture Slots — how to use texture slots in Boxshot;
- Glass Materials — how to make semi–transparent objects look attractive;
- UV–Spot — how to make a UV–spot effect easily;
- Foil Effect — how to add foil–finishing to your shapes;
- Bump — adding relief to your materials;
- Copying Materials — how to copy materials to other shapes;
- Custom Materials — extend the materials library with your own ones;
- Semi–Transparent Labels — making semi–transparent and partial labels;
- Boxshot Materials — more details about Boxshot materials.
Features
- Boolean Operations — combining and subtracting shapes, making holes;
- Decals — applying decals and configuring them;
- Bump Decals — applying bump where it is needed;
- Depth Of Field — adding more realism to your renderings;
- Tools — read more about Boxshot tools;
- Managing Images — how to manage image files used by Boxshot projects;
- Shapes Instances — creating lightweight copies of other shapes;
- Model Editor — edit embedded models in many ways;
- Shrink Wrap — heat–shrink film simulation for objects wrapping;
- Physics Simulation — applying gravity to your scene;
- Palletize — arrange scene objects for the pallet;
- Snapshots — save scene state to re–use it later;
- Translation — teach Boxshot to speak your language;
- Vector Artwork — how to maintain the quality of vector artwork.
Shapes
- Lathe Objects — making symmetrical objects using revolving curves;
- Loft Objects — making custom objects with 2D cross–sections;
- 3D Text — making 3D text objects in Boxshot;
- Extruded Objects — how to make thick 3D object of your flat 2D curve;
- Conical Labels — making conical labels with distorted artwork;
- Dieline Box — a very realistic dieline–based box;
- Custom Shapes — adding custom shapes to the left panel;
- Solid Shapes — create boolean-friendly shapes;
- Script-Based Solids — create complex solid shapes with code;
- Third Party Shapes — importing third party shapes to Boxshot.