Loft Objects
Using Loft objects in Boxshot you can create custom shapes from scratch by providing a number of cross–sections along the vertical axis. Each cross–section is a closed curve and together they form a solid object of the shape you need. This tutorial provides step–by–step instructions on using Loft objects.
Loft Editor
Let’s start with adding a loft object to the scene. Find the Loft object in the CAD section of the shapes panel at the left and drag it to the scene:
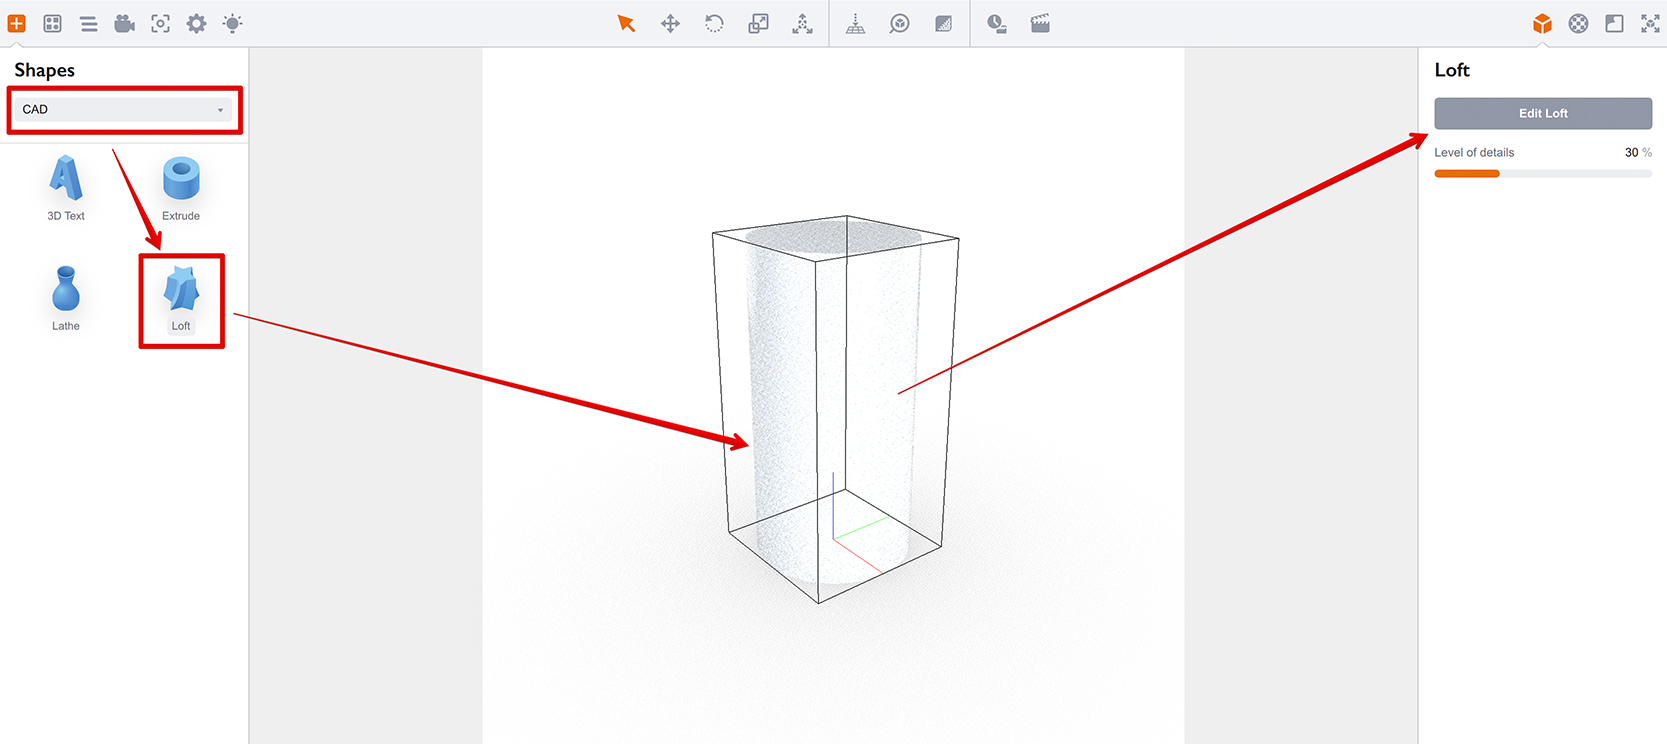
You will see a simple cylinder and Edit Loft button at the right. Click it to open Loft Editor window:
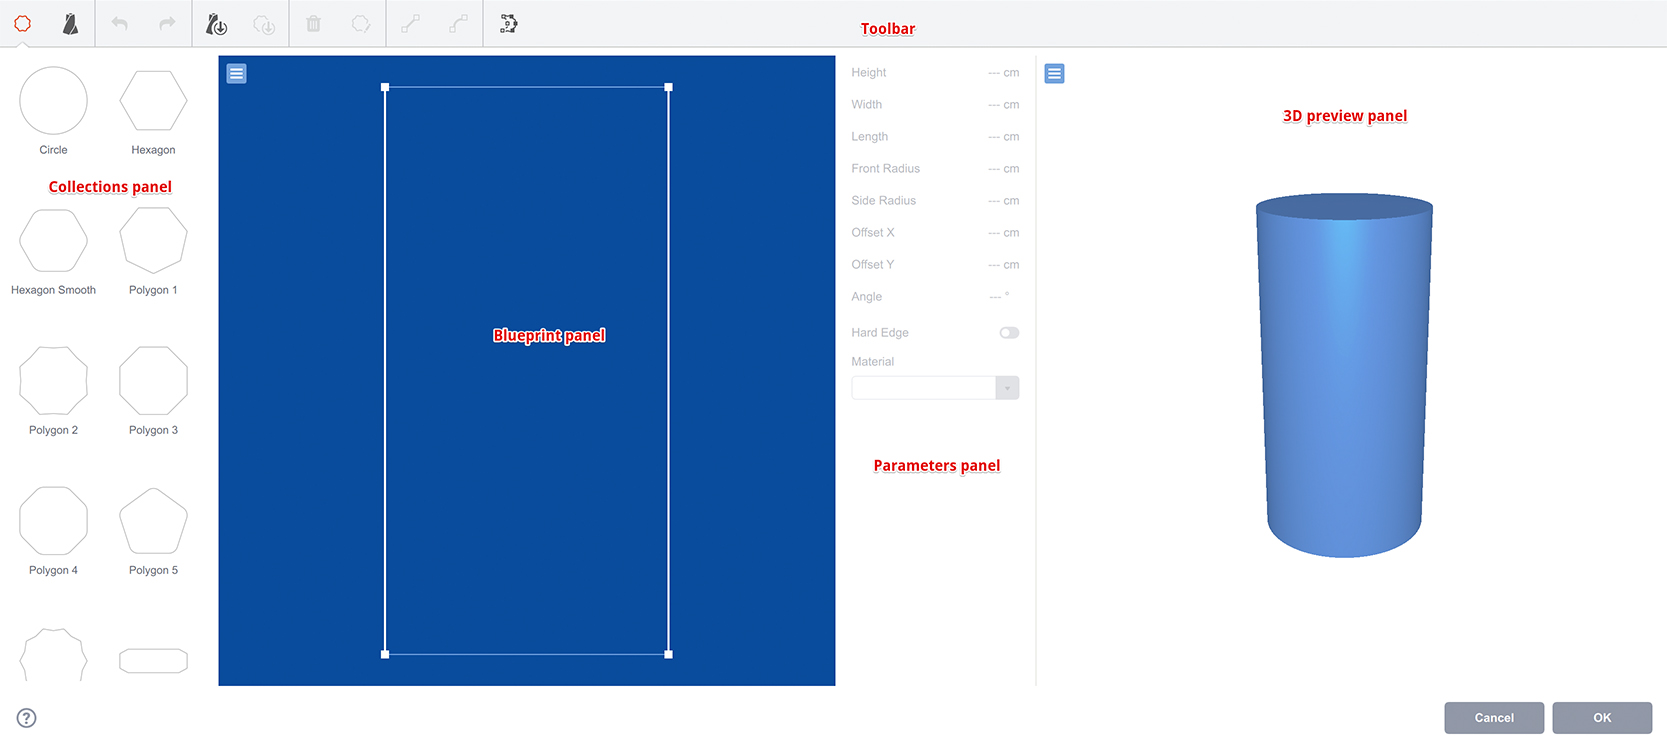
From left to right you see:
- Collections panel — here you find sample shapes and lofts that you can use in your design. You can add your objects there to re–use them later;
- Blueprint panel — displays front or side view of the currently edited loft shape. You can select and drag layers here, add or modify layers and so on. That’s the main loft editing tool;
- Parameters panel — displays the properties of the currently selected layer(s). Good for fine–tuning parameters and assigning materials;
- 3D preview panel — here you see the current low–poly version of your shape.
There is also a toolbar at the top of the window that lets you do most common things with loft objects. More controls are available at the right click menu of the blueprint panel:
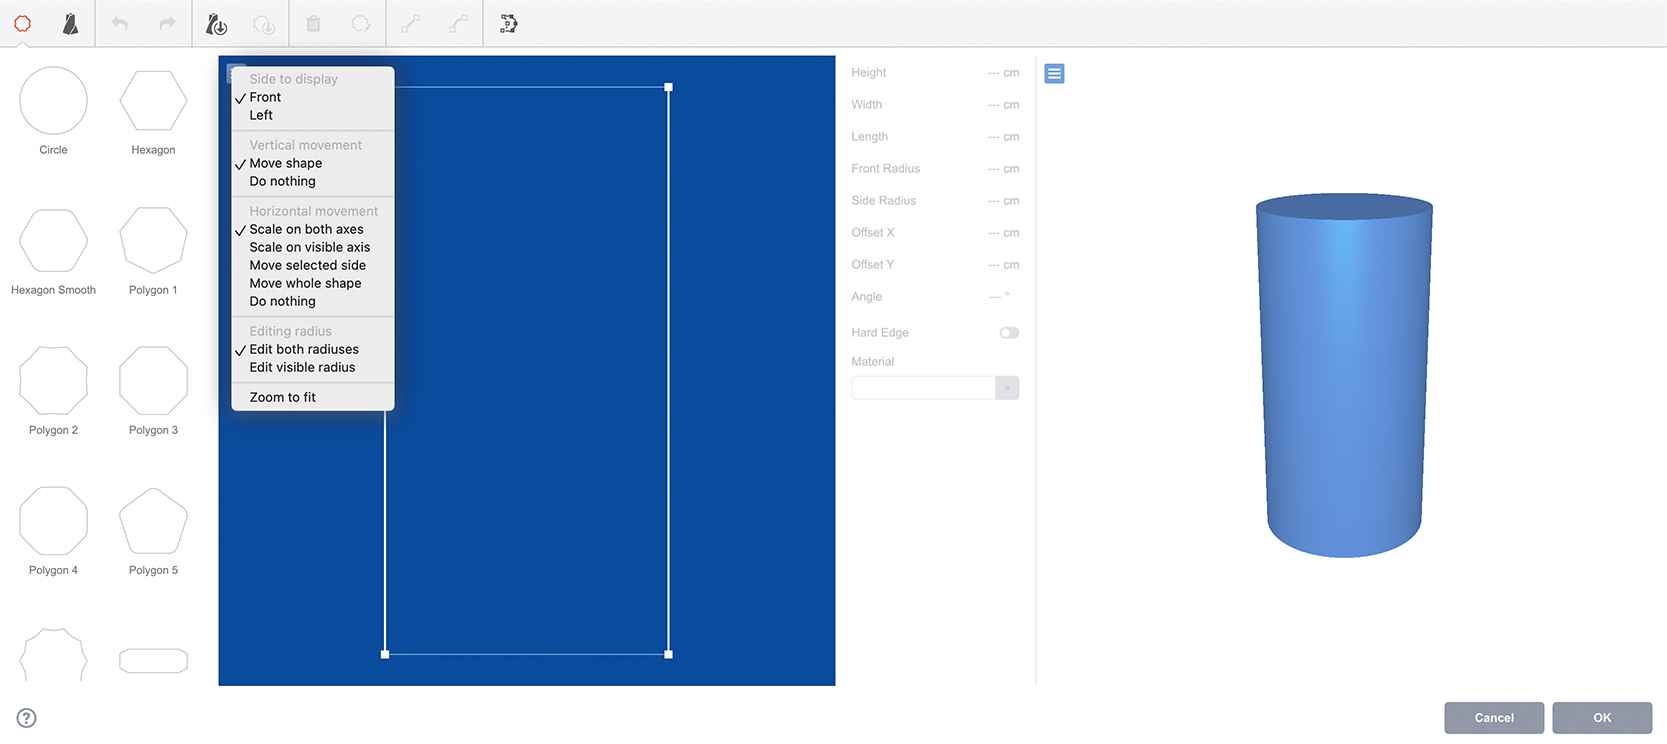
Here you can choose between front and side views of the loft, decide what to do for horizontal or vertical dragging of layers and also zoom the shape to fit the preview area.
Let’s Make It Square
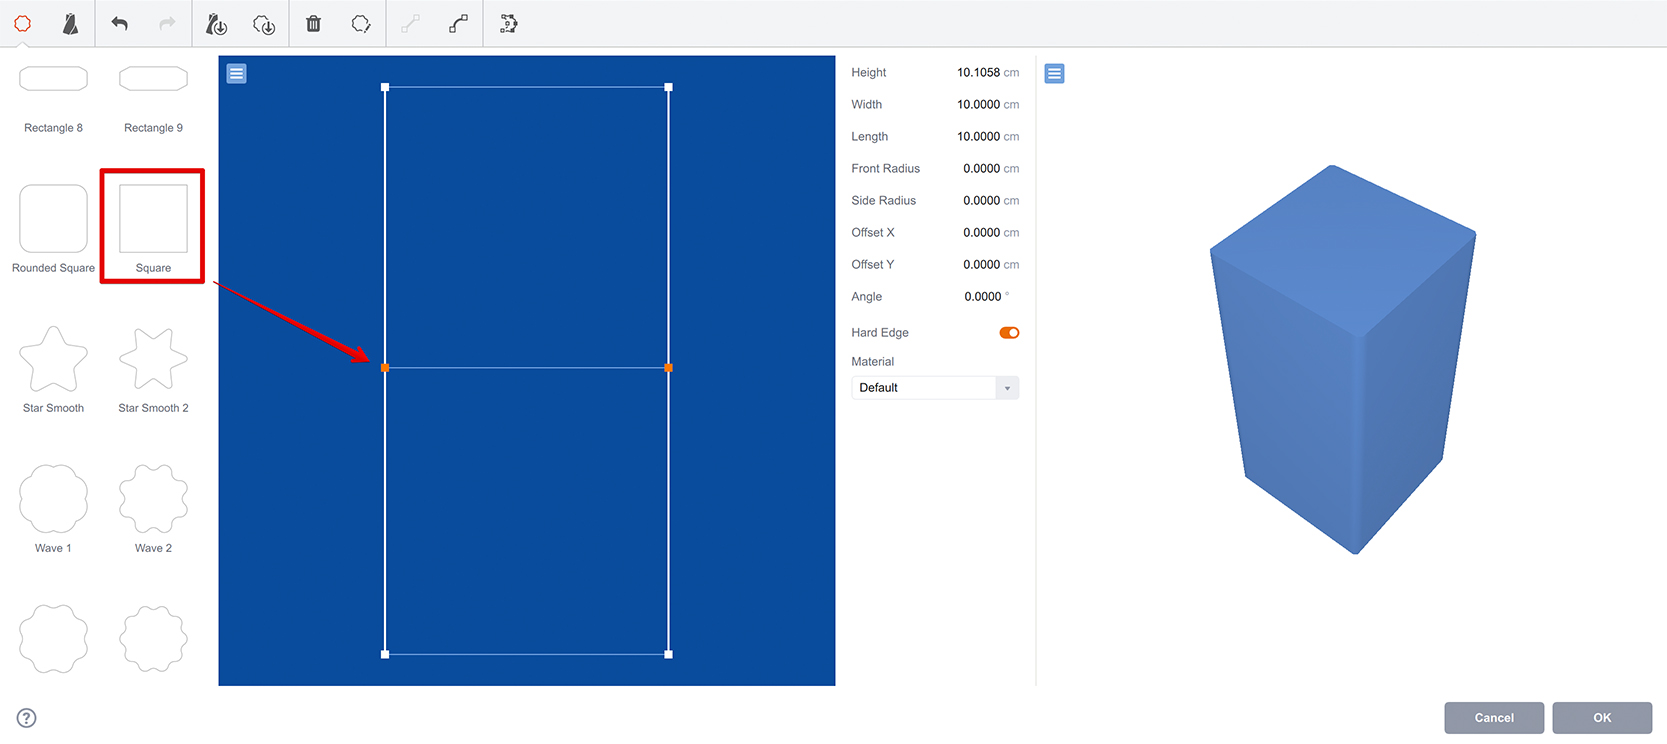
So far our object looks pretty simple, let’s make it slightly more complex. For instance, let’s make it square. Locate “Square” shape at the collections panel at the left and drag it onto the top layer of the loft object in blueprint panel:
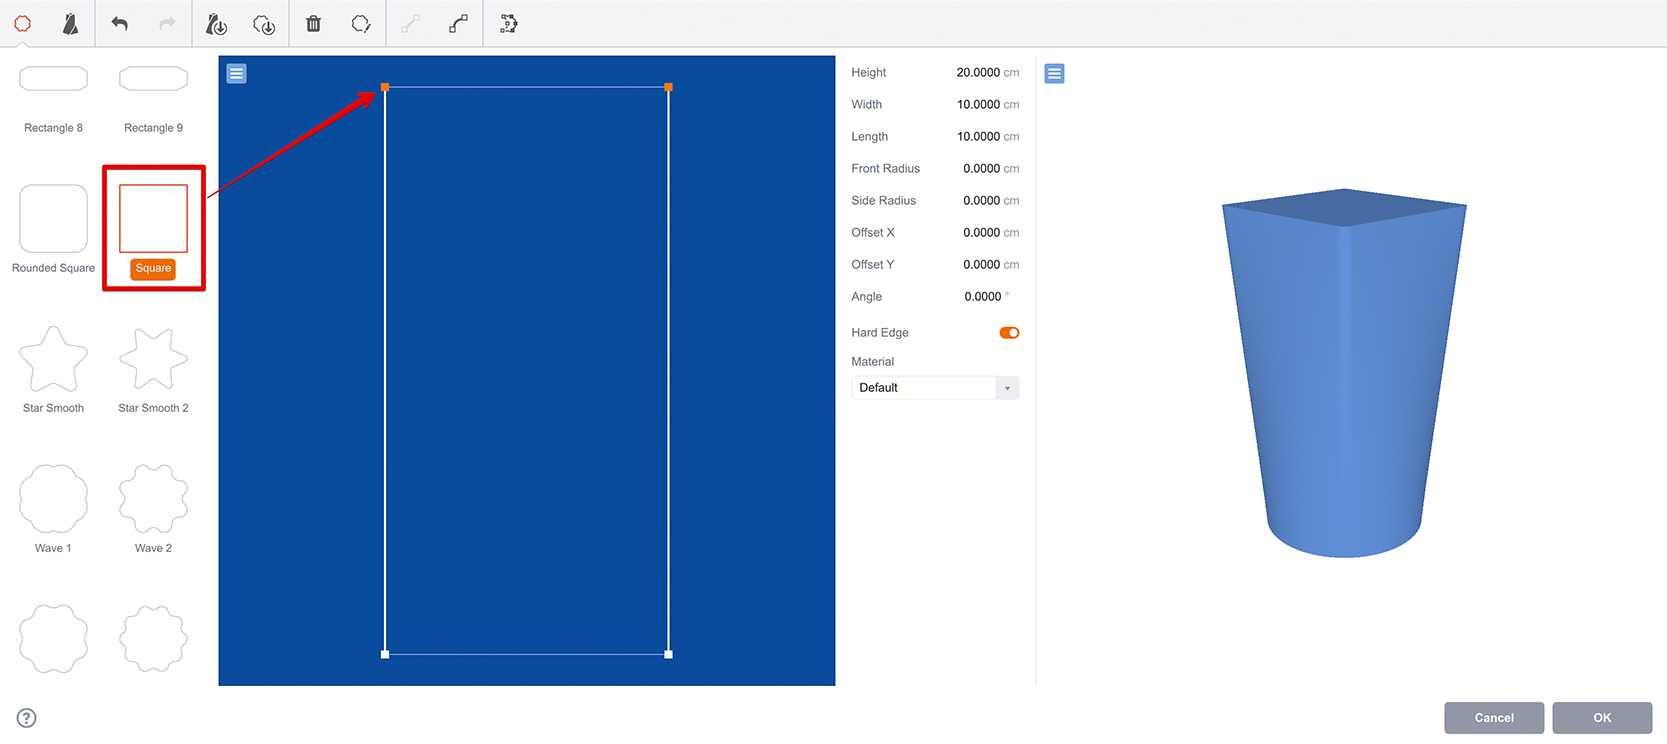
When you drop it you’ll see that the top part of our cylinder became square. That’s how loft objects work. Do the same for the bottom layer:

You can also drop shapes into the space between layers, just move them to the line that connects two layers and Boxshot will highlight the dropping place:
Let’s add one more square layer so there are 4 of them and select the top two by holding left mouse button and dragging around them as you usually select objects in any other 2D graphics editor:
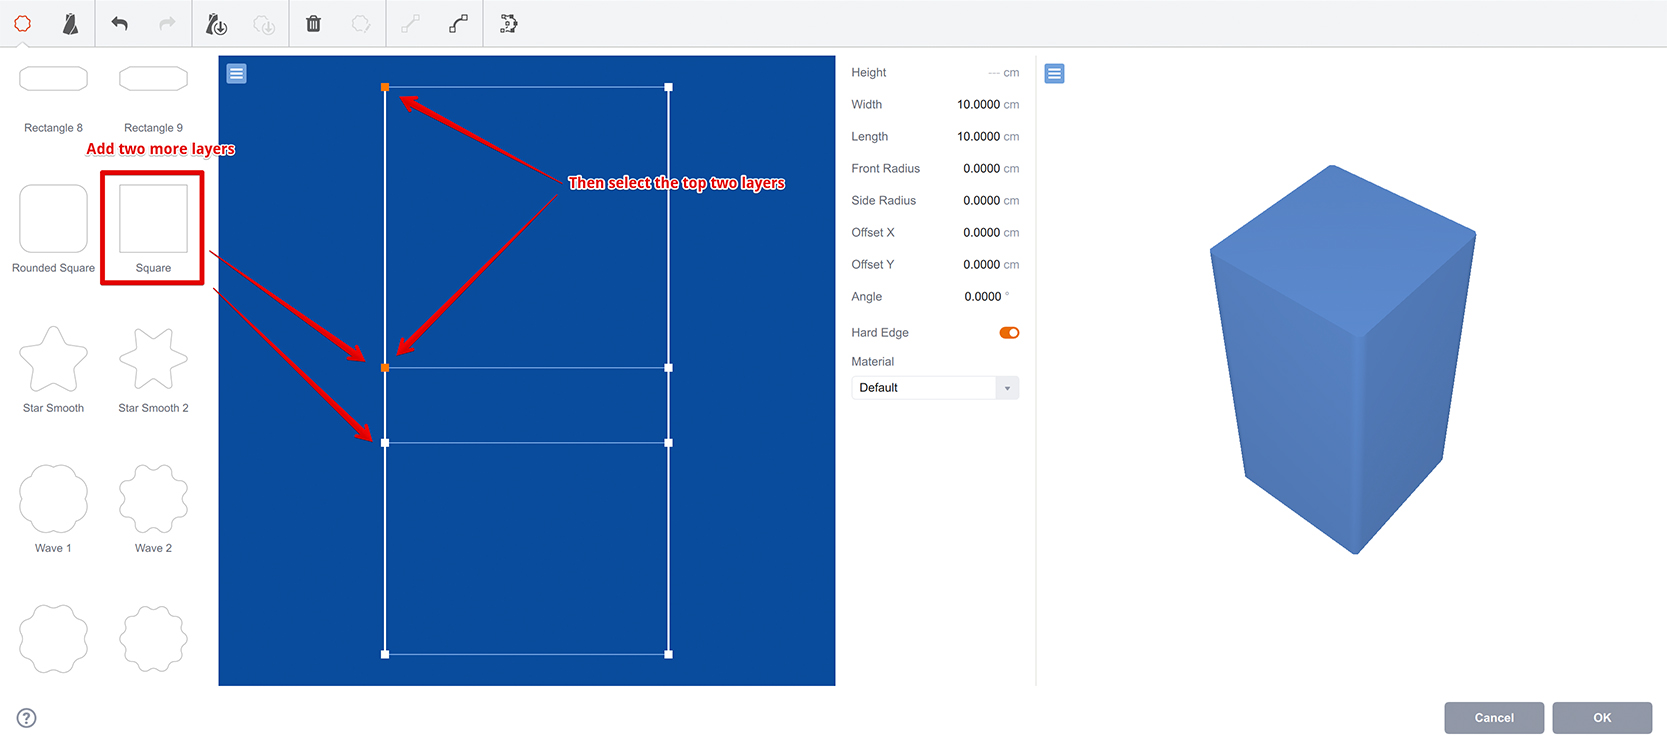
Now hold left mouse button over one of the control points of selected layers and move it to the right:
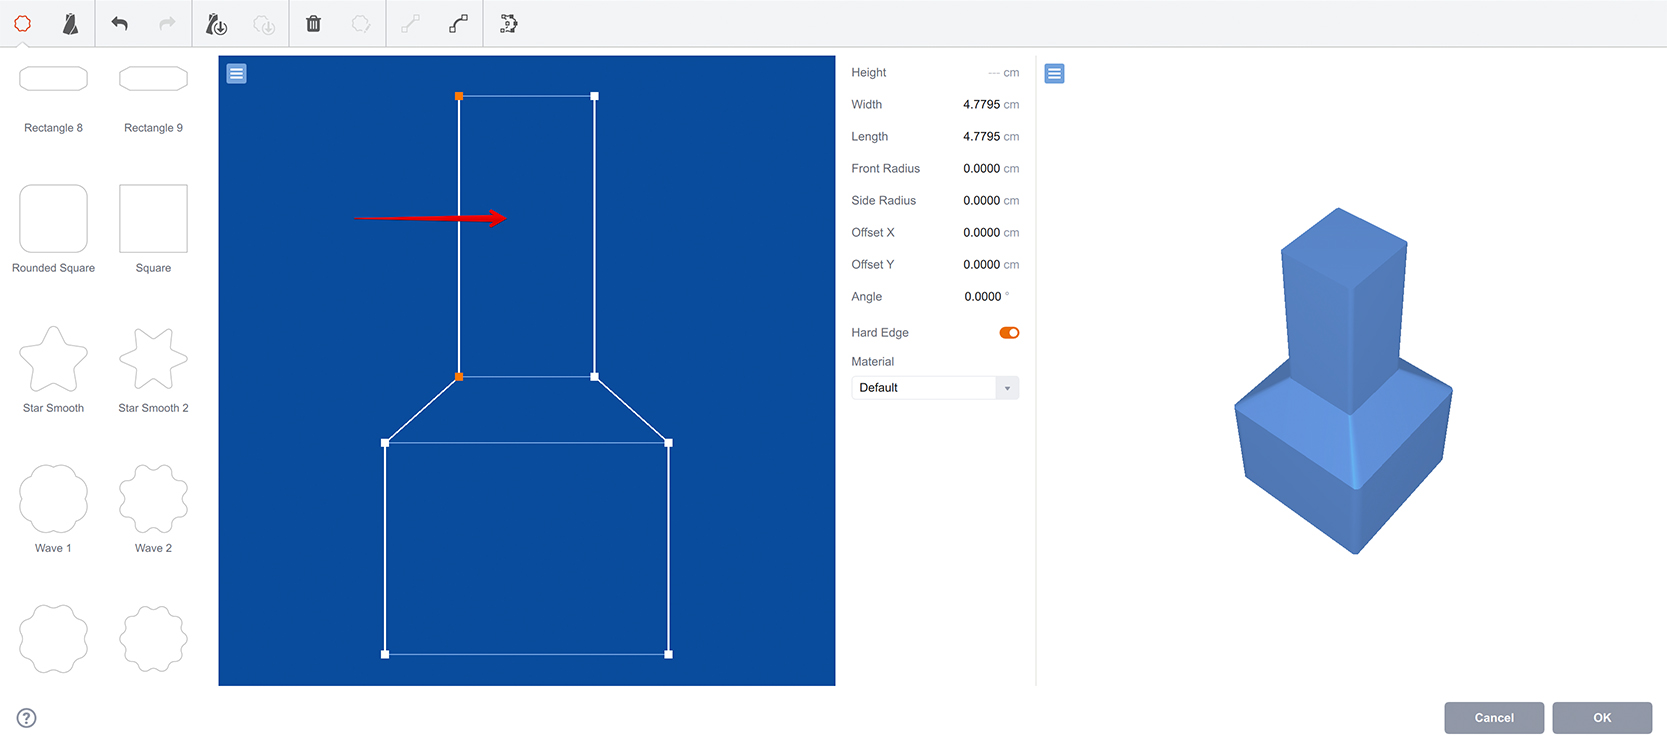
You see the changes in 3D preview: the top part of the shape gets smaller. You might also note that both width and length of the shape were affected by the move. You can change this using right click context menu, there is a section called Horizontal Movement there that controls what happens when you move layers left or right. Let’s switch it to Scale on visible axis:
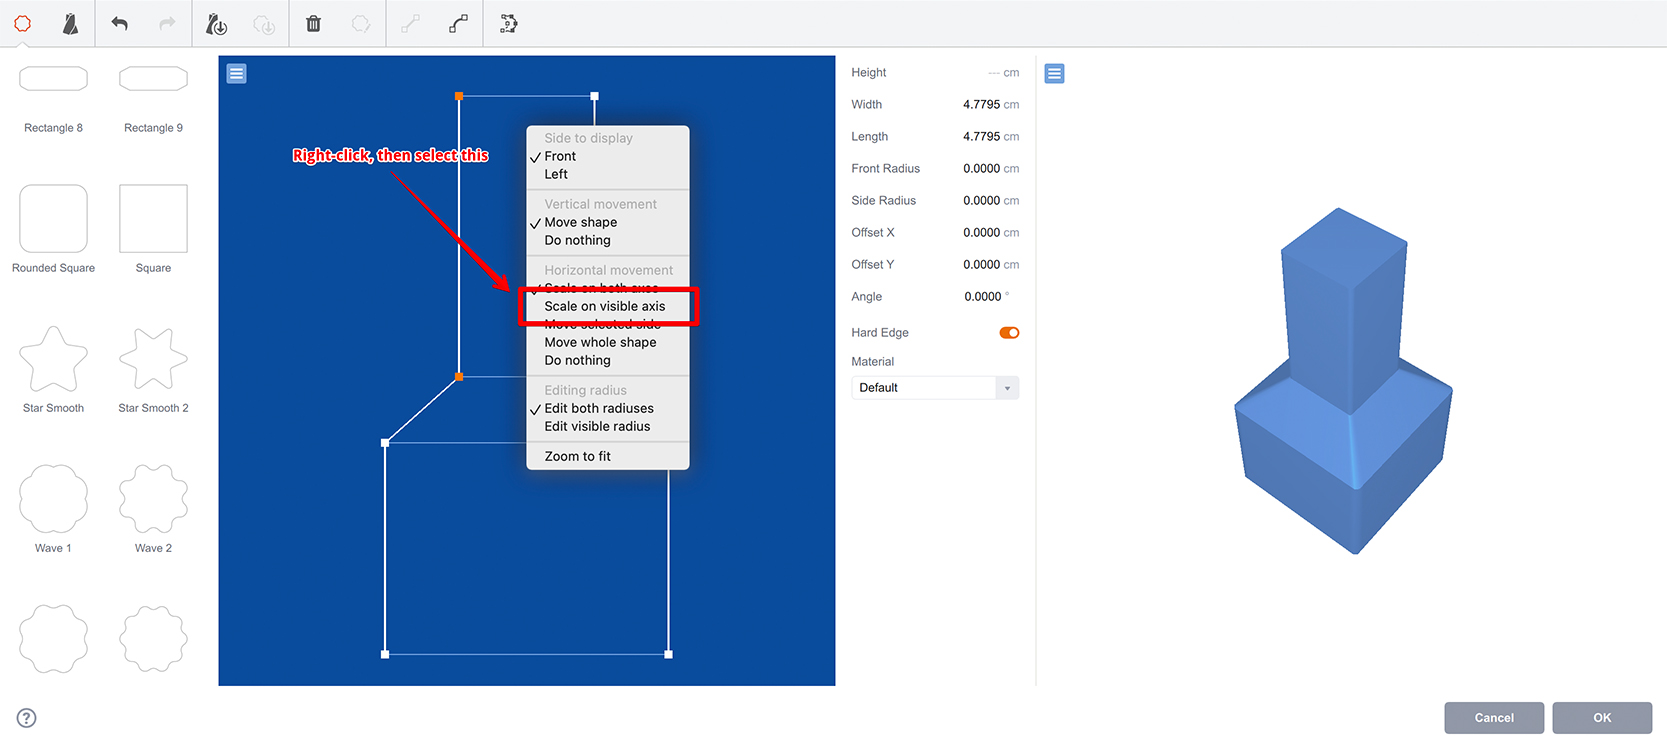
This means that moving control point left or right will only affect the visible side (Front, as you may see in the popup menu). Let’s now move the selected control points slightly left:
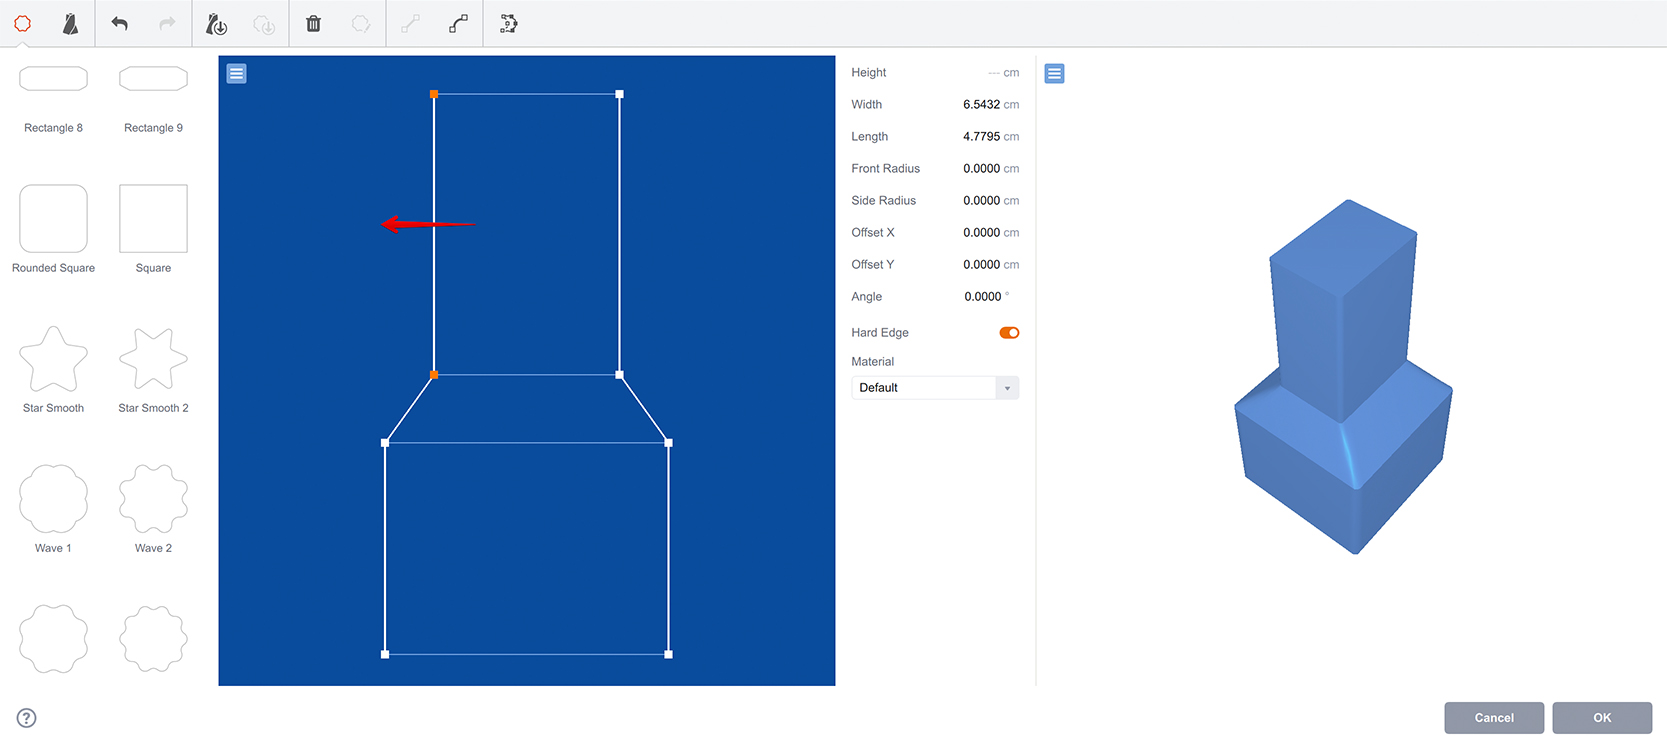
You see that our square top became rectangular, as it was resized along just one axis. Now if you switch between front and side views using the context menu, you will see they are different.
There are more options like this in the popup menu:
- Scale on both axes — horizontal move changes both width and length of the currently selected layers;
- Scale on visible axis — this way it affects only the visible side of the shape (either front or left, depending on what you see at the top of the context menu);
- Move selected side — by selecting this your movement will affect only the control point you drag, not the opposite one. This makes asymmetric shapes;
- Move the whole shape — this way you move the layer instead of scaling it;
- Do nothing — horizontal movement does not affect the selected layers at all. This is good if you want to adjust just the height of the layers.
There are also options for vertical movement, but they are much simpler and only let you define if you want vertical movement to change the height of selected layers or not.
Curvy Lofts
Let’s cancel the current changes and start with a brand new cylindrical loft. Then add another circle layer somewhere in the middle and click Make Curvy button in the toolbar:

This button updates all the selected layers and sets their curve radius to “40”, making them non–flat:
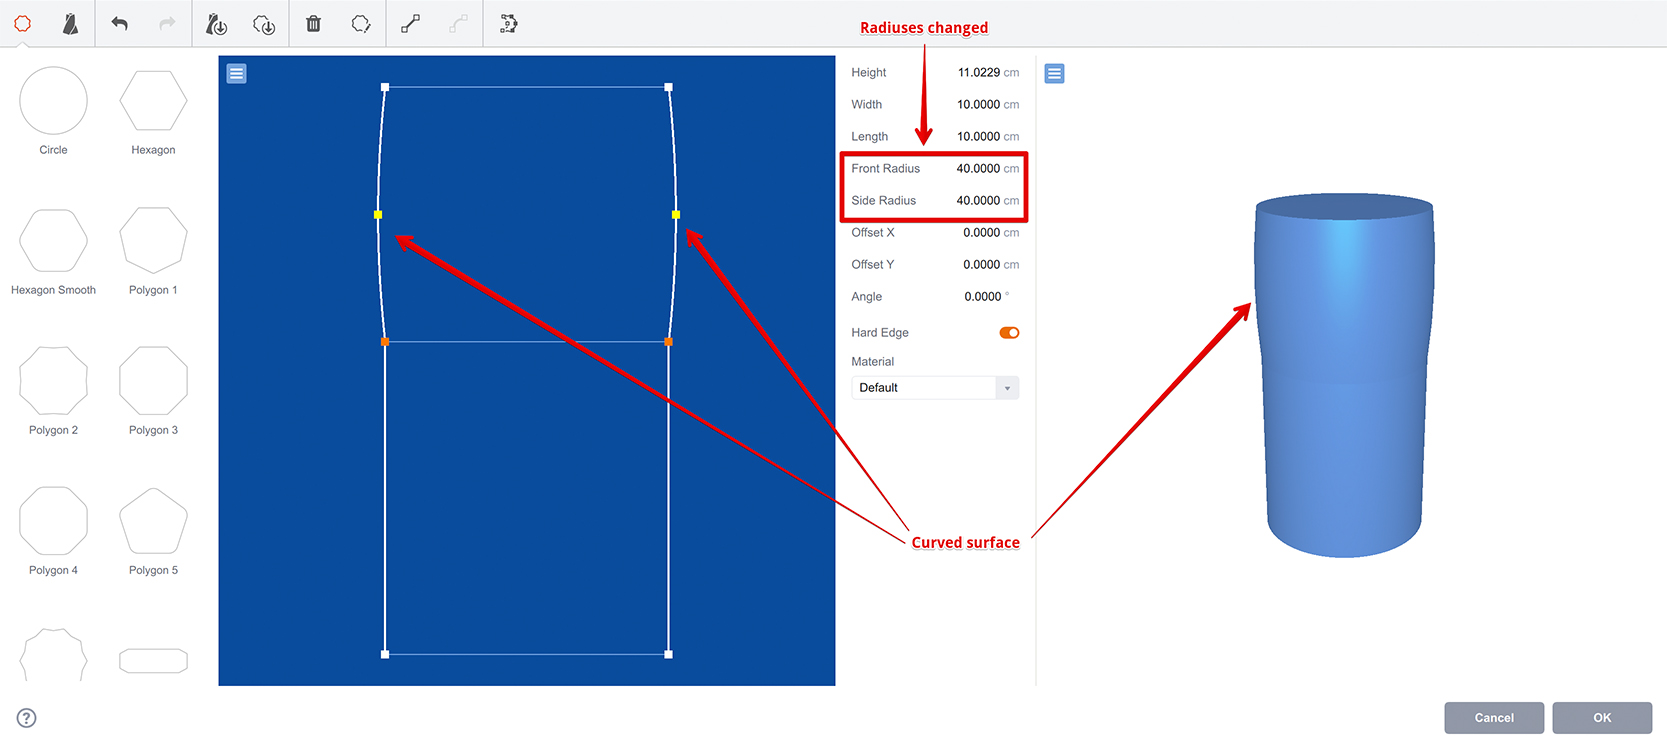
The button itself became inactive, but the shape has been modified and now doesn’t look like a flat cylinder. Also note the yellow dot on the edge in the blueprint panel. By dragging this dot you can control the curve.
Now make the bottom layer curvy, as well and drag the yellow dots to make this shape:
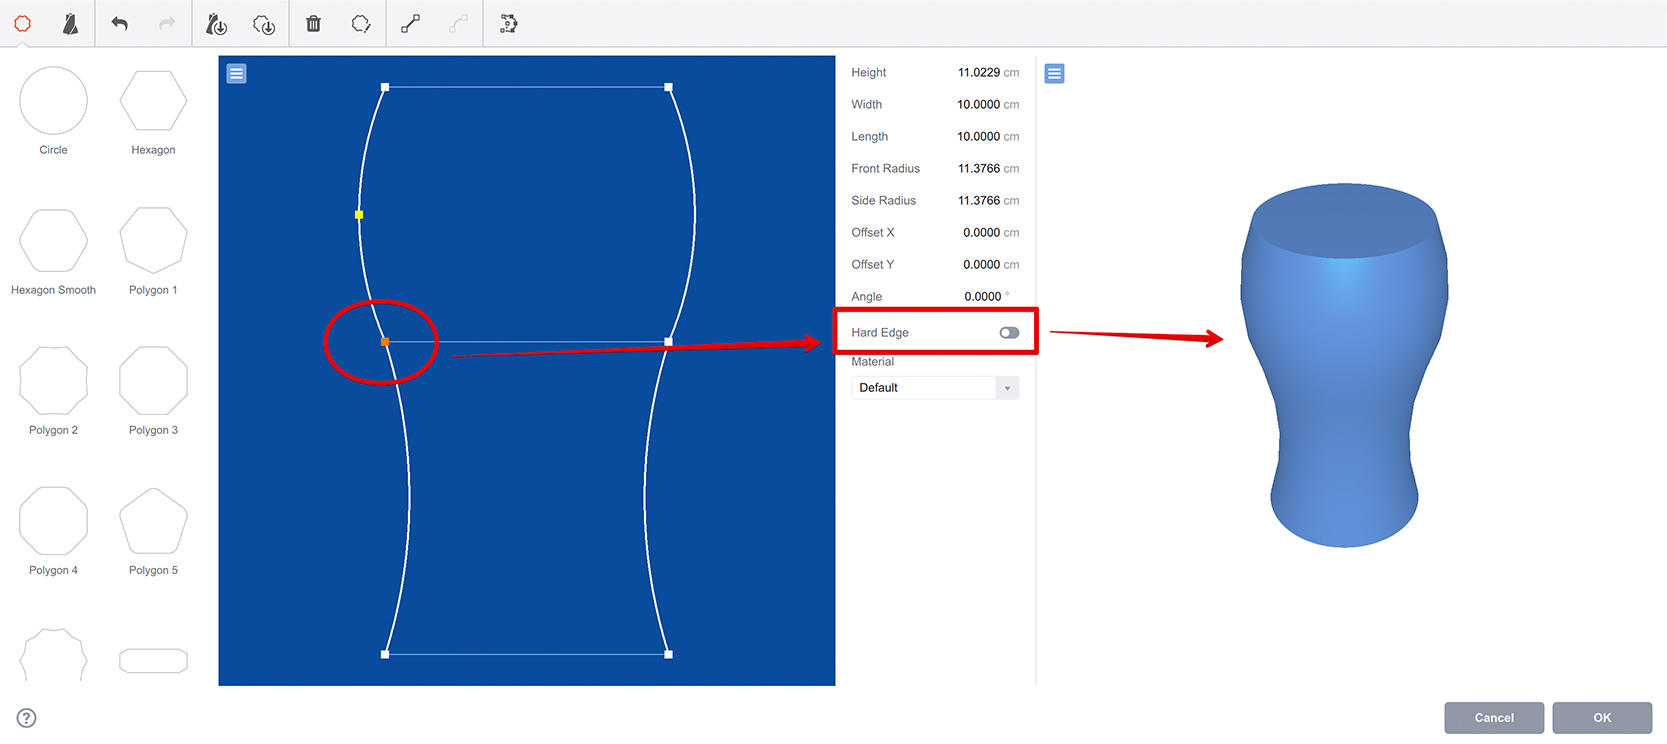
Also select the middle layer and uncheck Hard edge box in the parameters panel to make the edge soft. The shape now looks pretty much like a beer glass, except there is no space for beer itself. Lets fix that by clicking the special button in the toolbar:
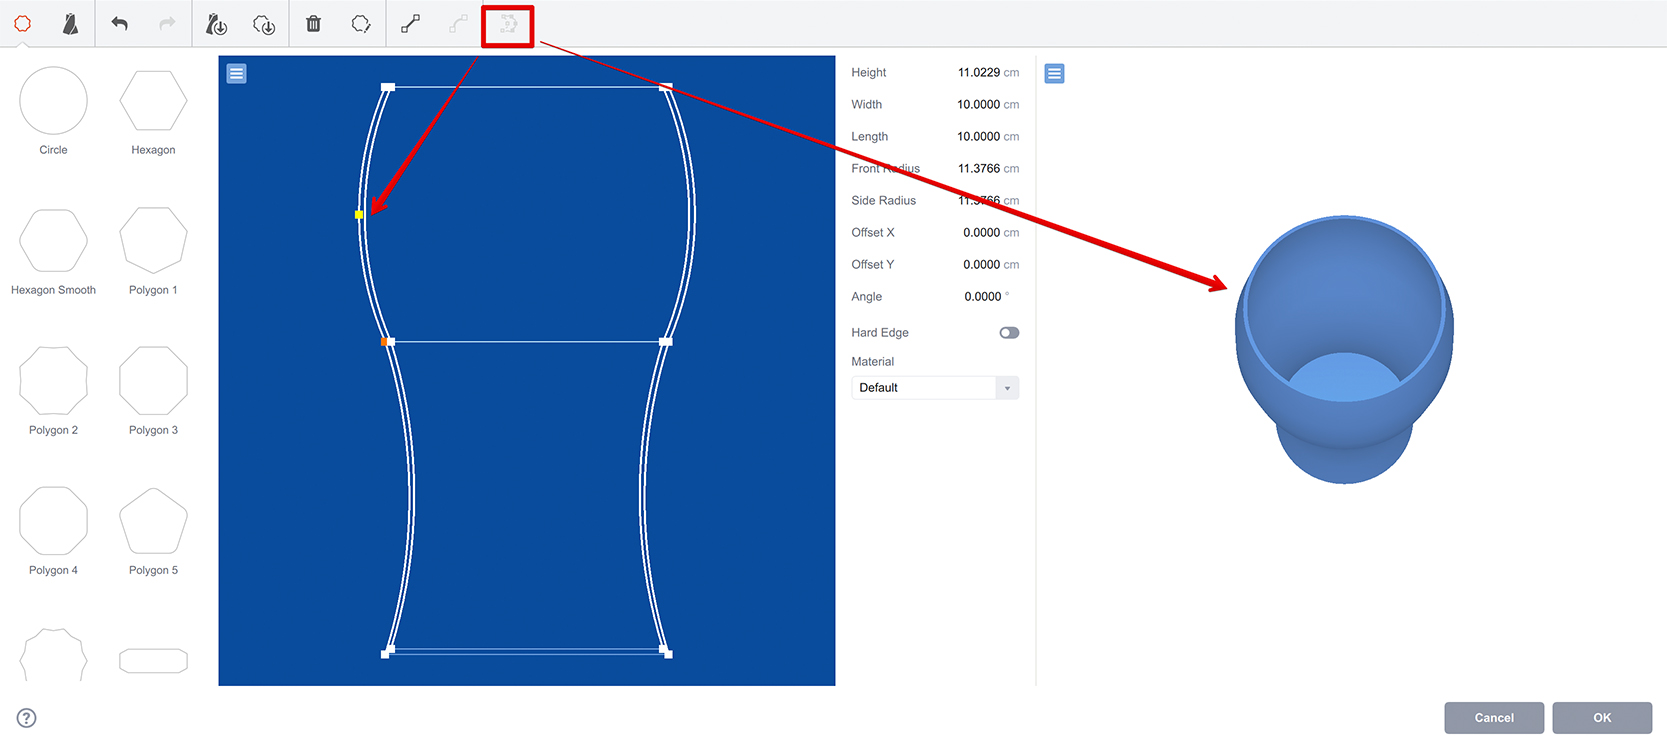
Magic just happened! When you click the button, Boxshot checks if the shape is simple enough (basically, each new layer is above the previous one) and automatically generates the inner part of the shape to make it hollow.
Let’s add a final touch and make the glass slightly more complex. Select all the layers in blueprint editor, then find “Polygon 4” shape in the shapes collection panel and drag it onto the selected layers:
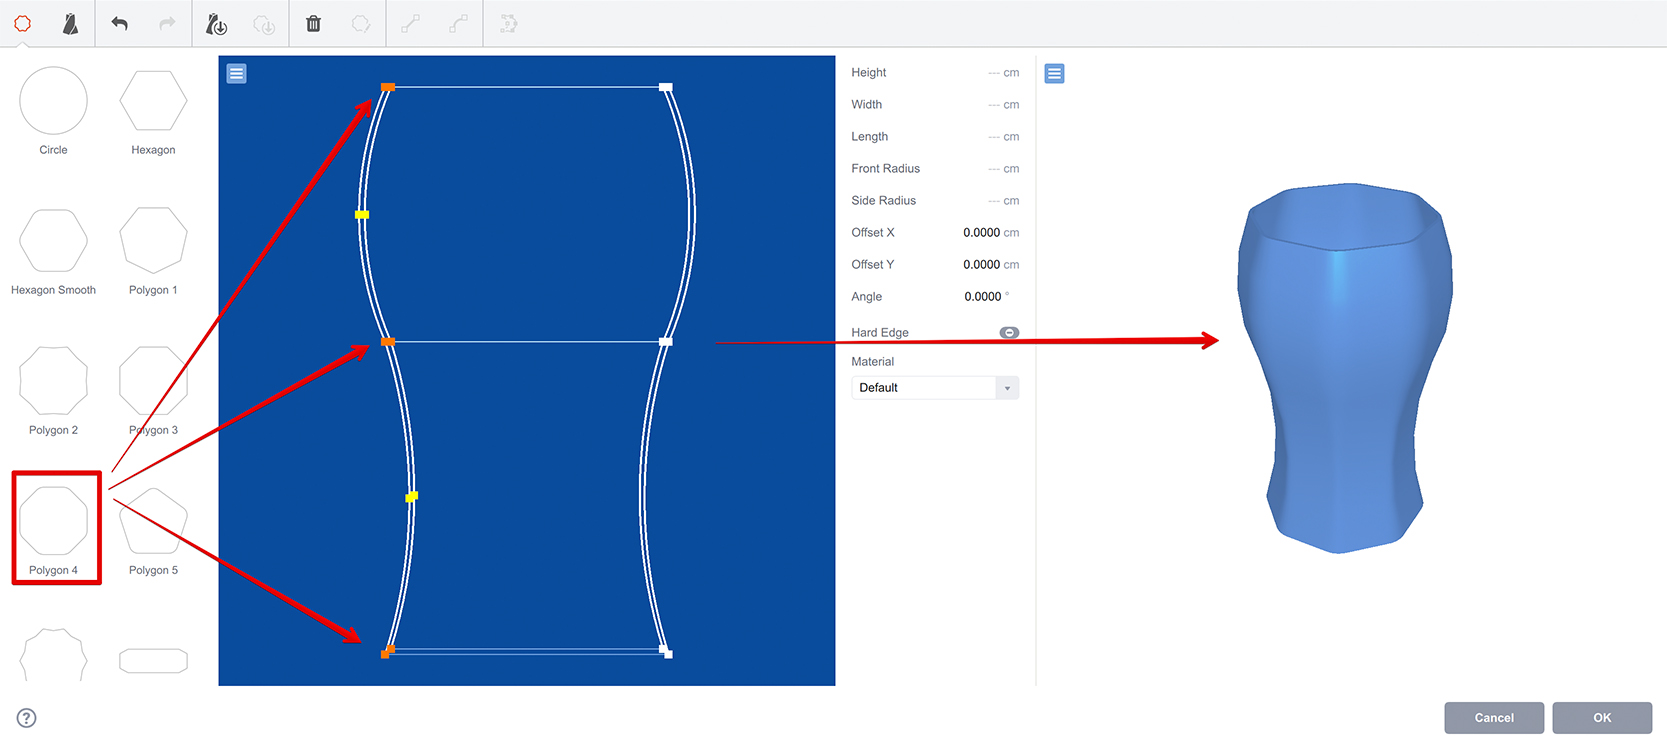
You see the glass got edges. You can make it even more interesting by adding a circle near the top and make the very top edge circular, as well:
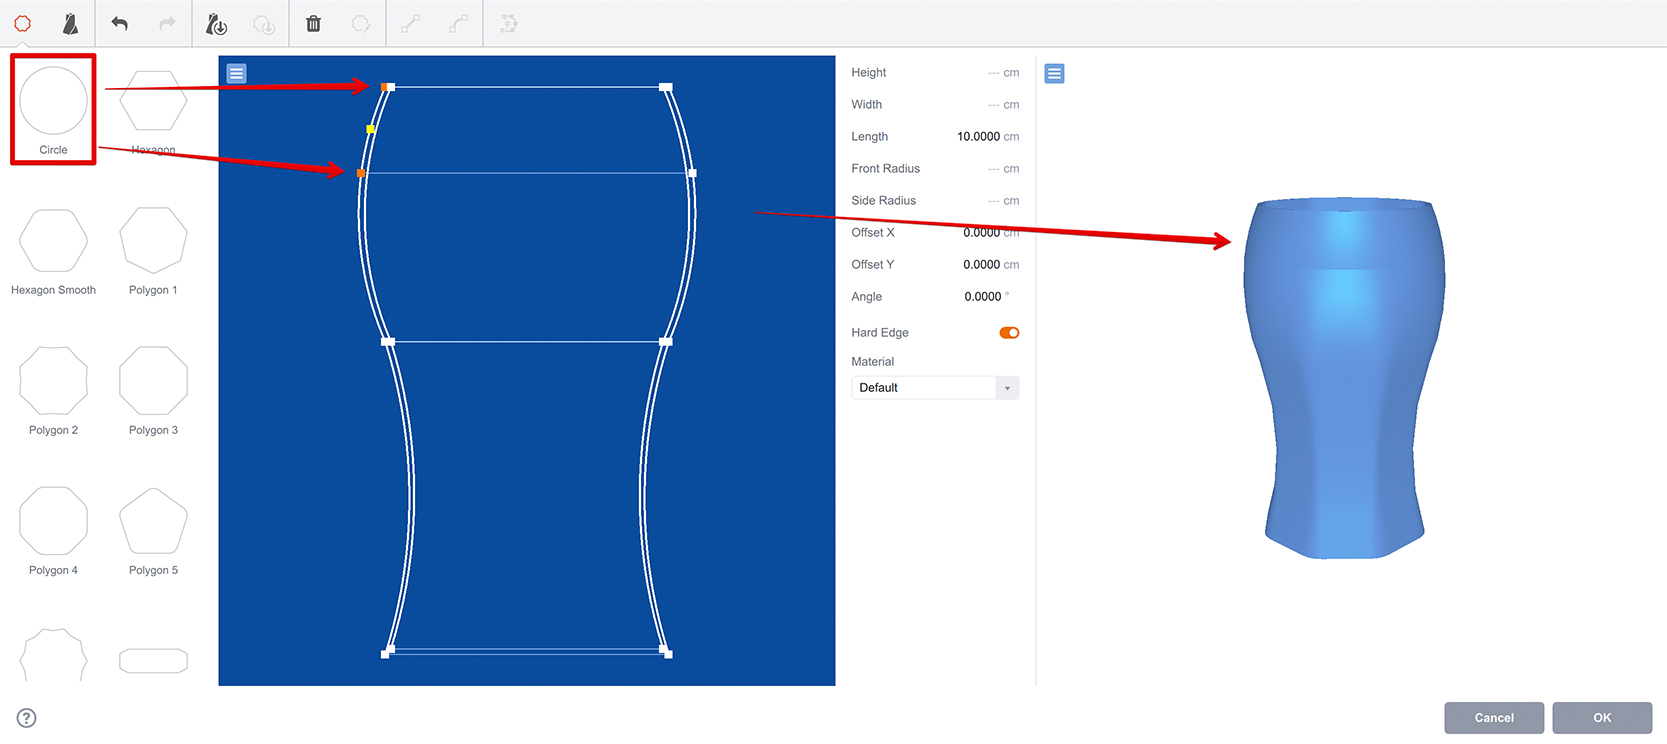
You can add more layers, adjust their size and positions, make them flat or curvy, hard and soft to make a perfect design.
Do not close your beer can model yet, there is one more thing to do.
Saving Lofts
Although you can simply click OK and get the loft object added to the scene, it might worth saving it for further usage by itself. Boxshot lets you do so, as it has a collection of loft objects. Click the Lofts button at the toolbar to see them:

Scroll down to see sample lofts that come with Boxshot. You can use them as a starting point for your own ones, or simply use them “as is”. The main thing is that you can add your own loft there by clicking Save Loft button in the toolbar:
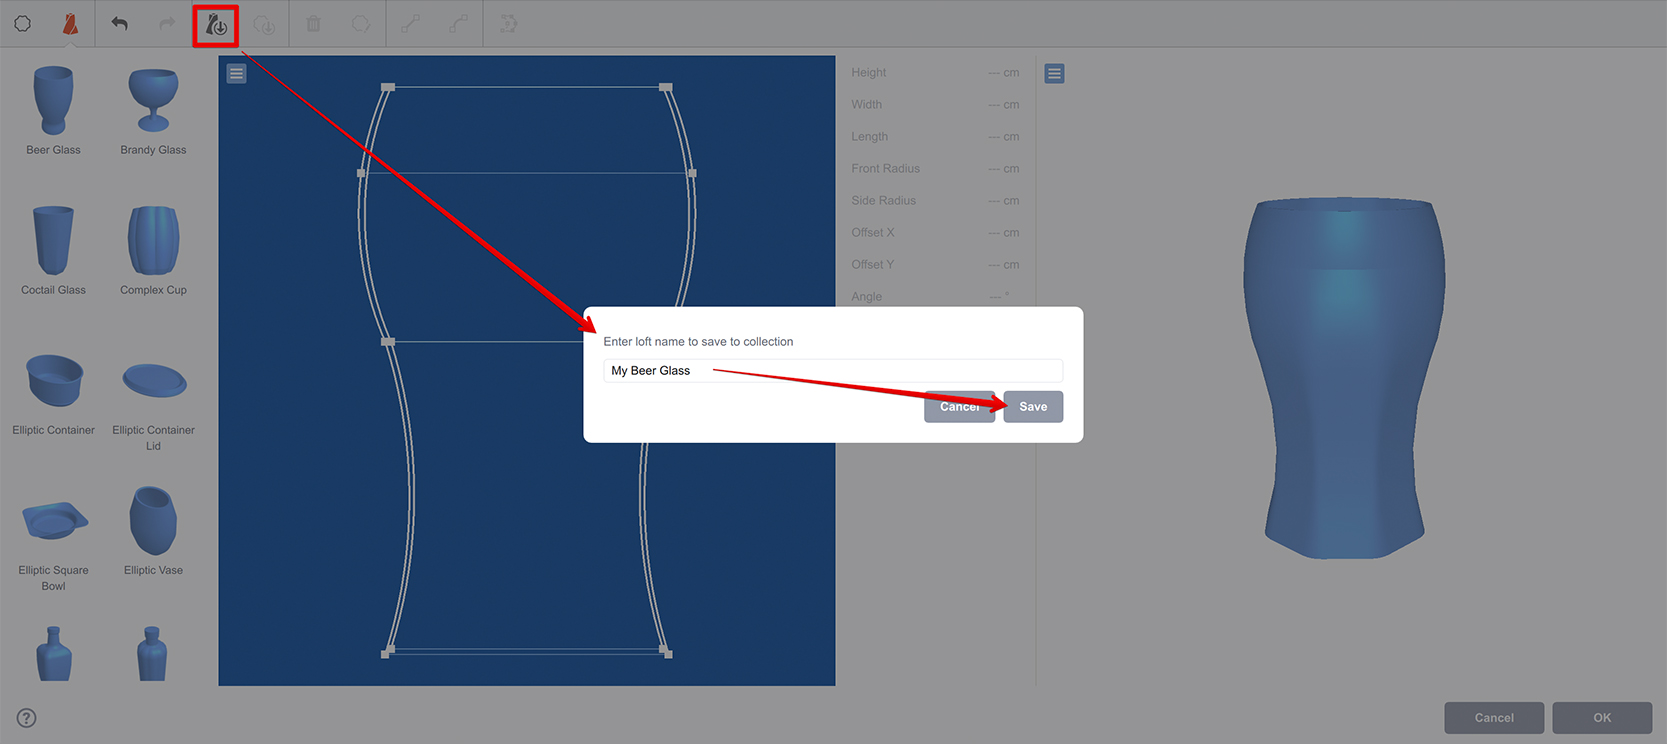
Enter the name you want and click Save, then find your shape saved to the collection:
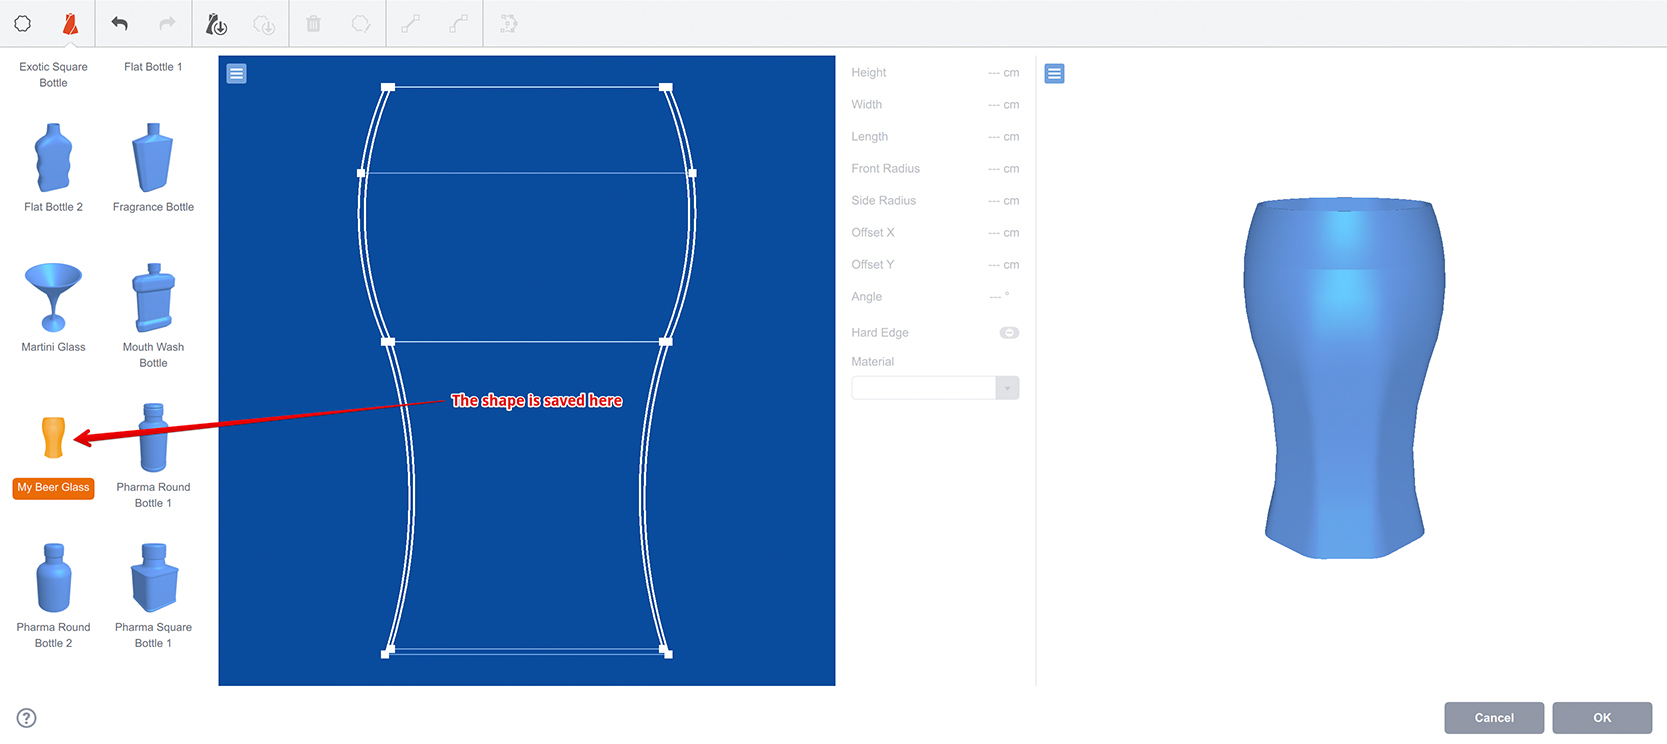
Anytime later you can simply drag that loft into the blueprint to get it loaded instantly.
Right click saved lofts to reveal their saved location or delete them.
Shape Editor
Boxshot provides quite a limited shapes editing functionality and the suggested way is to make shapes somewhere else and import them as SVG files by dragging and dropping them into the shapes collection panel. However, sometimes it is needed to make a small modification of the shape or make it non–flat and here comes the built–in loft shapes editor.
Let’s start with a simple cylindrical loft object and add a circle shape to its middle:
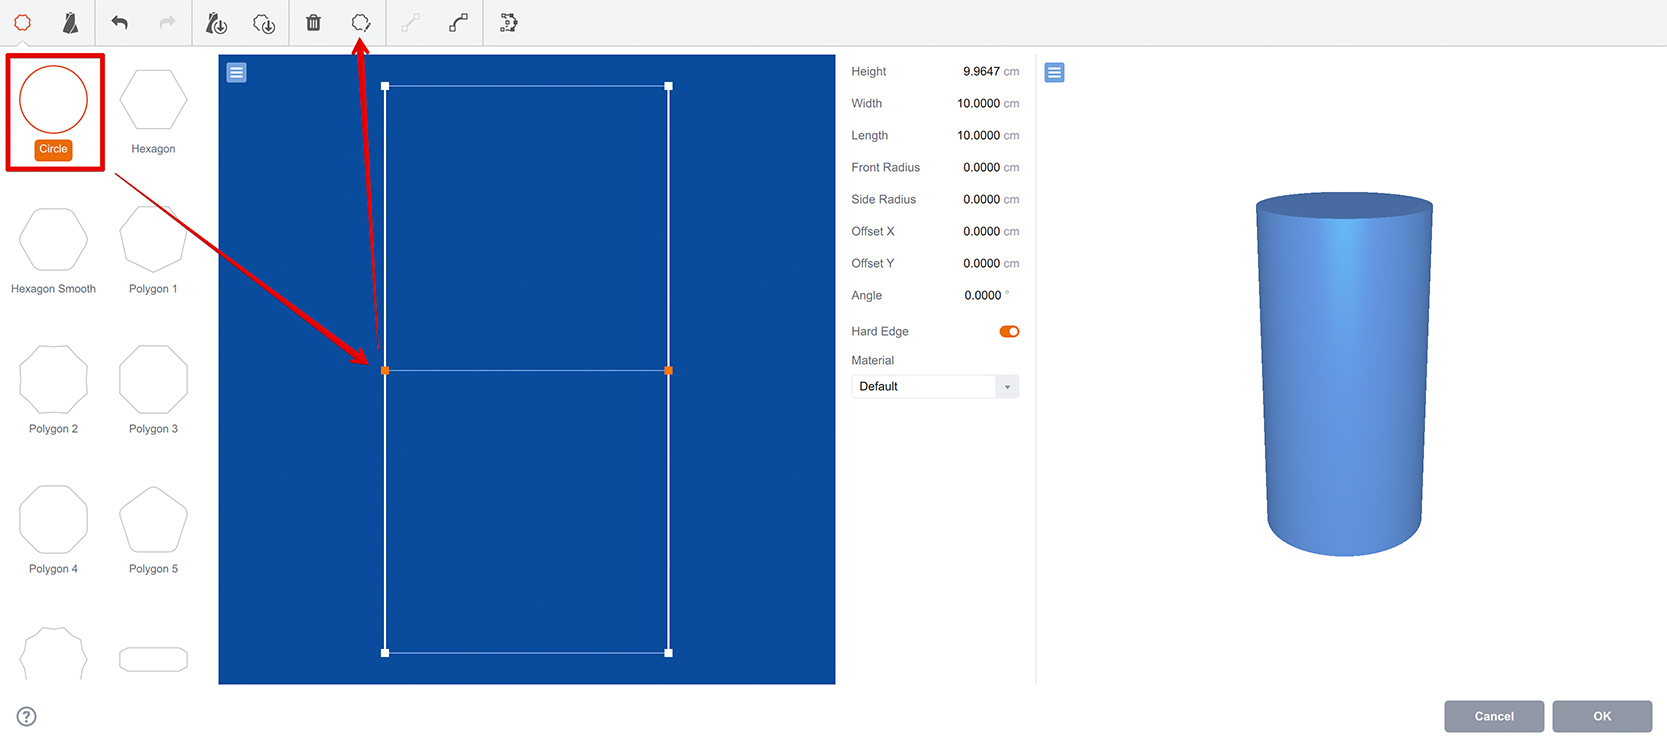
Do this, then click Edit Selected Shape button in the toolbar to open the shape editor:
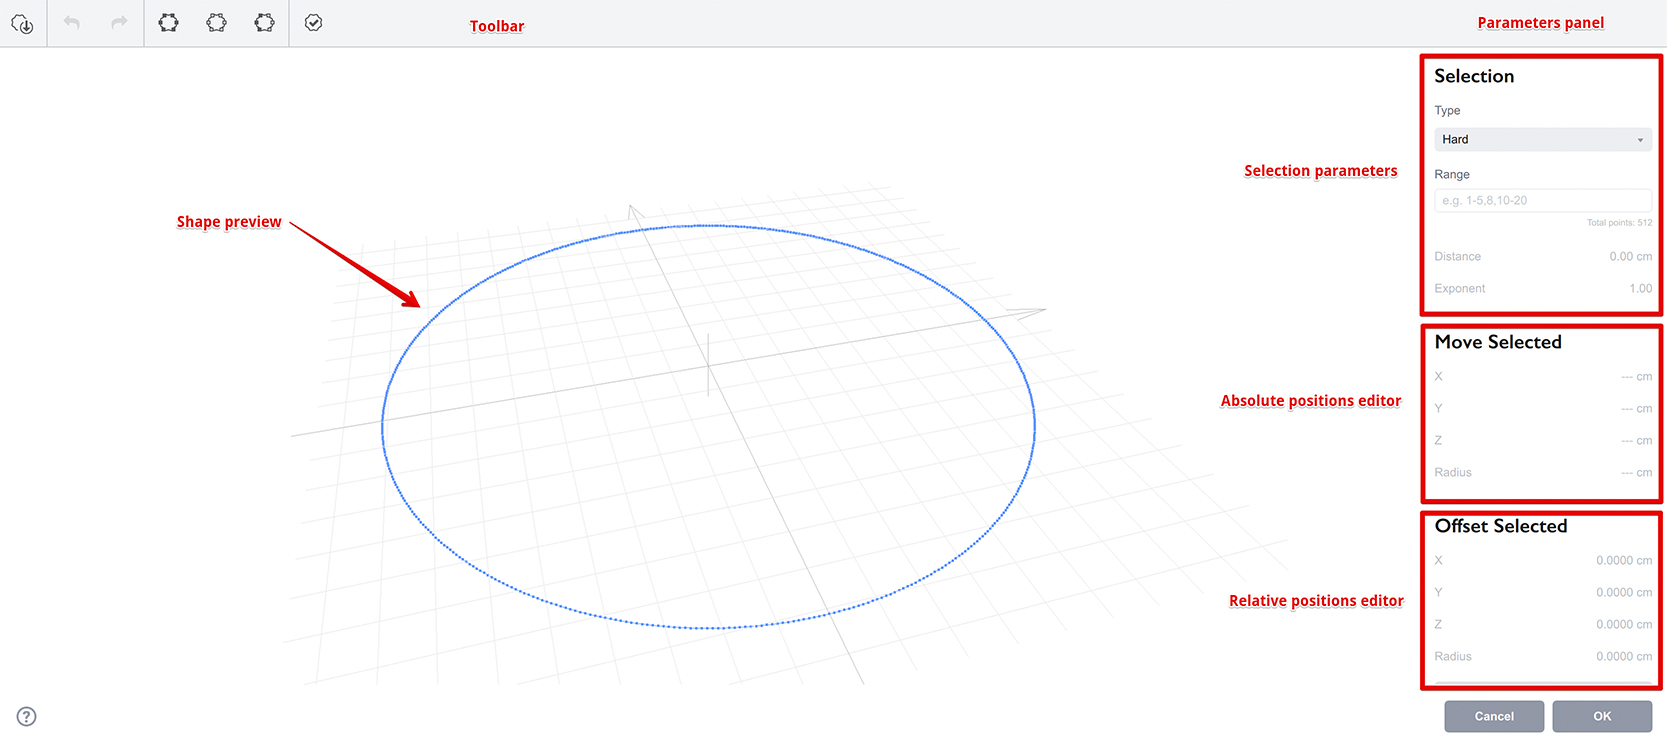
The main part of the window is shape preview area, there is a toolbar at the top and parameters panel at the right. From the top to bottom at the right there are:
- Selection parameters — the controls here let you see and configure the current selection. All the tools in figure editor work with currently selected points and sometimes it is essential to have precise control over them;
- Absolute positions editor — this panel has four fields and modifying any of them automatically updates all the selected points directly;
- Relative positions editor — this panel looks pretty much as the previous one, but instead it has Offset button, by clicking that you add the entered values to all the selected points.
Selection Types
Loft shapes editor has three types of selection:
- Hard — each point is either selected or not, no soft selection;
- Soft Inner — when you select a range of points, Boxshot makes the selection “soft”, so the further is selected point from the center of selection, the less it is selected. Soft selection does not leave the selection range, so points outside of the selection are not selected;
- Soft Outer — Boxshot does hard selection for all the points you selected and also extends soft selection up to the Selection Distance away from the selected area. To make selection soft, Boxshot reduces the selection level with distance, according to the Selection Exponent parameter.
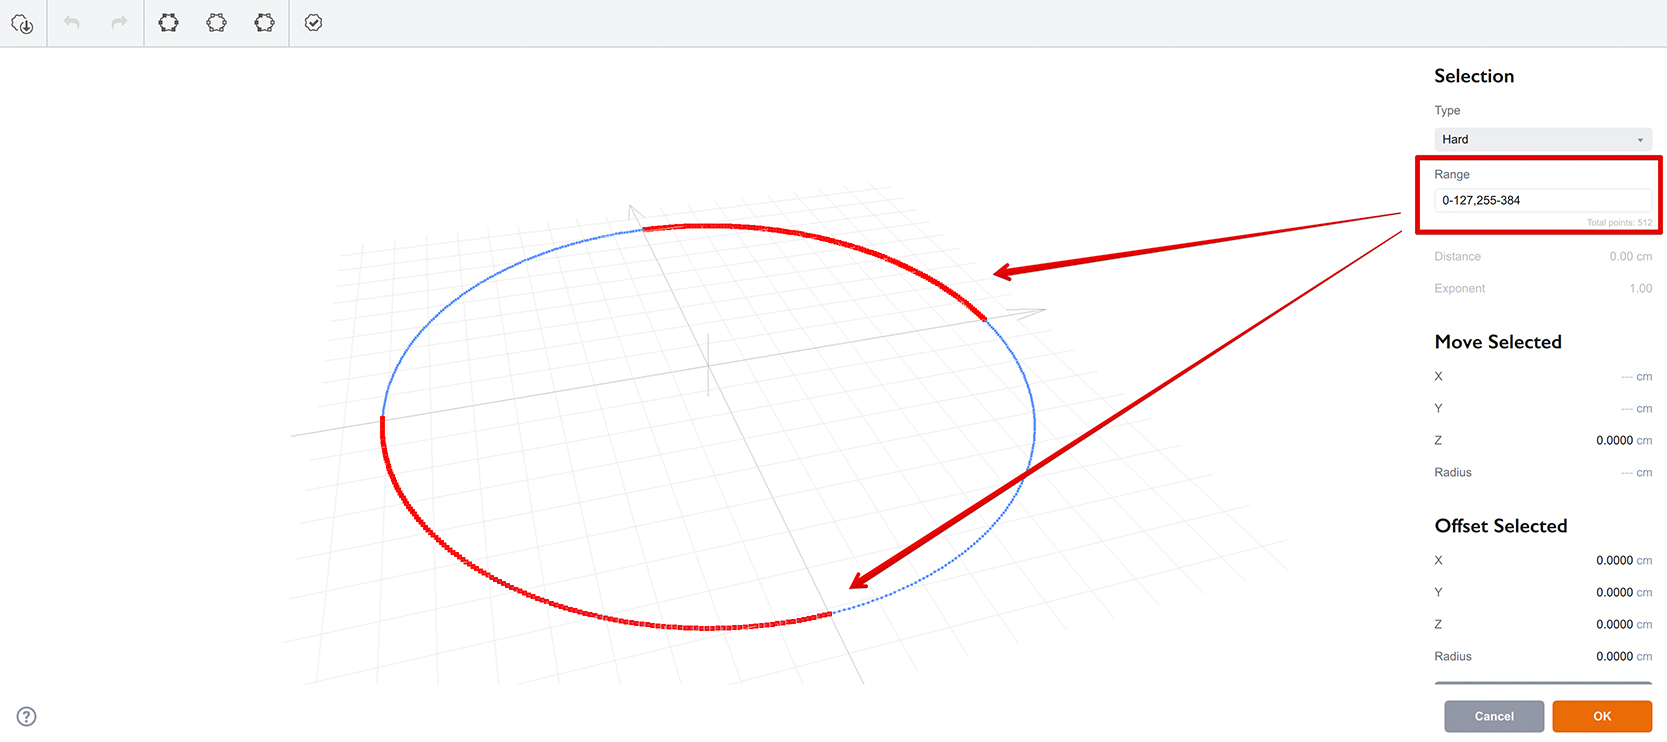
There is another field Selection Range that lets you enter the numbers of selected points instead of manually selecting them with your mouse. Shapes usually have 512 points, so in order to select half of them you can type “0–255” into the field.
Let’s Make It Wavy
Let’s make the shape wavy, so it height varies. To do so, we need to select the first and third quarters of the points. You can do so with your mouse, or by entering “0–127,255–384” into the selection range field:
Now switch to “Soft Inner” selection mode and see the difference:
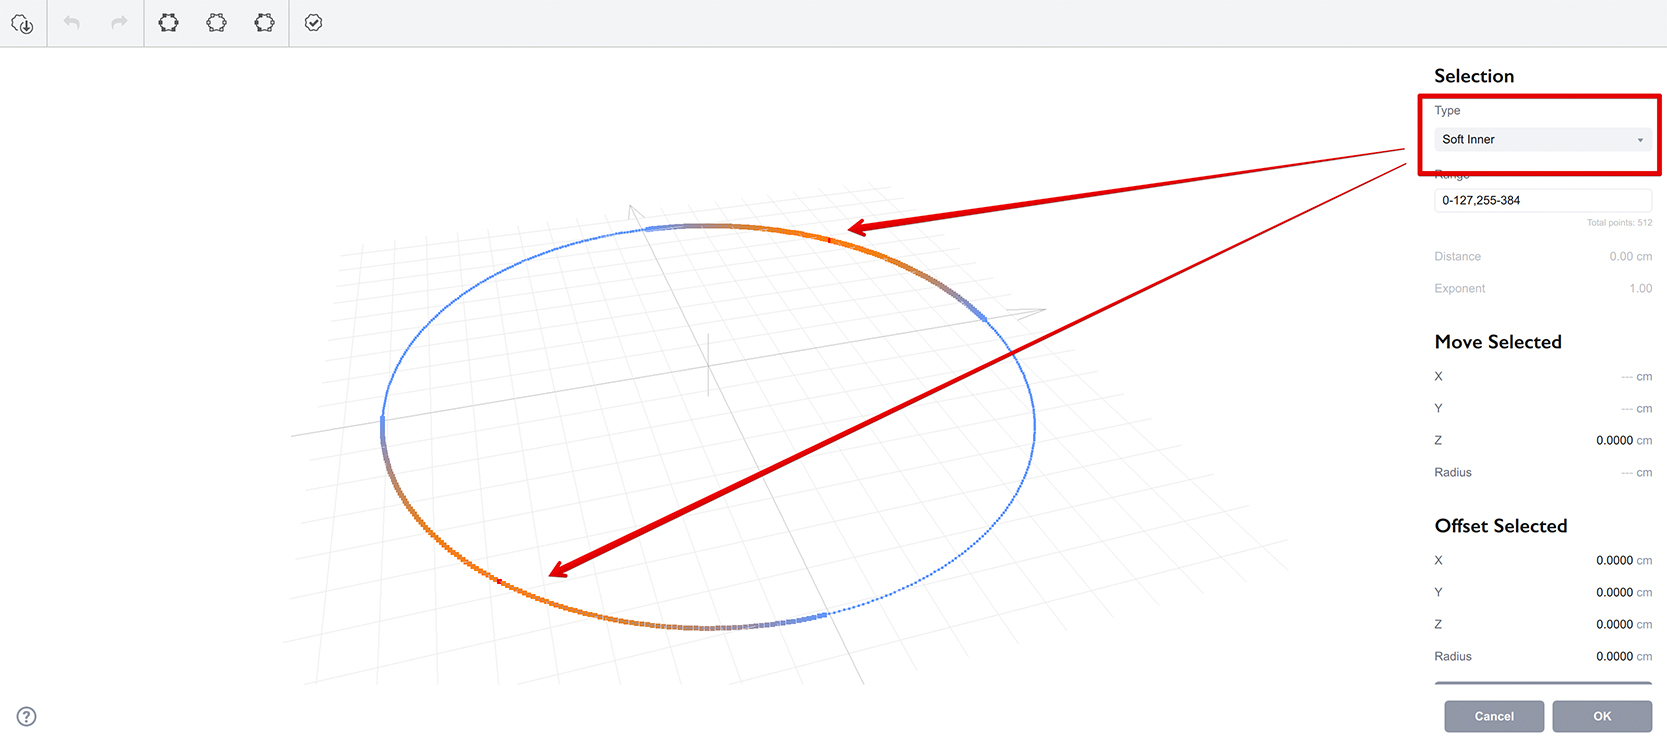
You see the color of selected points changed. The more reddish they are, the more they will be affected by the changes we’ll make. The more blueish they are, the less they will be affected.
Now go to the Z field of the “Move Selected” section, enter “1” there and press “Enter”:
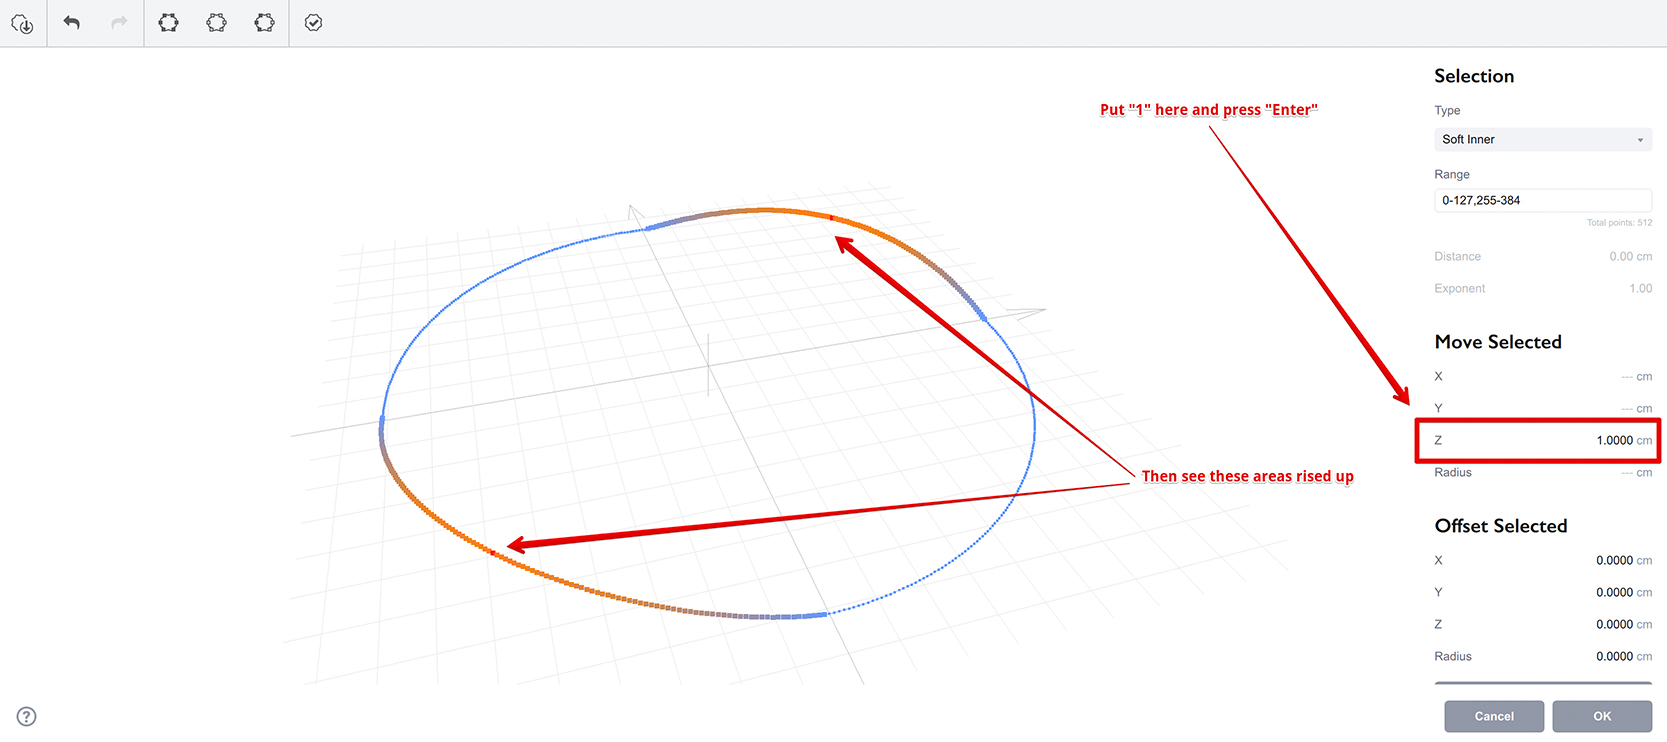
Rotate the shape with right mouse button and see the selected points moved up, and their offset depends on the selection level. The most selected one in the middle now has its Z coordinate of 1, the other ones have lower Z values from almost 1 to almost 0, depending on their distance from the center of selection.
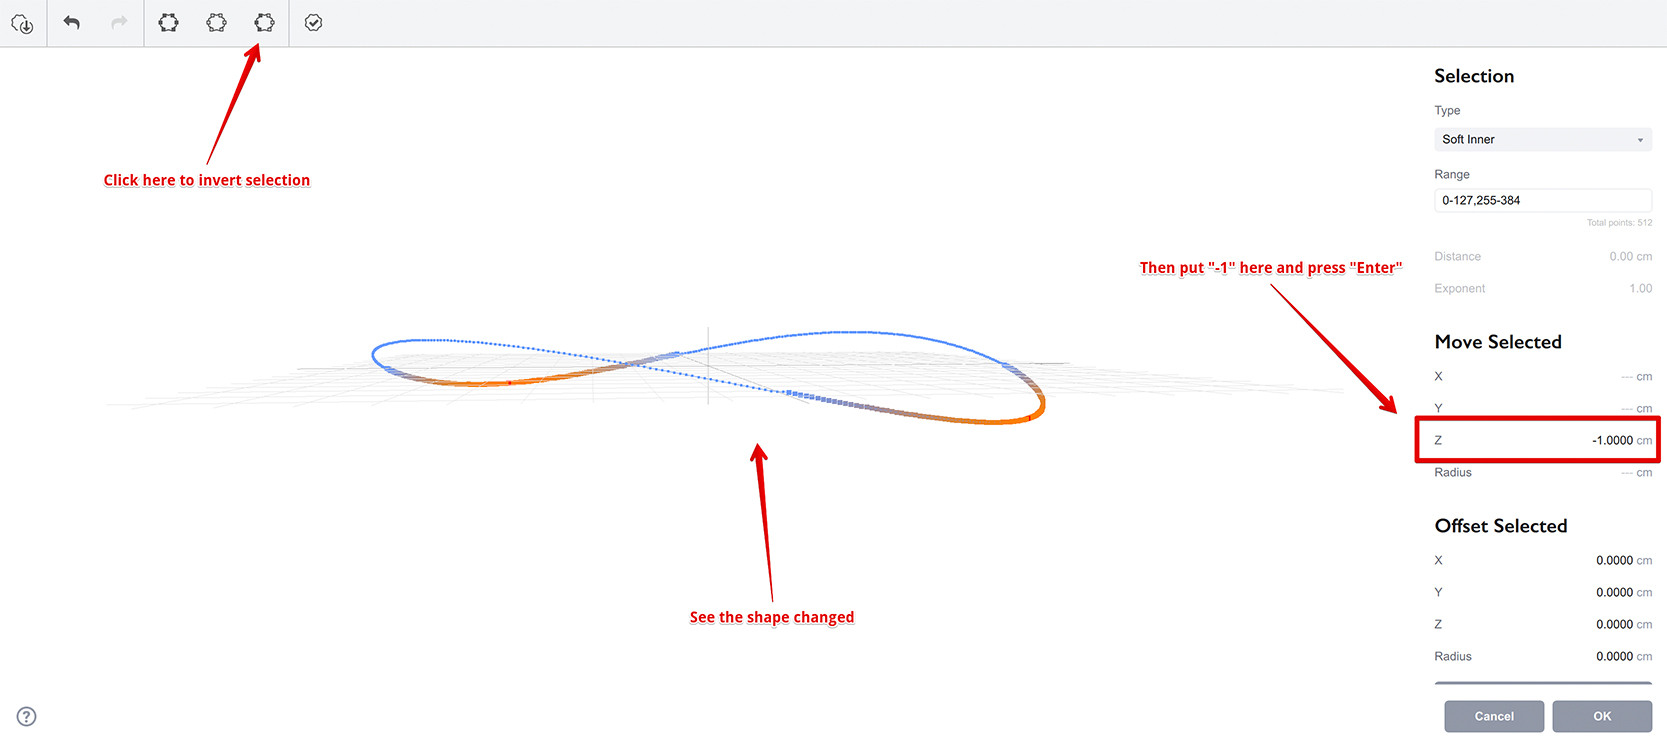
Now we need to do the same for the rest of the points, but move them down. Select the other quarters of the shape by clicking Invert Selection button in the toolbar, then enter “–1” into the same Z field:
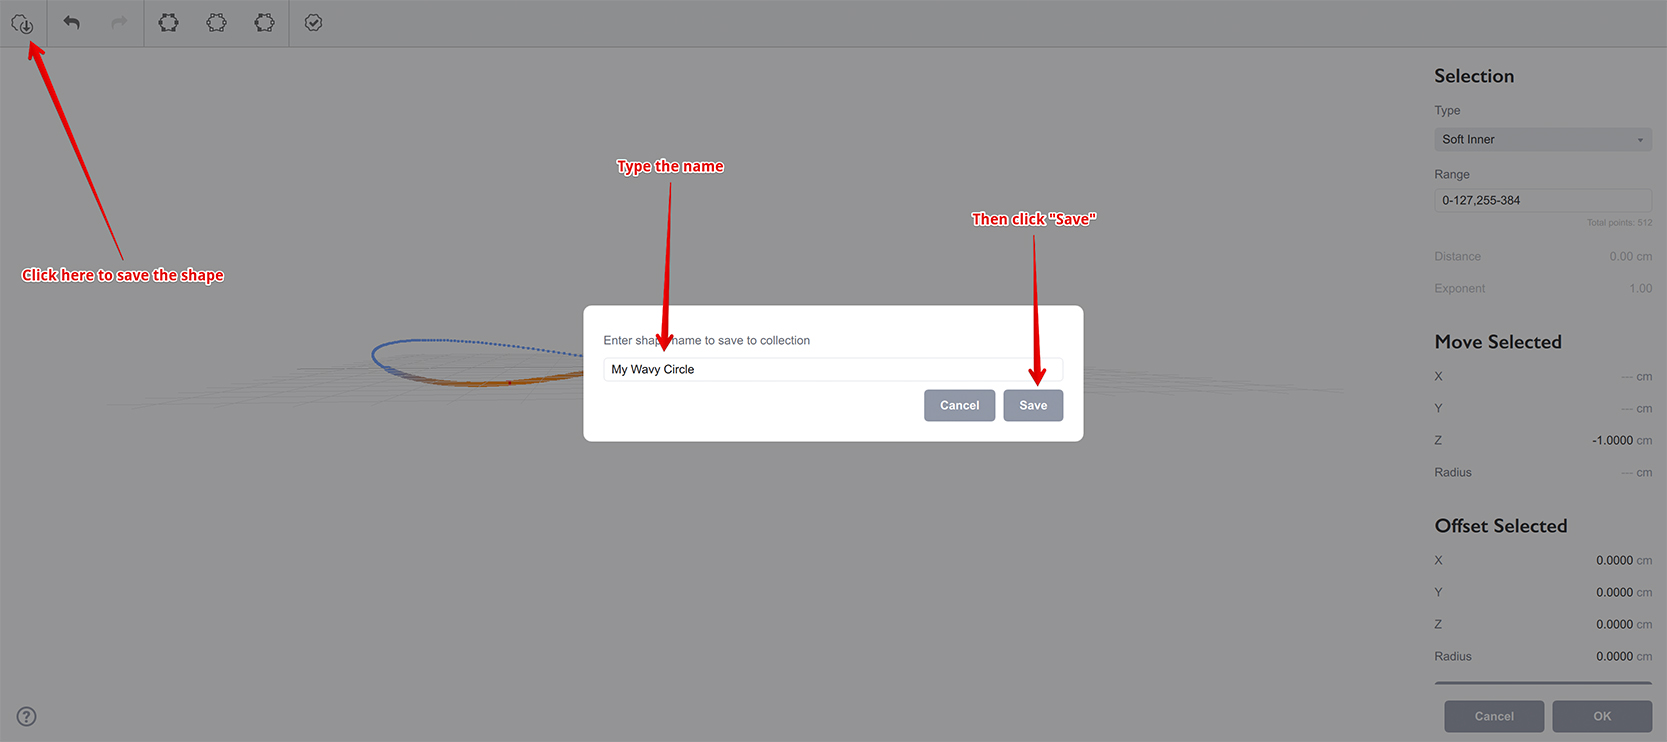
We’ve got a nice wavy shape that we can use in our loft object. We’ll need it more than once, so click Save Shape button and save it under “My Wavy Circle” name:
Now you can click OK to close the shape editor and get your shape updated in the loft editor.
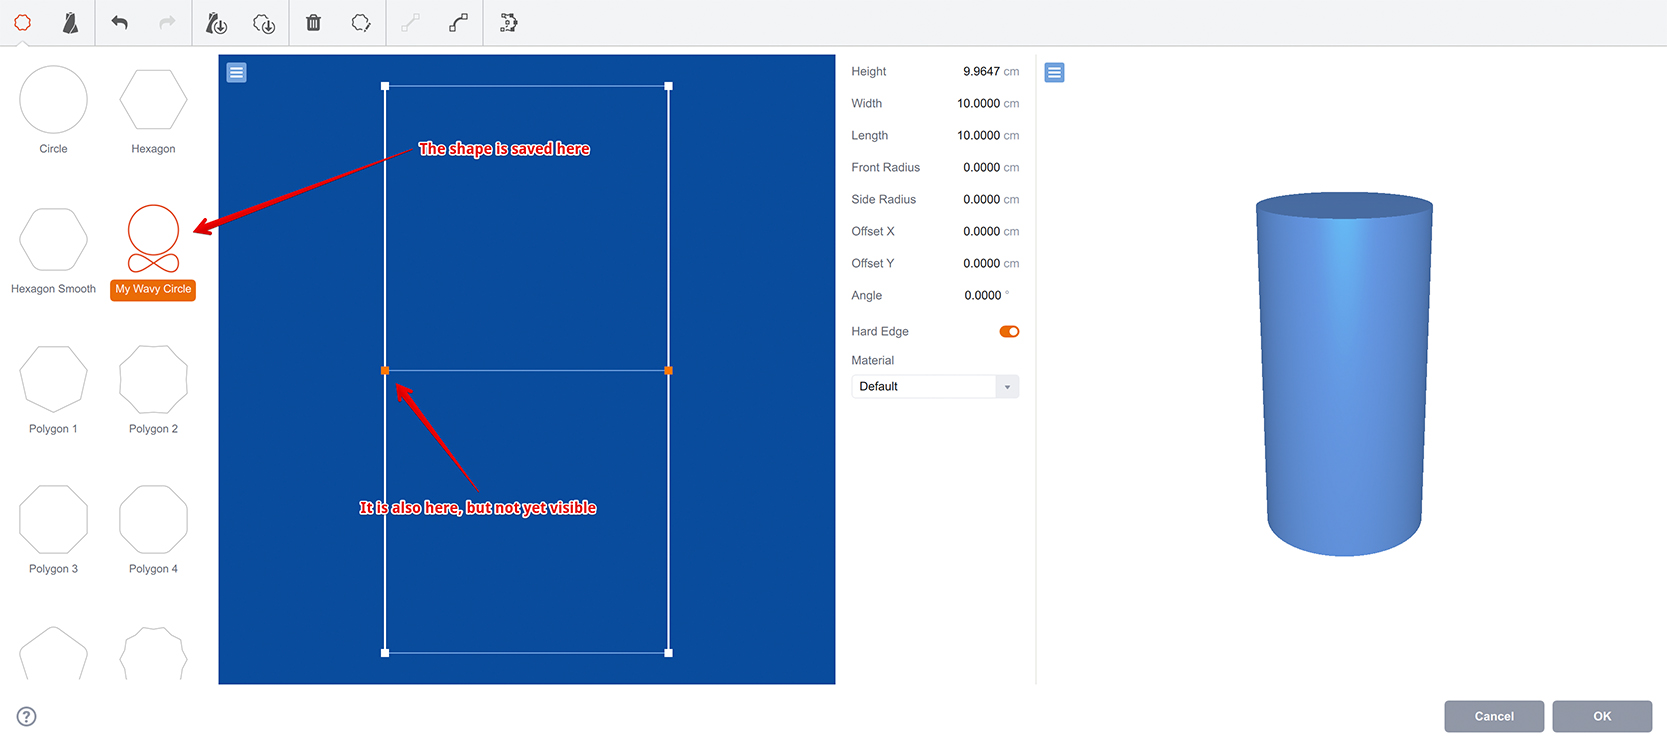
Using The Edited Shape
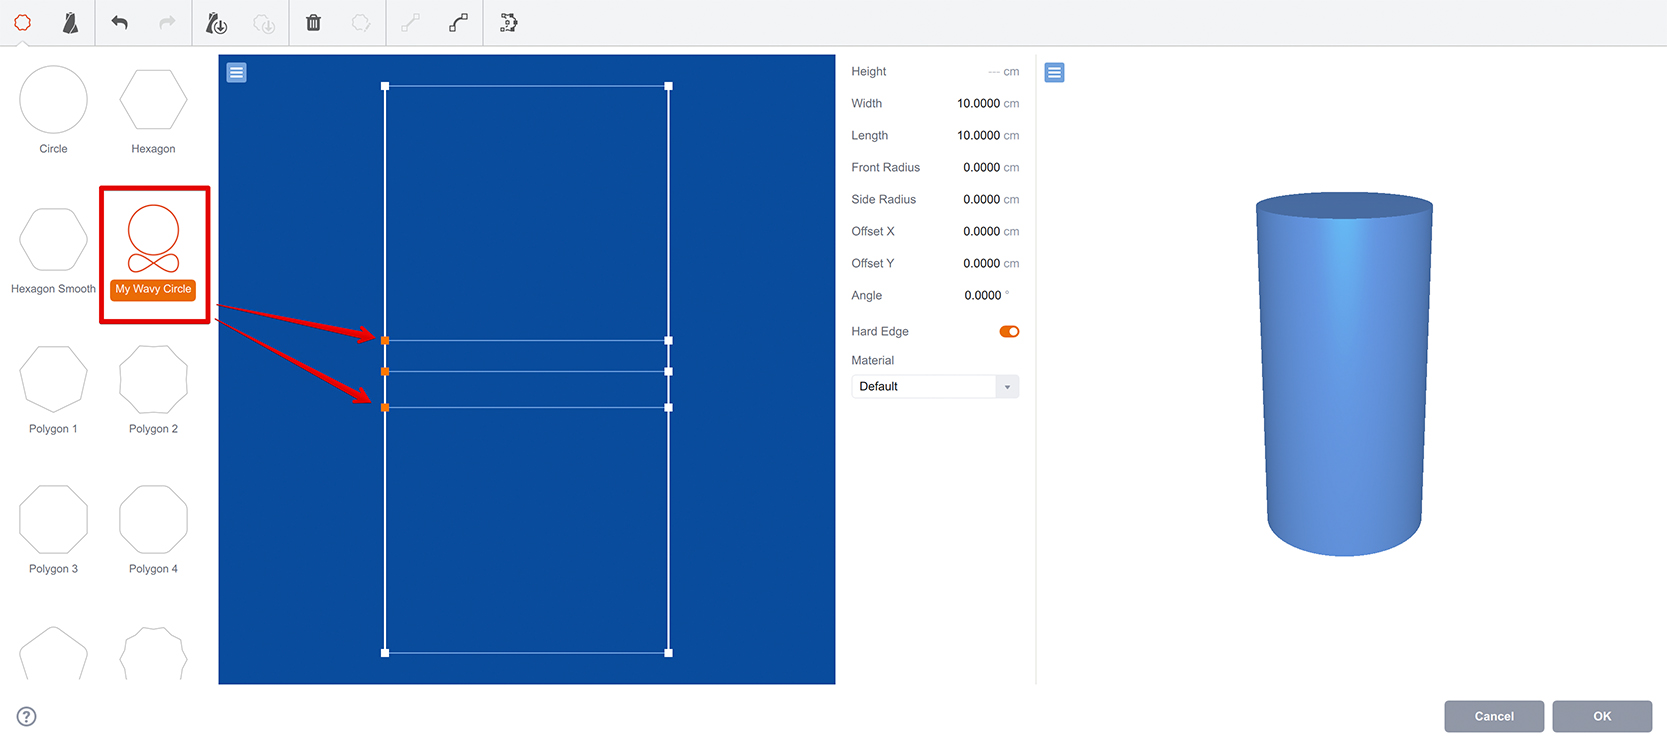
You will see your saved shape in the shapes collection. It is also applied to the currently edited loft object, but it is not visible, as it is still round:
Let’s add the newly selected shape above and below the middle layer:
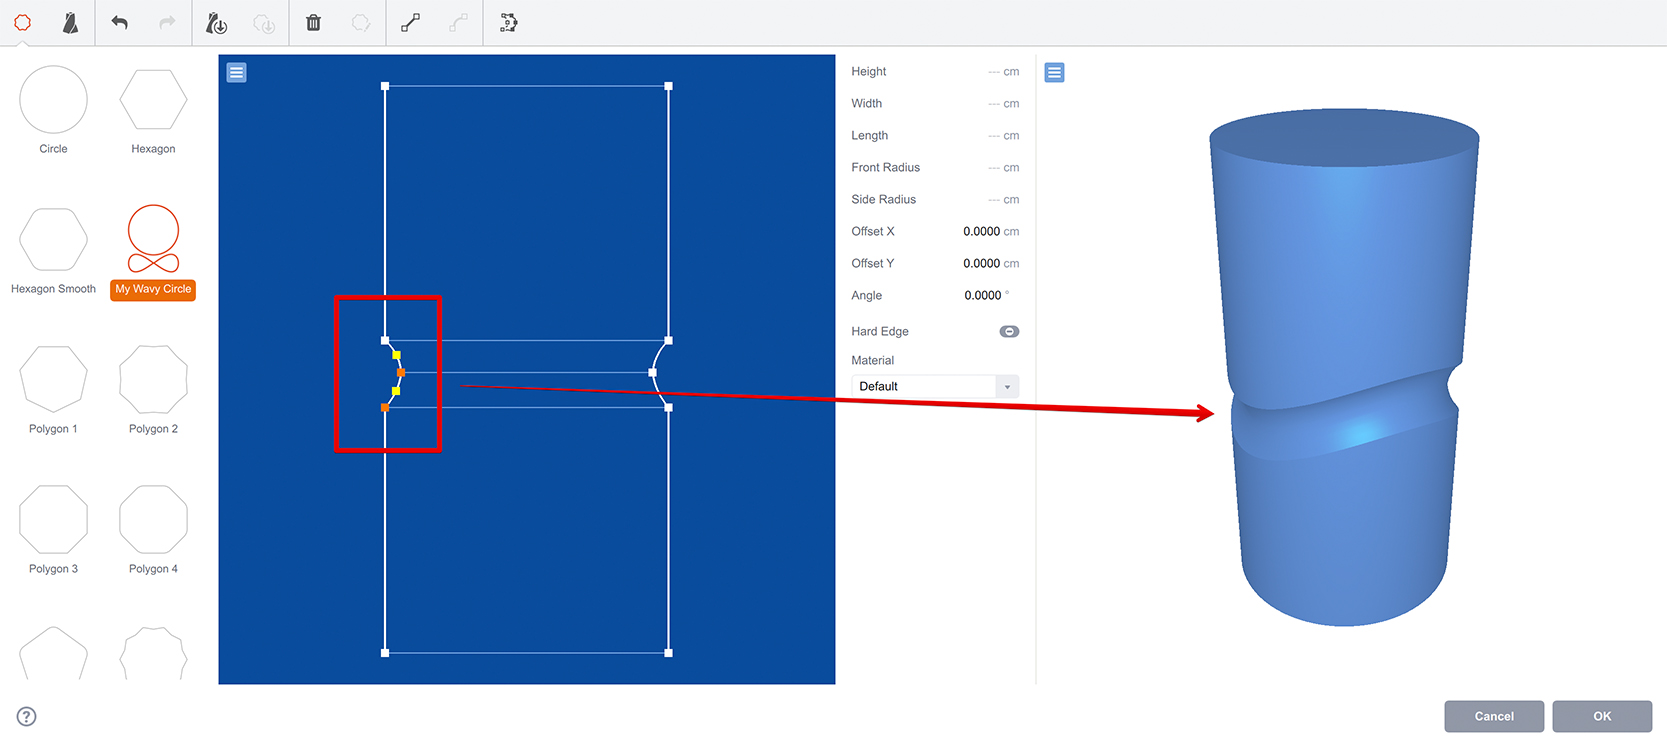
The shape contour is still not visible, so we need to make one last move. Select the middle layer and move it slightly right to scale it down:

And here it is! You see all the three middle layers are now visible and make a nice wave around the shape, like you see on the plastic bottles.
Let’s add some final touches by making the middle layer soft–edged and make both segments curvy:
Note that Boxshot displays such “non–flat” shapes differently in collection: it displays both top and side views in preview, so you can see the shape is non–flat.
Frequently Asked Questions
Can I add my own shapes to Loft Editor?
Boxshot lets you import SVG files and use them as shapes in Loft Editor. In order to import a file, open the Loft Editor window, select shapes collection at the left and drag your SVG file there. Boxshot will convert SVG files to its internal format and displays them in the shapes collection.
Can I make shapes non–flat?
Yes, shapes may have height and you can configure that in Loft Shapes Editor window. Select a shape in blueprint panel of the Loft Editor window and click Edit Shape button in the toolbar to open the editor. Read the shape editor topic above for more details.
How to assign materials to loft object?
Open loft editor and select the layer below the segment you want to assign material to. See the parameters panel at the right of the blueprint editor. There will be Material field at the bottom. You can type the material name there, or use the existing one from the drop down list.
Exactly as with lathe objects, Boxshot will join sections with same materials and make shared UV mapping for them.
How to avoid adding top and bottom caps to loft object?
Boxshot automatically adds top and bottom caps to loft objects and the only case when it doesn’t do so, is if the heights of both first and last layers of the loft object are the same. In that case Boxshot doesn’t add caps and you can make objects like thick pipes.
More Tutorials
Rendering
- Realistic Rendering — improving scenes visual appearance;
- Lighting — control environment and directional lighting;
- Saturated Reflection — make "rich" colorful reflections;
- Floor Reflection — reflecting scene objects in the floor;
- Job Manager — rendering jobs later;
- GPU Rendering — rendering scenes faster on GPU;
- Rendering Time and Quality — getting more control on rendering;
- Simple and Realistic Lighting — speeding up scene rendering.
Materials
- Texture Slots — how to use texture slots in Boxshot;
- Glass Materials — how to make semi–transparent objects look attractive;
- UV–Spot — how to make a UV–spot effect easily;
- Foil Effect — how to add foil–finishing to your shapes;
- Bump — adding relief to your materials;
- Copying Materials — how to copy materials to other shapes;
- Custom Materials — extend the materials library with your own ones;
- Semi–Transparent Labels — making semi–transparent and partial labels;
- Boxshot Materials — more details about Boxshot materials.
Features
- Boolean Operations — combining and subtracting shapes, making holes;
- Decals — applying decals and configuring them;
- Bump Decals — applying bump where it is needed;
- Depth Of Field — adding more realism to your renderings;
- Tools — read more about Boxshot tools;
- Managing Images — how to manage image files used by Boxshot projects;
- Shapes Instances — creating lightweight copies of other shapes;
- Model Editor — edit embedded models in many ways;
- Shrink Wrap — heat–shrink film simulation for objects wrapping;
- Physics Simulation — applying gravity to your scene;
- Palletize — arrange scene objects for the pallet;
- Snapshots — save scene state to re–use it later;
- Translation — teach Boxshot to speak your language;
- Vector Artwork — how to maintain the quality of vector artwork.
Shapes
- Lathe Objects — making symmetrical objects using revolving curves;
- Loft Objects — making custom objects with 2D cross–sections;
- 3D Text — making 3D text objects in Boxshot;
- Extruded Objects — how to make thick 3D object of your flat 2D curve;
- Conical Labels — making conical labels with distorted artwork;
- Dieline Box — a very realistic dieline–based box;
- Custom Shapes — adding custom shapes to the left panel;
- Solid Shapes — create boolean-friendly shapes;
- Script-Based Solids — create complex solid shapes with code;
- Third Party Shapes — importing third party shapes to Boxshot.