Lathe Objects
Boxshot lets you create symmetrical objects like bottles, vials and cans by revolving a curve around the vertical axis. You can then assign different materials to the resulting shape’s elements to customize the object’s appearance.
The object is called Lathe and is located in the CAD section of the Shapes panel.
Creating a Lathe Object
Let’s start with creating a new empty scene in Boxshot and adding the Lathe object to it:
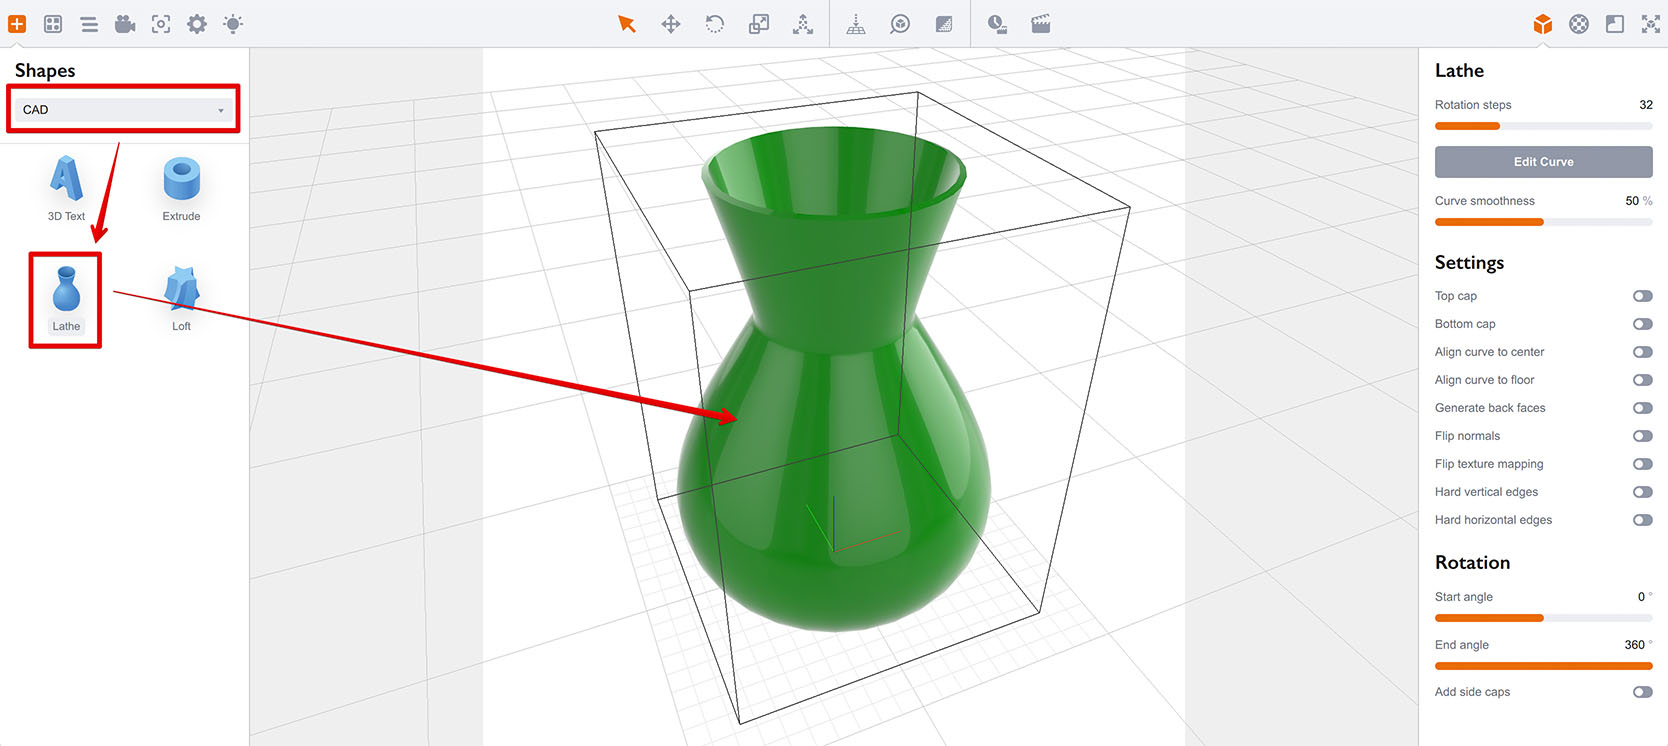
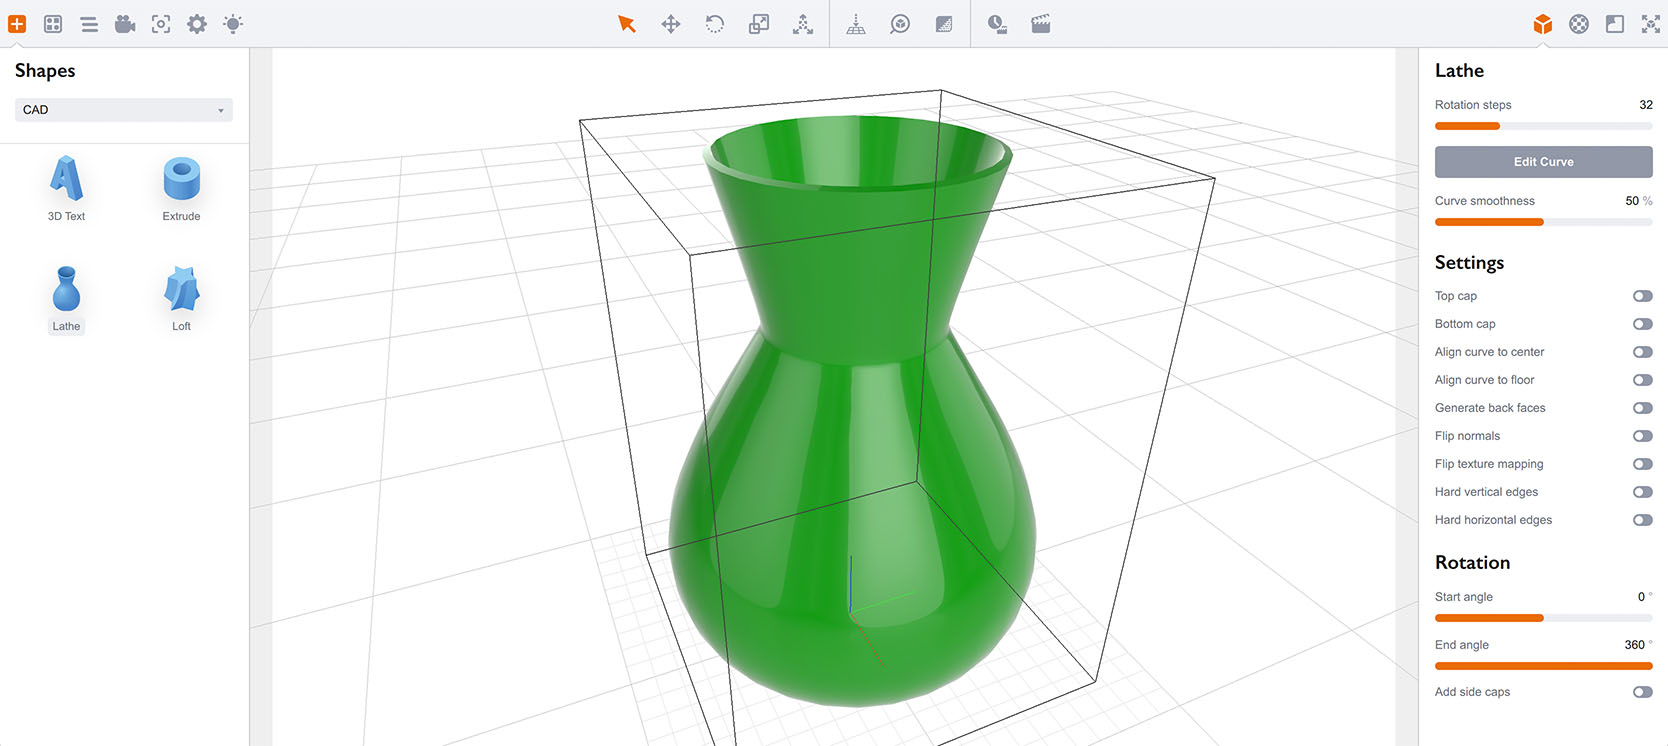
Select CAD in the shapes drop-down list, then select the Lathe object below and drag it into the scene. A green vase object will be added — that’s the default appearance of the Lathe object.
There are multiple parameters on the right that we’ll cover later. Meanwhile, just click the Edit Curve button to open the Lathe editor.
Lathe Editor
The lathe editor displays the revolving curve in 2D and lets you edit it to get the shape you need:
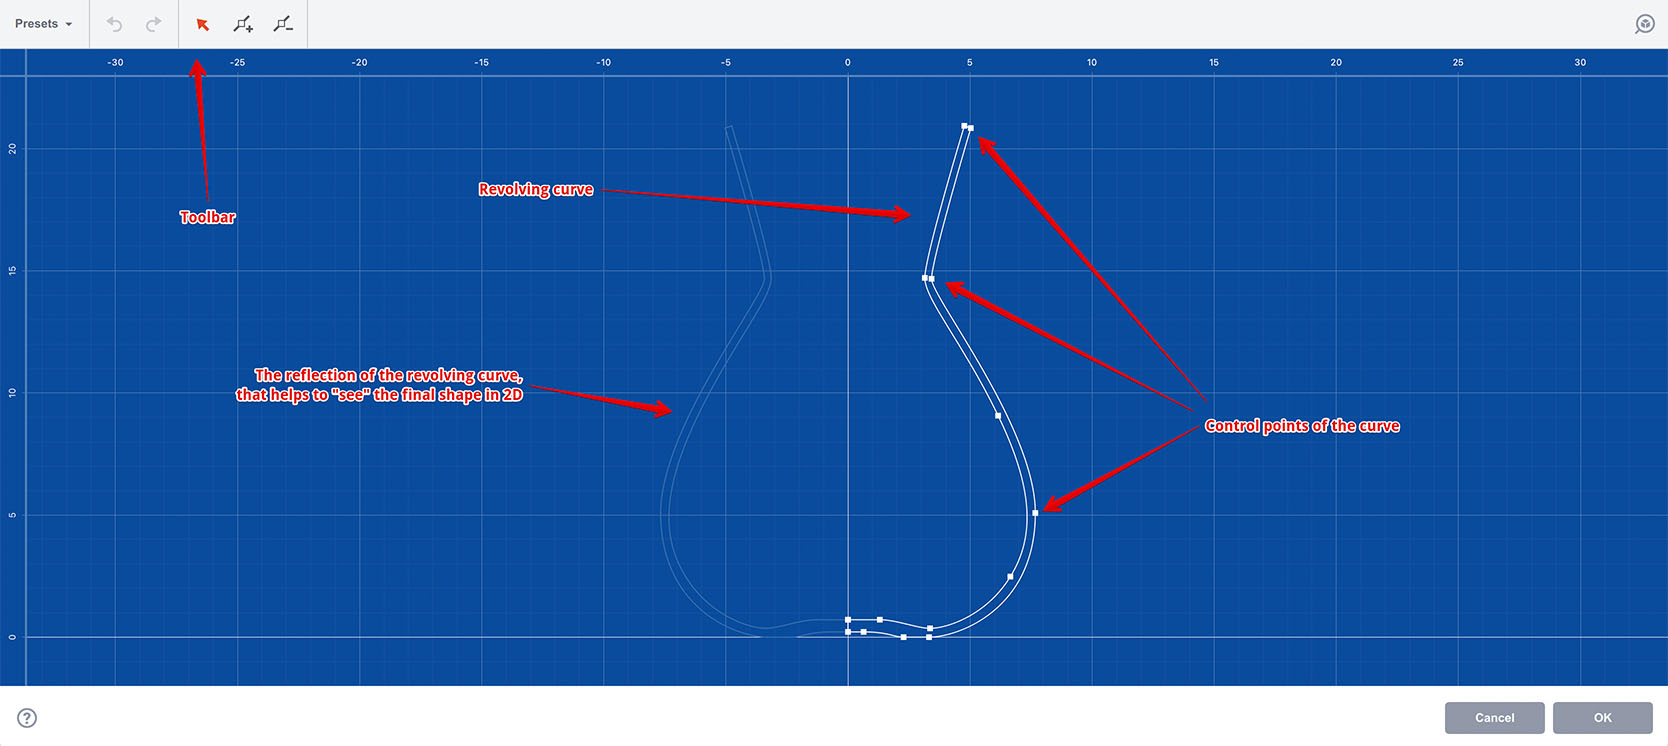
On the top there is a toolbar which lets you select a preset, load and save the curve as an SVG file and select, add or remove control points. The toolbar also displays some context information explained below.
In the middle there is a blueprint with the curve that you can adjust by dragging handles, and finally there are OK and Cancel buttons that let you commit or roll–black your changes.
Importing Curves
Although Boxshot lets you edit Lathe curves straight away, you might find it more convenient to use a vector editor like Adobe Illustrator or Affinity Designer for that.
When Boxshot imports 3rd party curves it expects to find a single solid curve line in the imported file. If it fails — you will get an error message and the curve will not be imported. In that case consider joining all the segments into a single line and make sure that there is one and only line in the exported file.
Here are the SVG exporting settings for Adobe Illustrator (make sure you use File → Save As… in Illustrator, not the Export option):
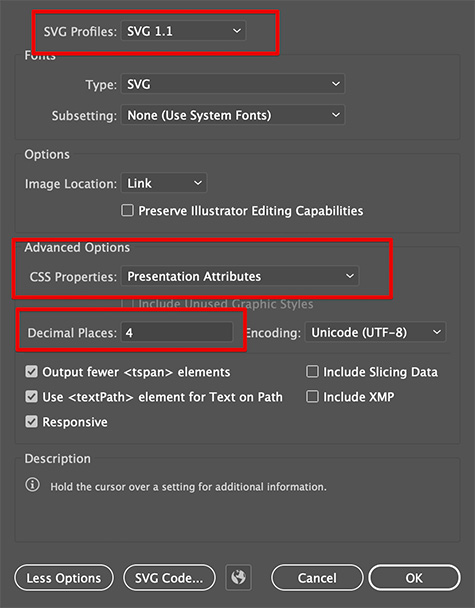
The main options to consider are: SVG Profile 1.1, CSS properties as presentation attributes and at least 4 decimal places precision, 6 is even better. For Affinity Designer and other vector editors consider using similar export options to make sure the file can be imported to Boxshot.
Once you exported the SVG file, click Presets → Load Preset… in the toolbar and select the SVG file, or simply drag and drop the SVG file onto the blueprint. You should see it loaded like this:
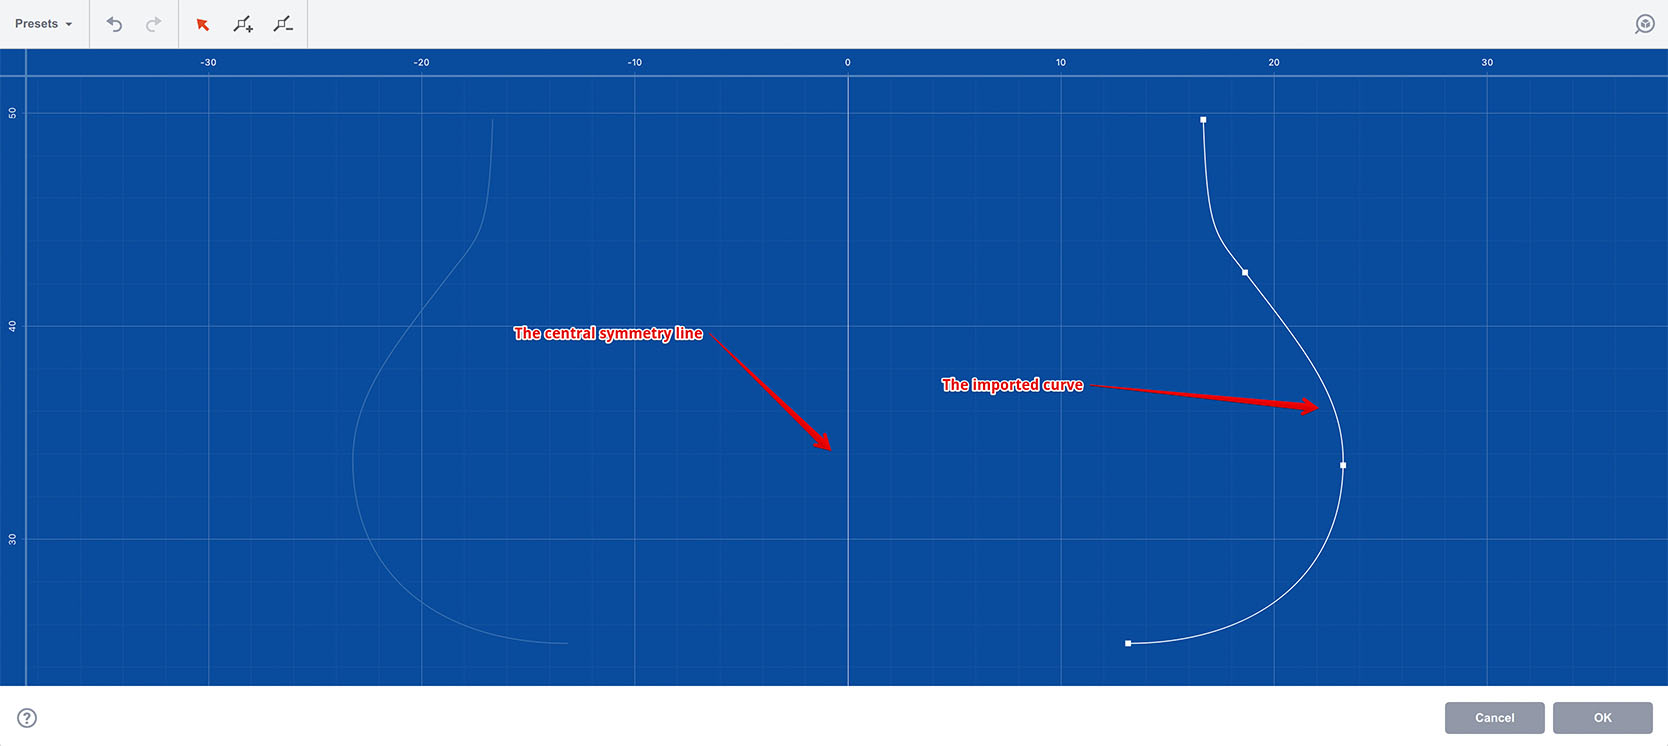
As you can see, the curve is loaded away from both vertical and horizontal axes, as Boxshot doesn’t automatically center curves for you. Consider placing the curve at the bottom left corner of the artboard in Illustrator (or your other vector editor) if you want it to be loaded at the zero point.
Here I did that and re–loaded the curve:
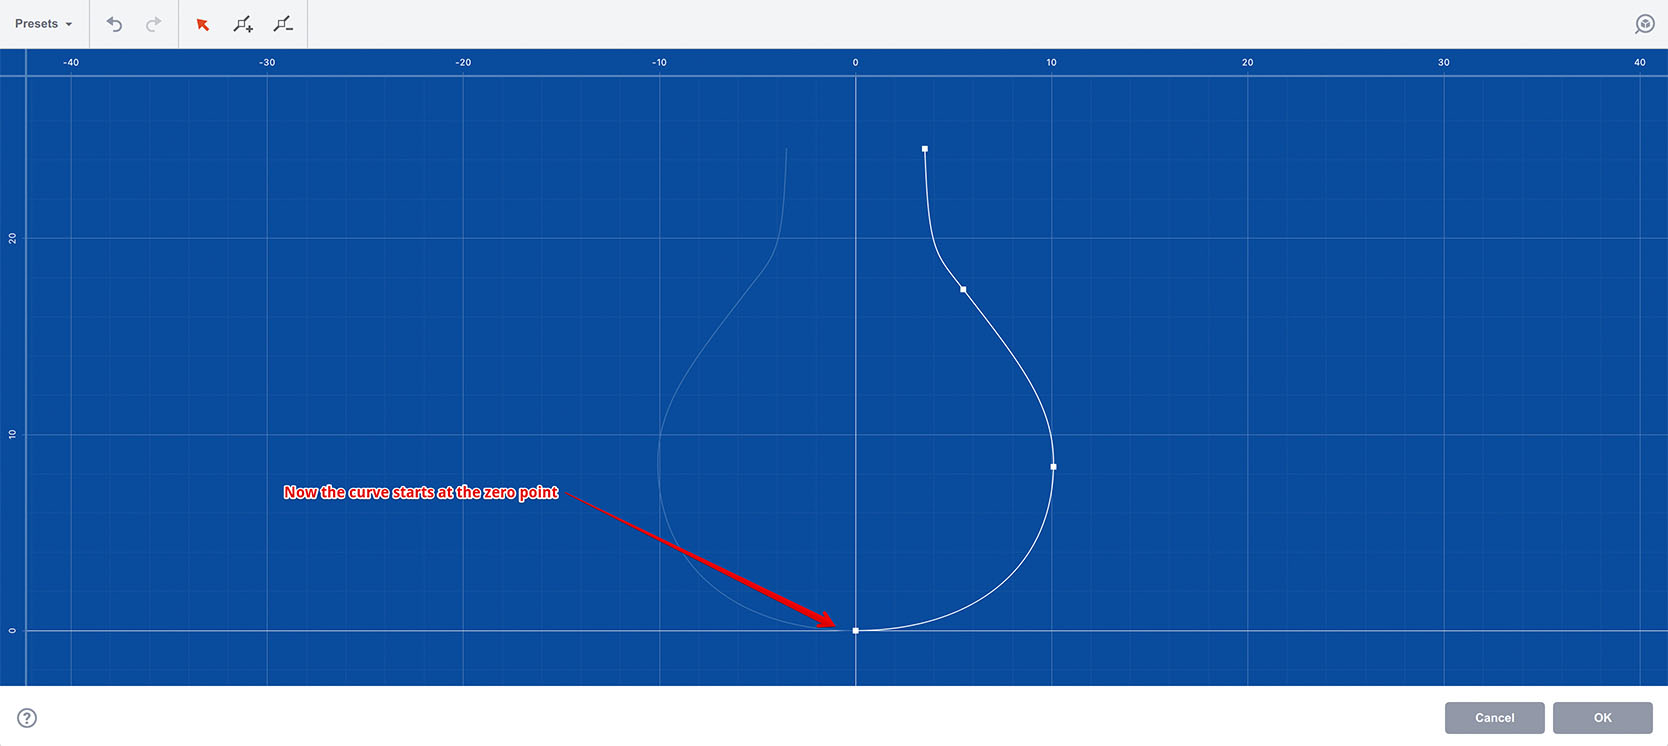
Here the curve starts right at the intersection of the axes at the zero point. Now we can click OK and instantly get a 3D model created for us.
Possible Issues
After importing or editing the curve you can end up with a weird–looking and not very usable shape. That’s normal and can be fixed easily.
Let’s continue with the curve we imported above. After committing the curve editing, we ended up with this:
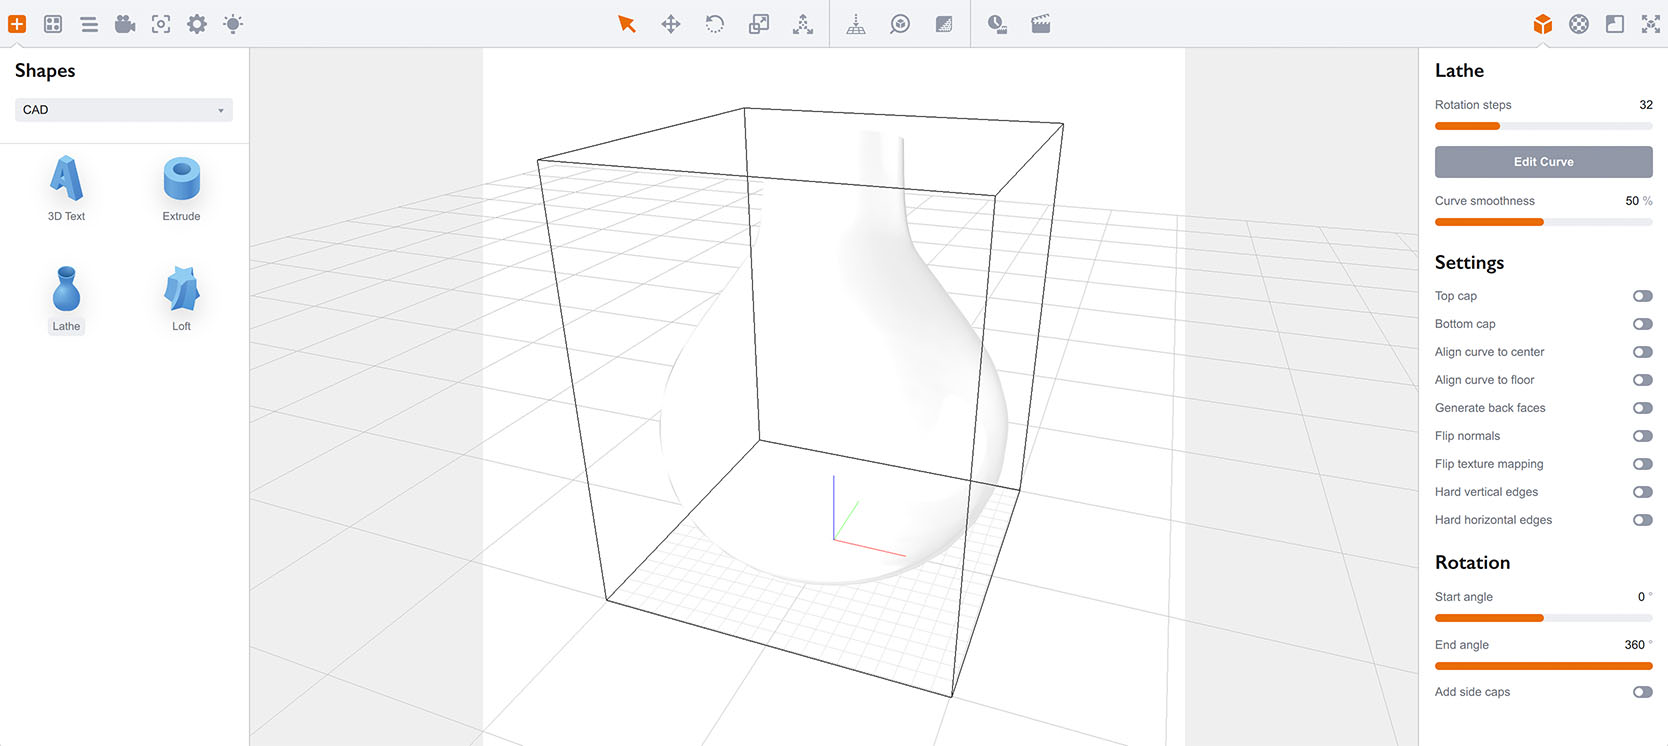
The model is not clearly visible as it uses a default white material. Let’s adjust it to have color and texture:
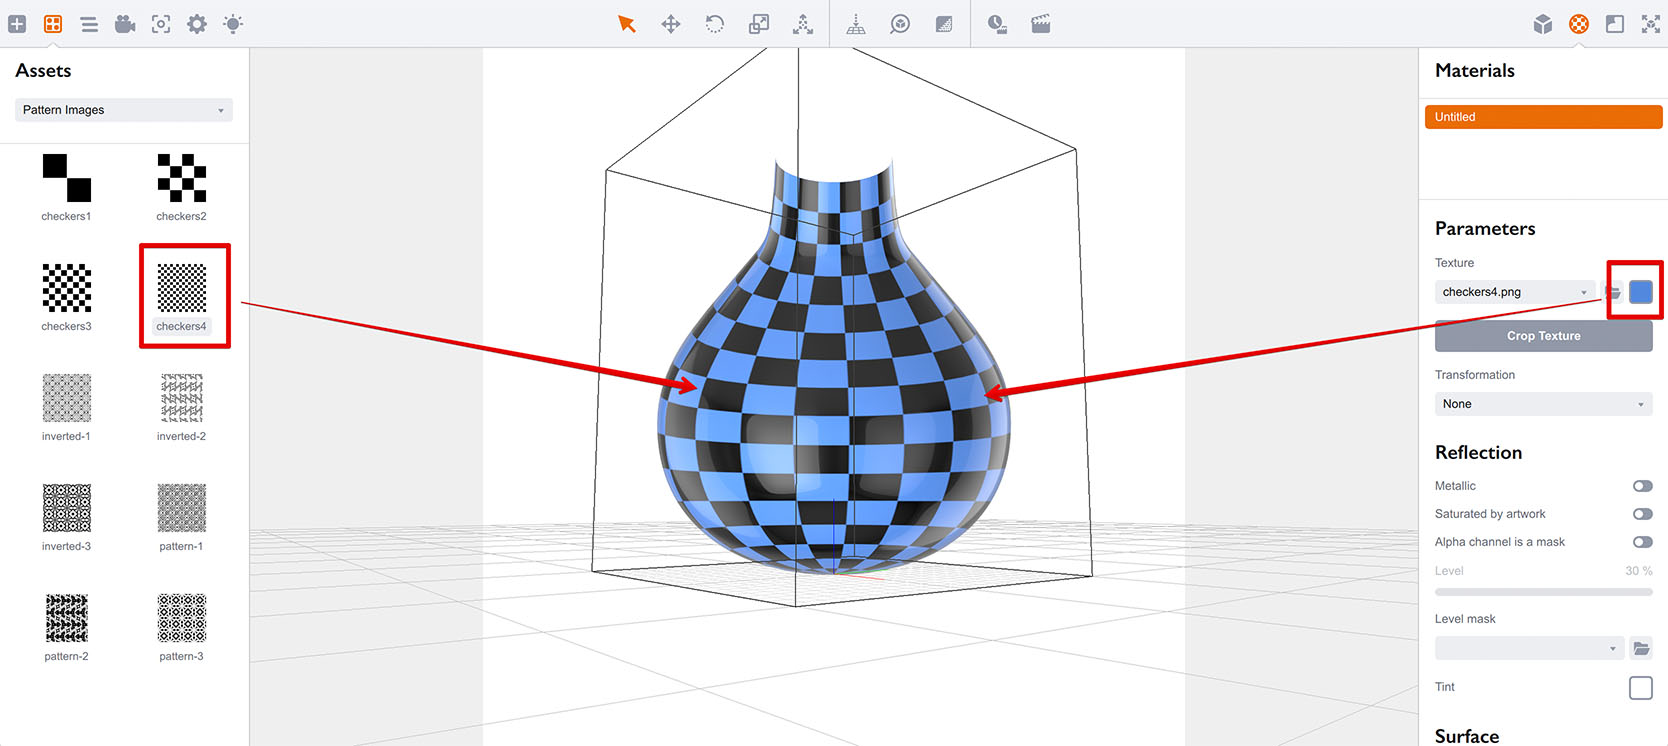
After applying the color and texture we can see the shape, which looks weird when you move around. This happens if Boxshot detected the curve direction wrong and basically generated “inverted” model. To fix that you need to check the Flip Normals option of the lathe object:

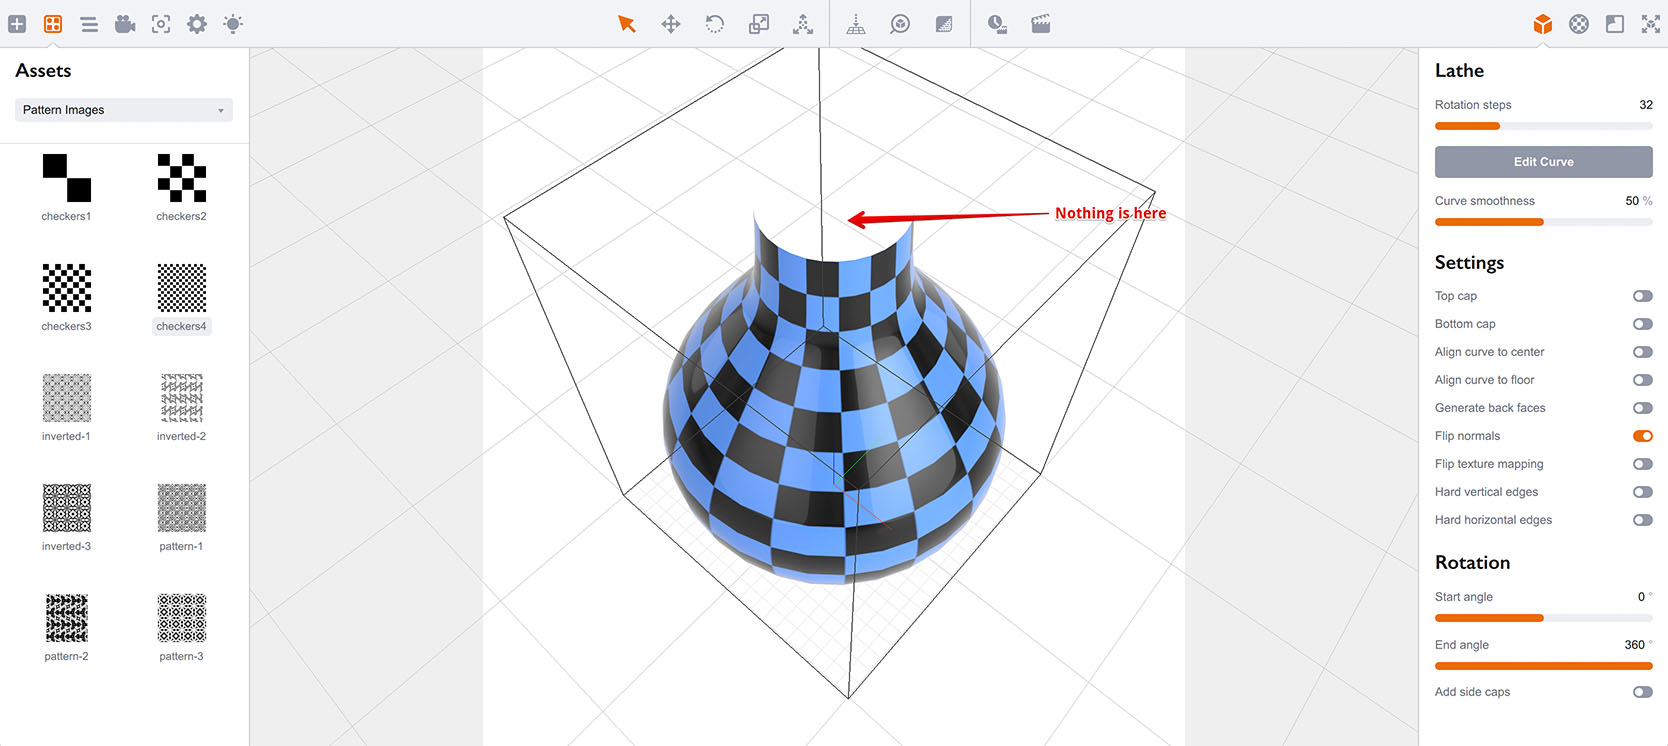
Note that you don’t always need to flip the normals, as this depends on the way you created the curve. Making it from bottom to top usually gives you a proper shape straight away. So only flip normals when the shape is inverted.
Now if you look to the shape from the top, you’ll notice it is transparent from the inside:
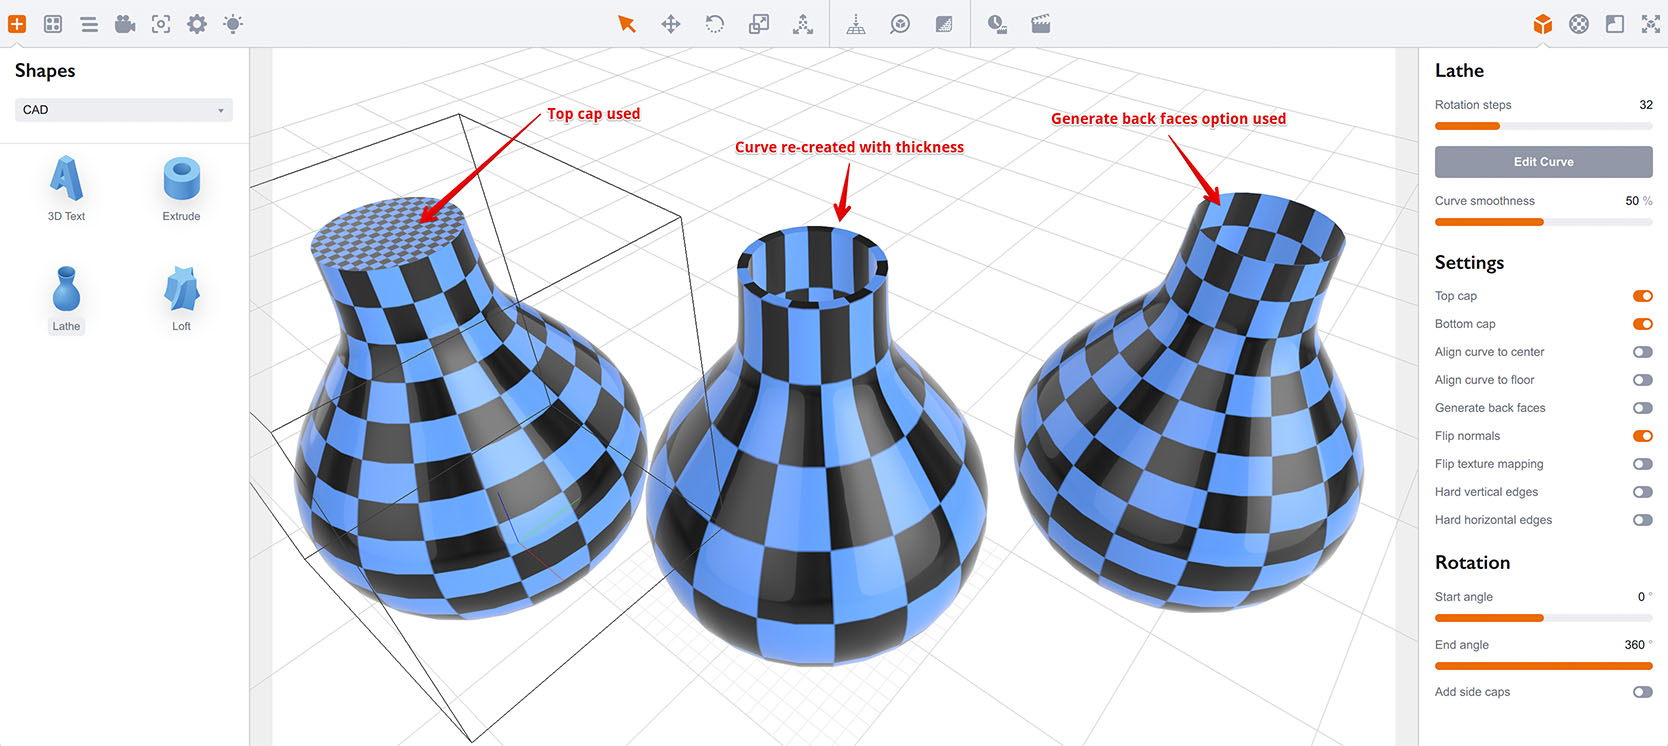
The reason is that Boxshot generates single–sided models by default, so as long as there is no inner surface defined in the curve, you will end up with outside geometry only. There are three ways you can fix this:
- If you need a solid object like cylinder, you can use Top cap and Bottom cap options to close the holes;
- If you want thick walls say for glass effects, you need to edit the curve and add the inner outline there;
- If you simply need a back wall without any thickness, you can use Generate back faces option.
Here you can see the result of all three options:
Sometimes you might also need to use the Flip texture mapping option to sort out the curve direction issues. It is hard to tell which option will work for a particular curve, so give them all a try until you get the expected result.
Editing Curves — Points
You can make small adjustments to the curve or make complex curves from scratch right in the lathe editor. Let’s go back to our curve and see what can be done:
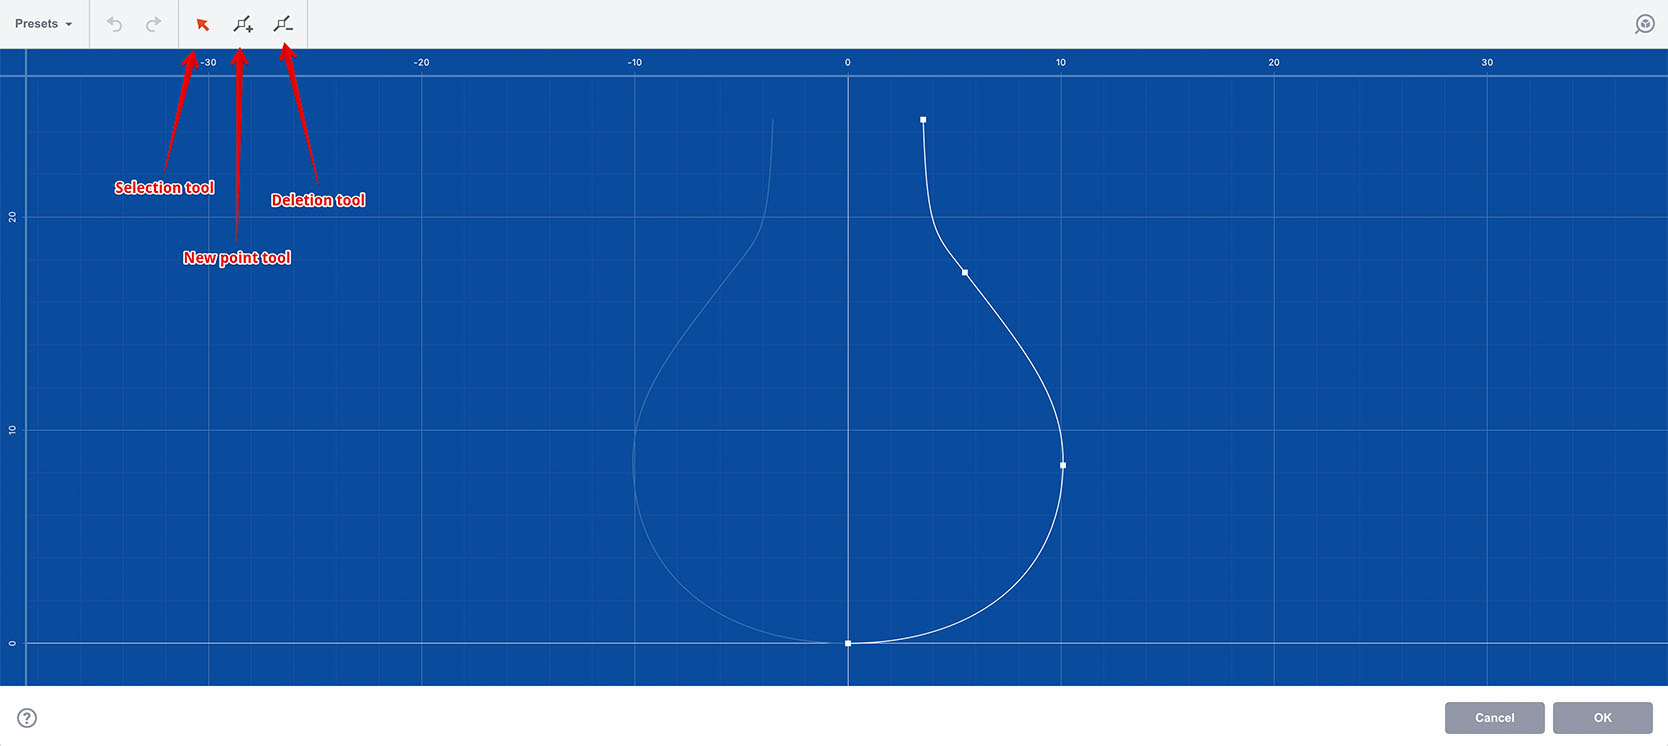
There are three buttons in the toolbar that control what happens when you click a curve point: selection, addition and removal. On the screenshot above we are in the selection mode, so let’s click a handle:
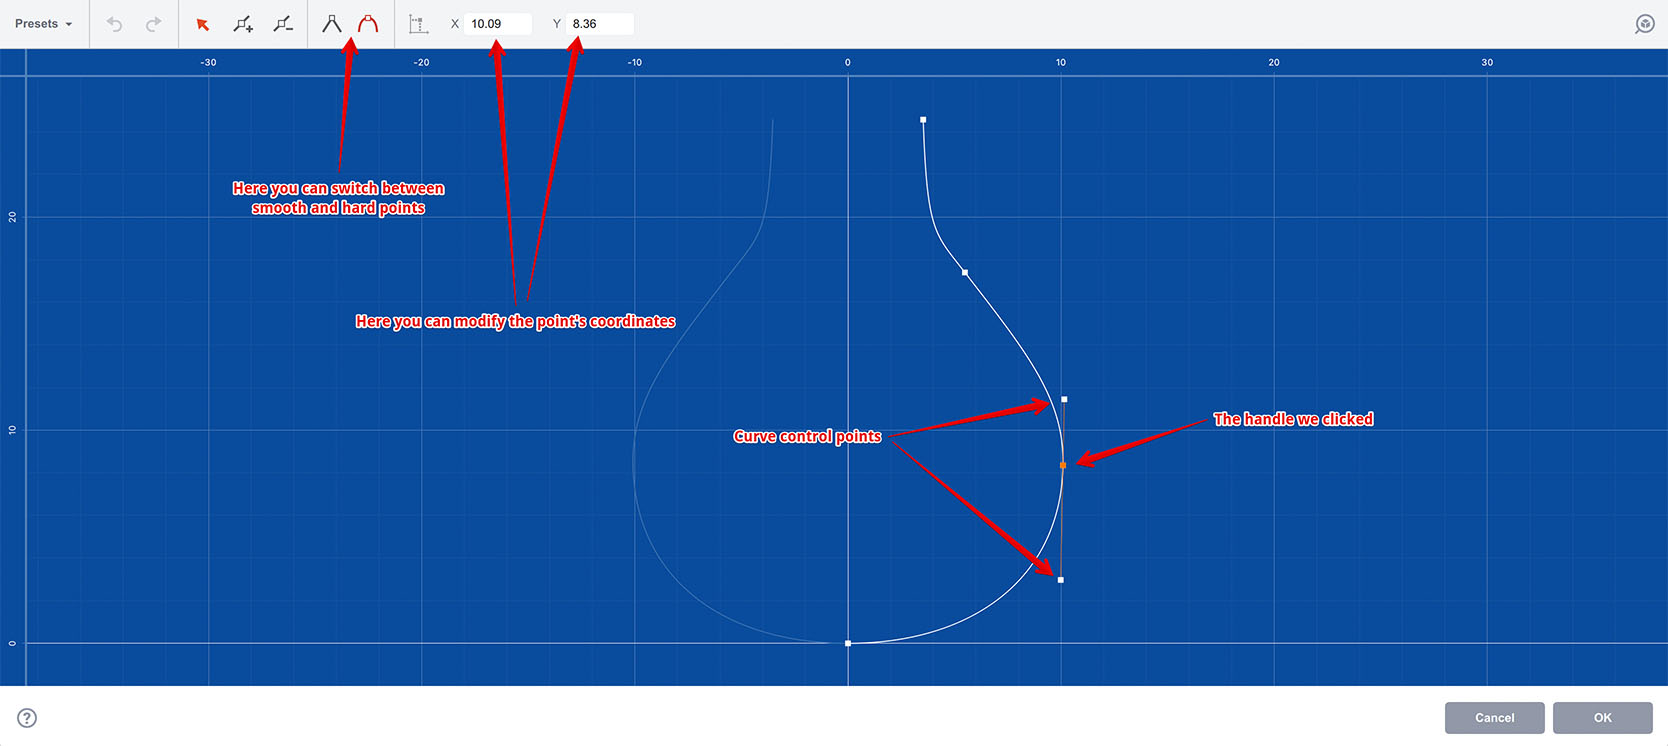
Once you clicked a point, it is selected and curve control handles are displayed nearby. Now you can drag the point and use the control handles to adjust the curve around the point — pretty much as with any other vector editor.
You can also manually adjust the point position using the coordinates field in the toolbar. Finally, you can switch between soft and hard points using two other buttons in the toolbar, again as in many other vector editors.
Addition Mode
Let’s now switch to the addition mode by clicking the icon in the toolbar and then click somewhere on the curve:
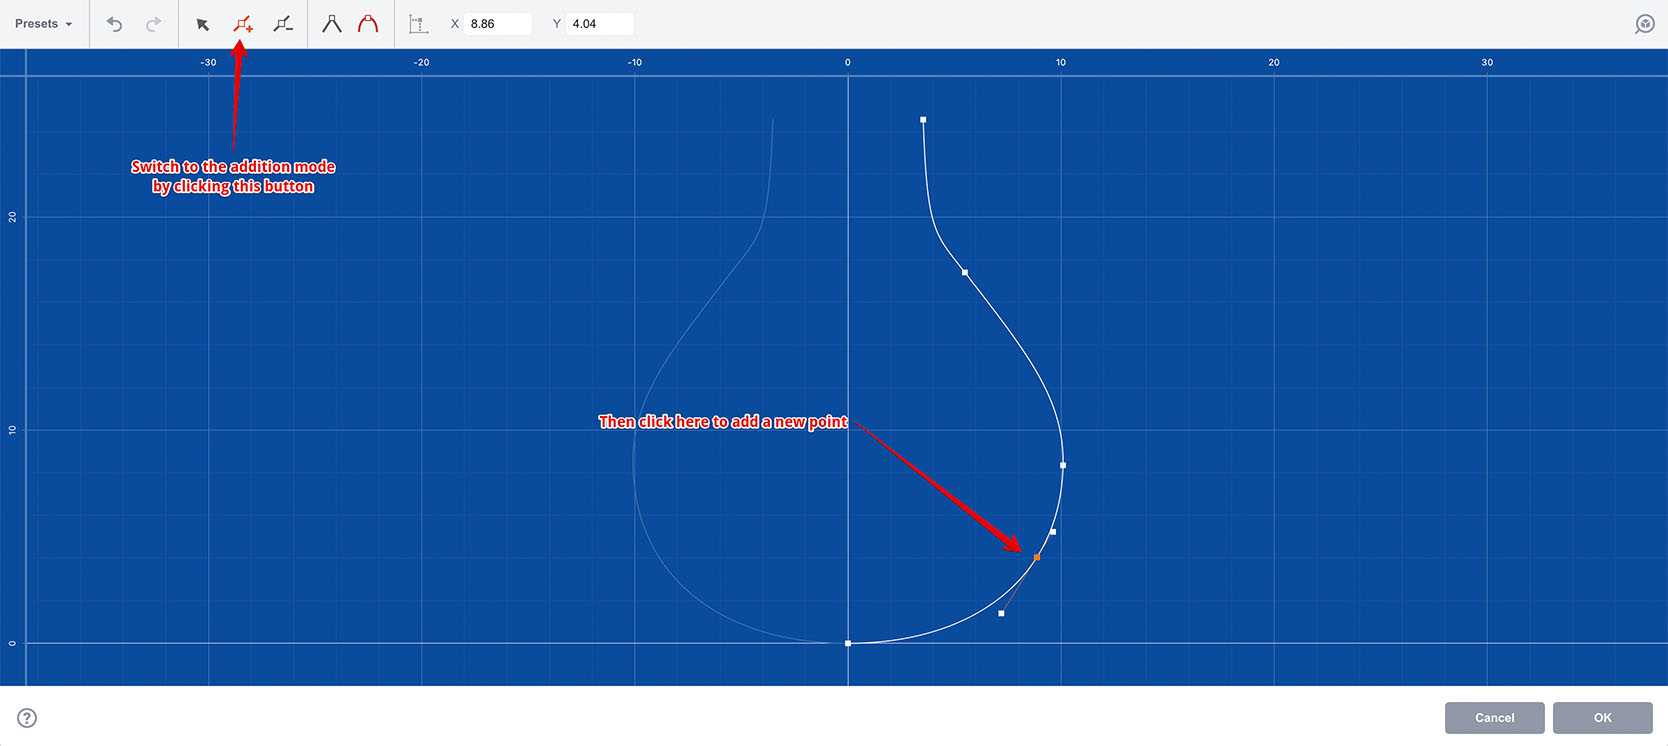
Once you clicked the curve, a control point is added to that place. You can now click the curve somewhere else to add more points, or start dragging the point you’ve just added to switch back to the selection mode.
Deletion Mode
Finally, you can switch to the deletion mode by clicking its button in the toolbar. Now any point you click will be removed:
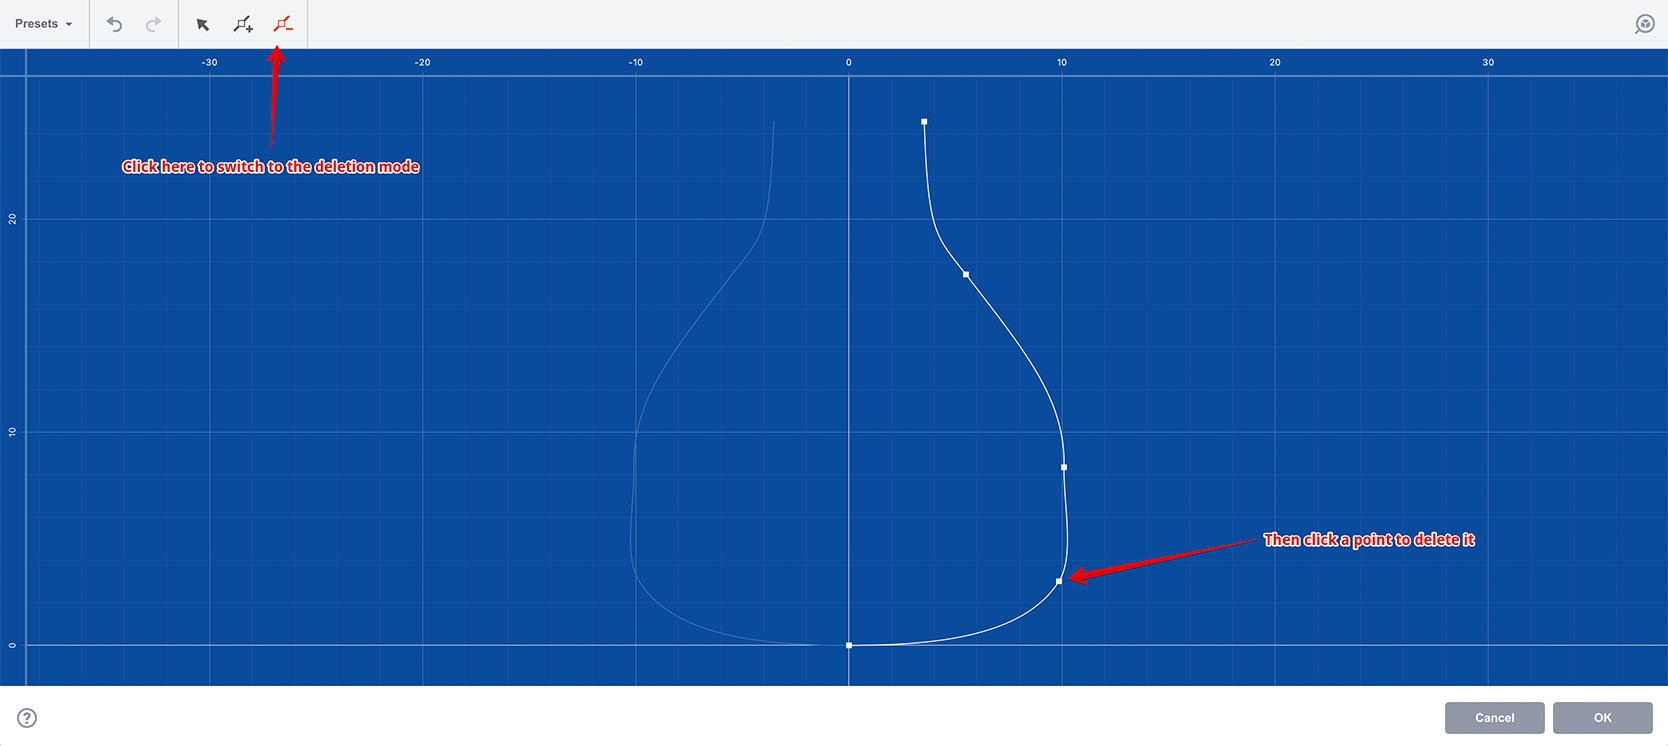
Note that you cannot remove the last two points, as Boxshot still needs at least a single segment to build the shape.
Editing Curves — Segments
In selection mode you can also select curve segments. Here I clicked a segment in the middle of the curve:
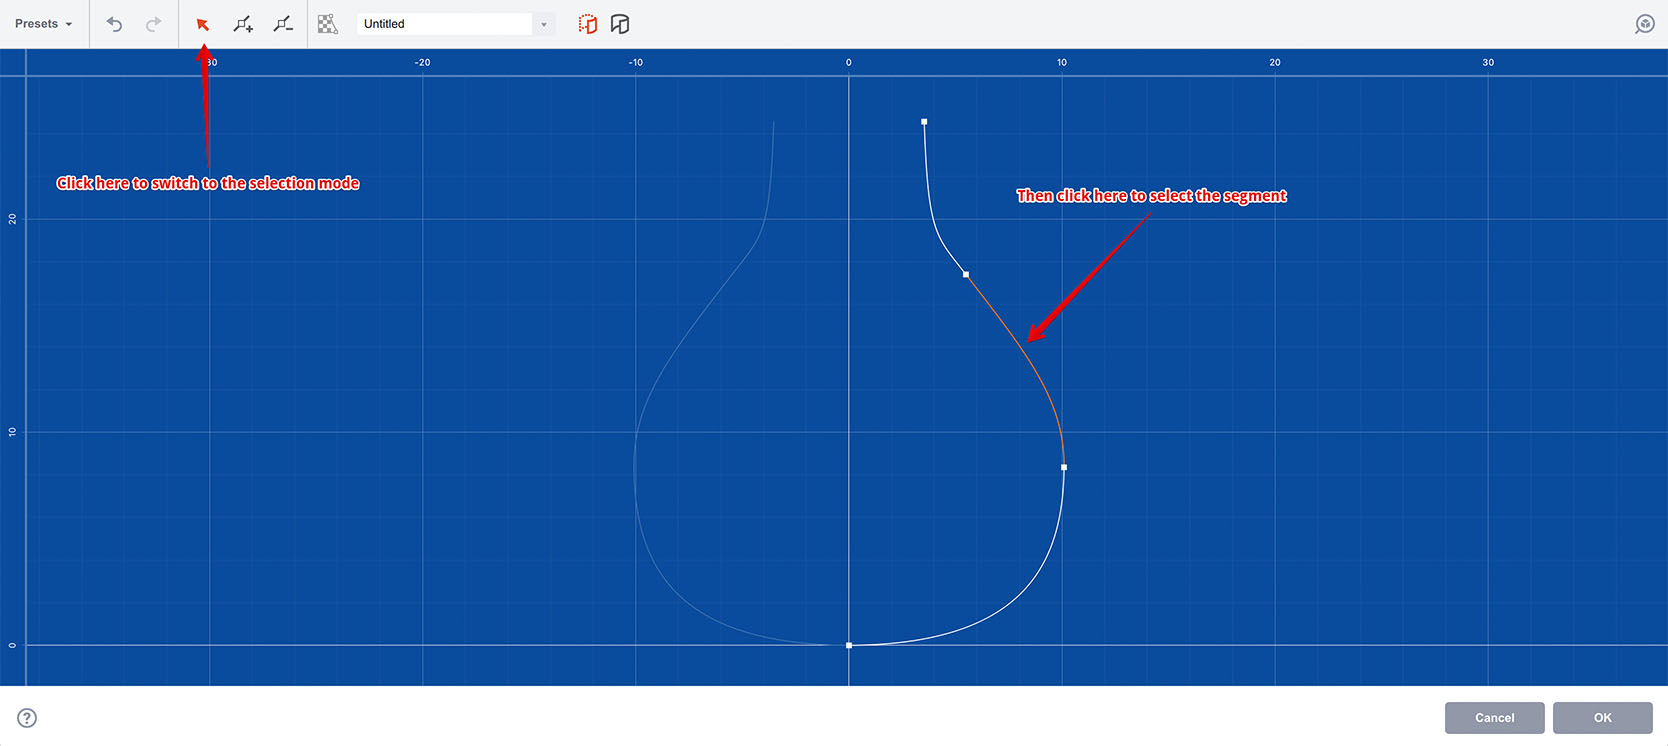
Selected segment is highlighted and the toolbar is changed again to offer context commands for the selected segment:
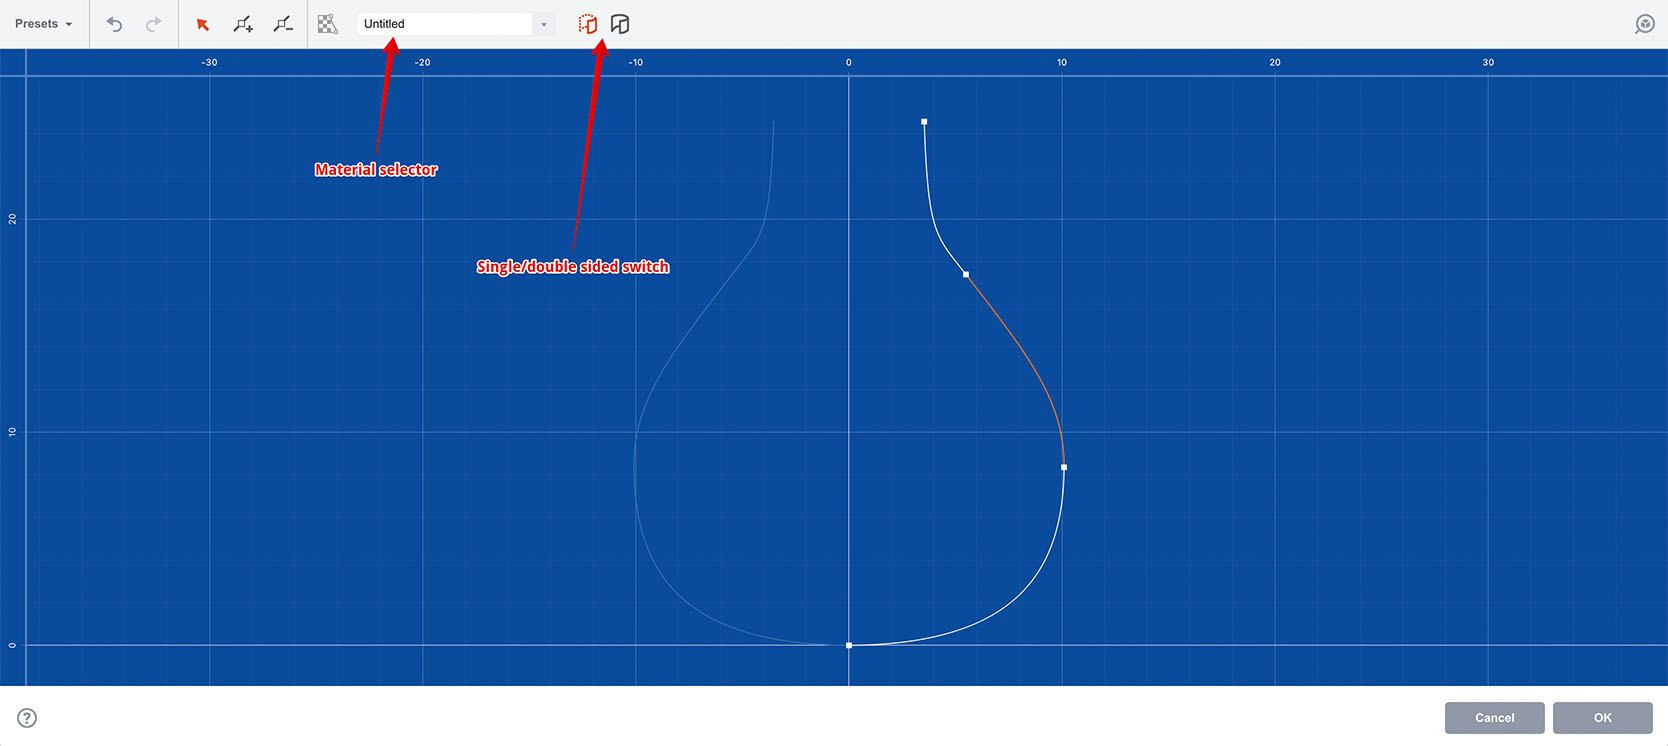
In the toolbar you can assign a material to the selected segment and also decide if it needs to be a single– or double–sided. The latter was covered above when we made the inner side of the shape visible. Here you can adjust that on a per–segment basis. The former is worth some extra explanation.
Curve Segments and Materials
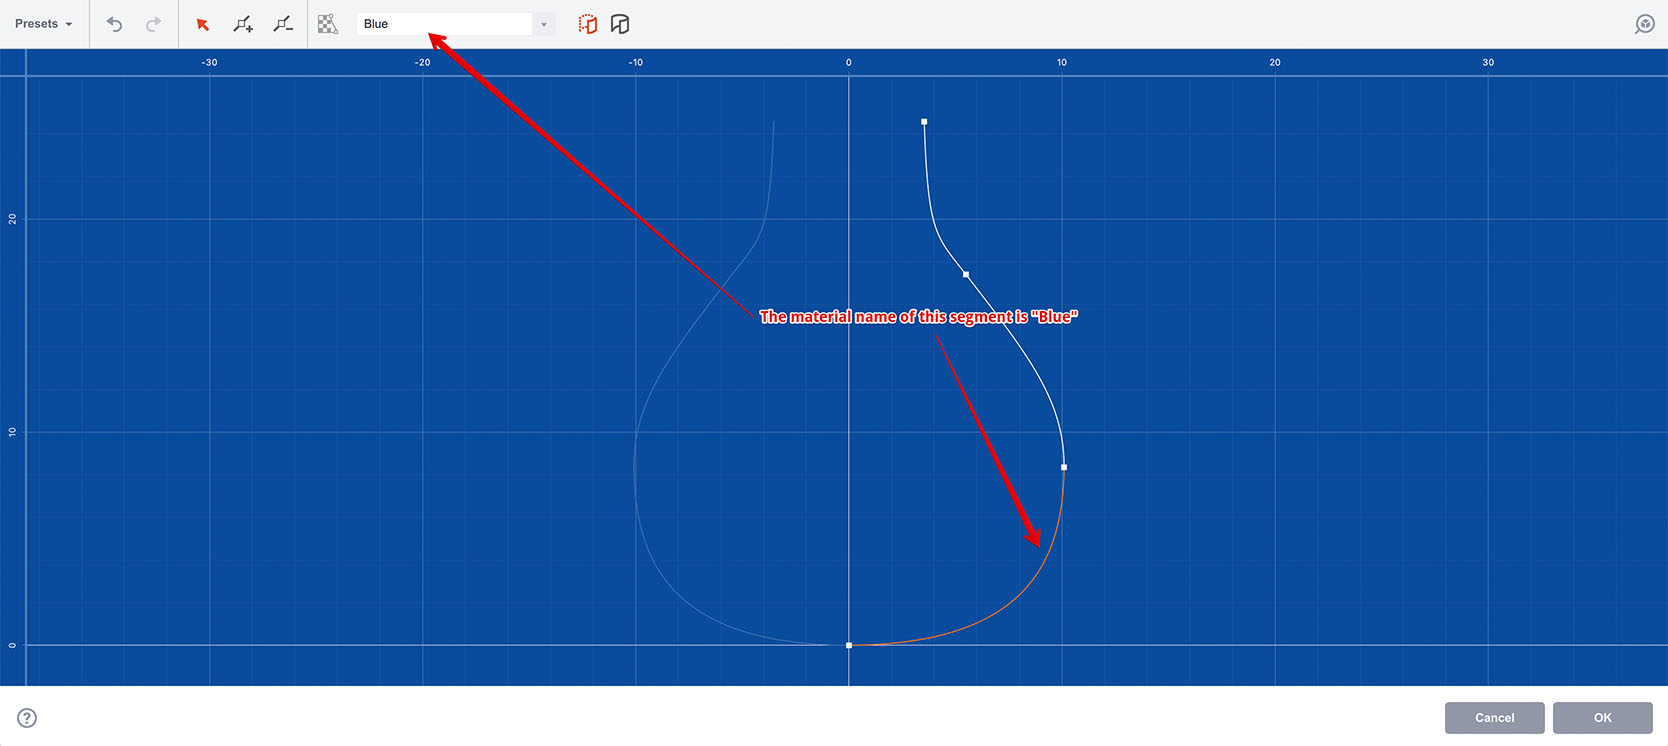
When we imported a curve above it had 3 segments, but when we saw it in 3D the whole shape had the same material called “Untitled”. Boxshot lets you assign materials to the shape on a per–segment basis and that’s where you do this.
To assign a material: select a segment, then go to the material name editor in the toolbar and enter the name you need. If you already have this name on other segment of the same curve, you can click the down arrow next to the input field and select that name from the list.
Here I clicked all the three segments top to bottom and assigned materials named “Red”, “Green” and “Blue” to them:
Now let’s click OK and see what happens:
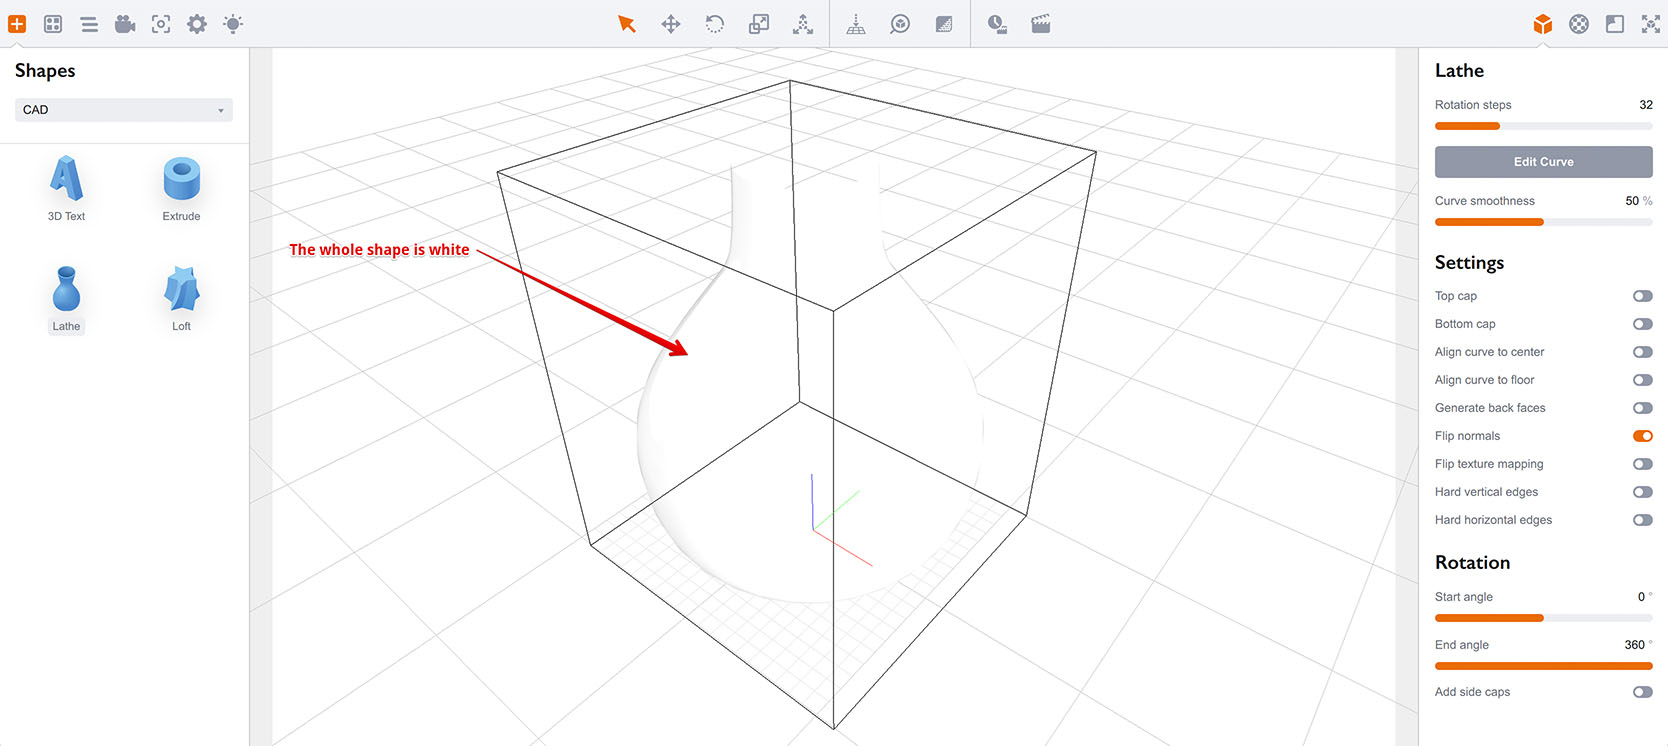
The whole shape is still white, so where are the materials? Let’s switch to the materials panel and have a look:
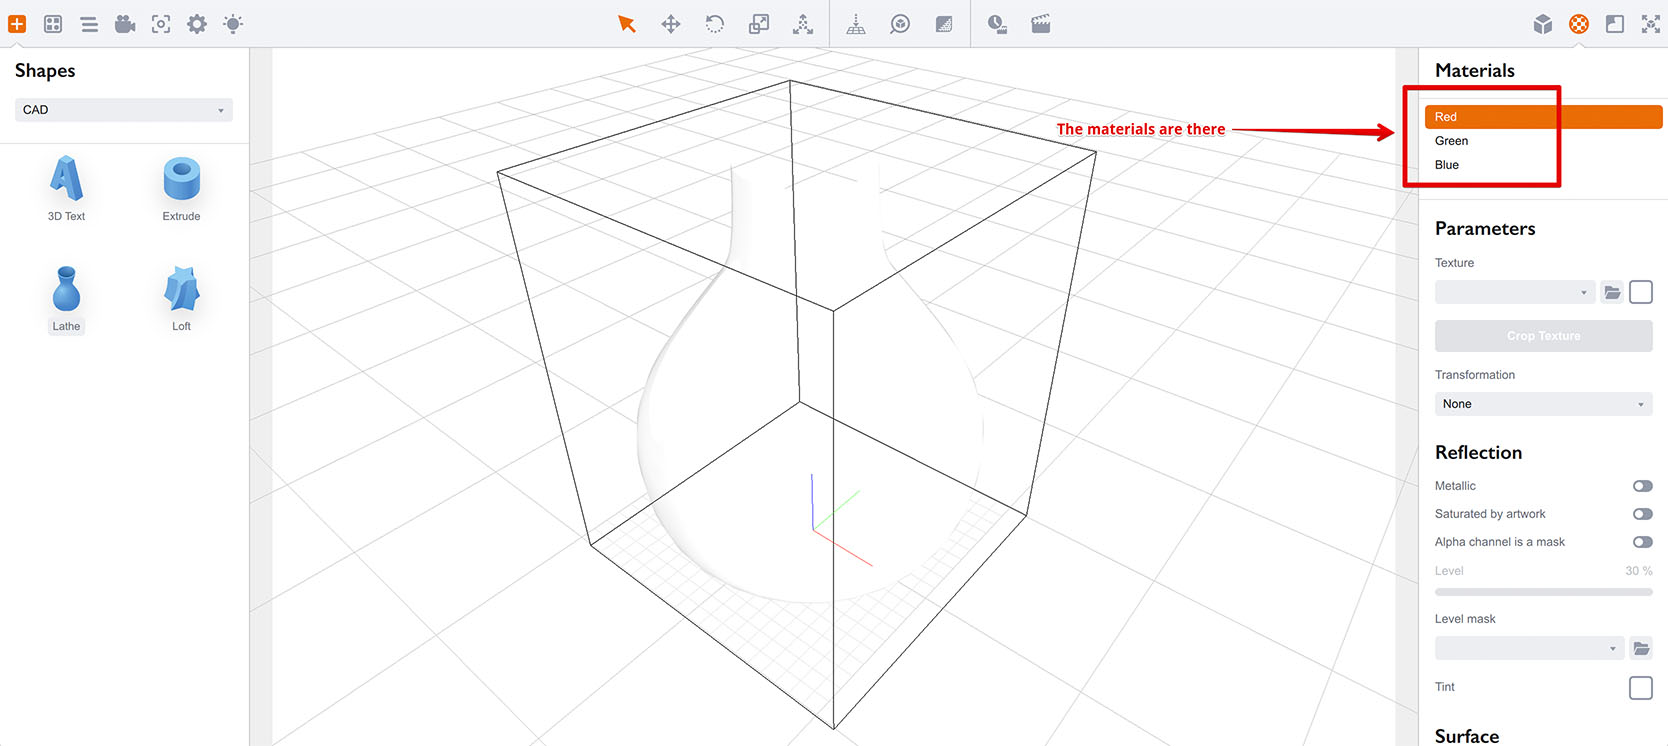
As you can see, the materials are there, they are just plain white by default, so the shape looks white. Let’s adjust them one by one and change their diffuse color to match their names:
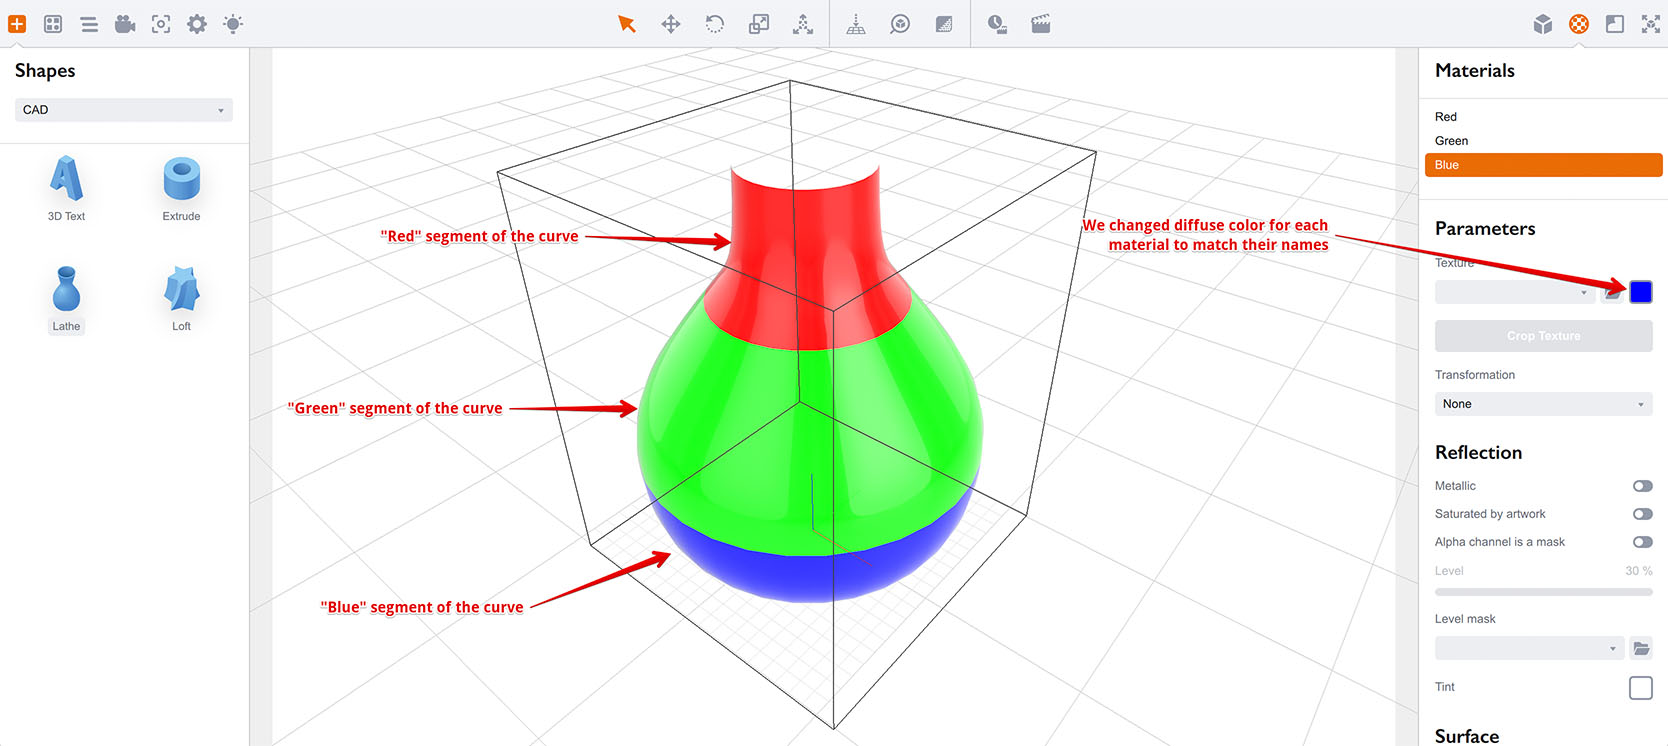
When you change materials you will see the shape gets updated and the parts of the shape get colored according to the materials we assigned to the curve segments.
Assigning multiple materials to the curve is useful for making labels and caps that have different appearance, compared to the main shape.
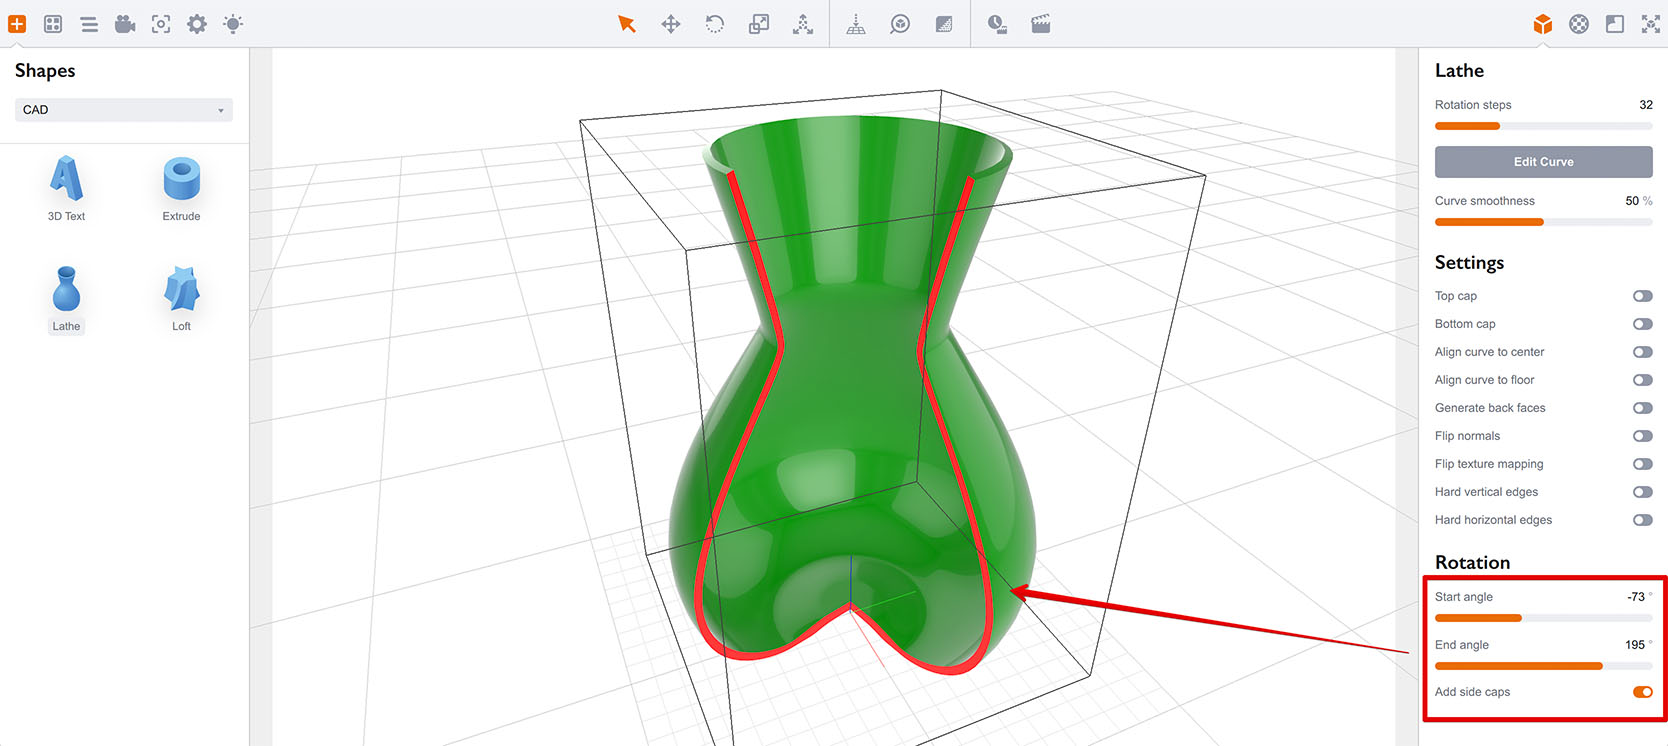
Other Lathe Parameters
Now let’s have a quick look to the parameters of the lathe object. I’ll use the default green vase lathe object for this part:
From top to the bottom, there are three blocks of parameters. The first one controls the curve and its level of details:
- Rotation steps — defines the number of steps the curve makes when revolving. The more steps it makes, the smoother is the surface;
- Edit curve — starts the curve editor explained above;
- Curve smoothness — controls the number of steps along the curve, same as Rotation steps but in vertical direction;
The second block controls the generation and alignment parameters:
- Top/Bottom Cap — automatically close top and bottom holes with geometry. These elements get custom materials and can be configured as any other element of the shape;
- Align curve to center — if the curve doesn’t start at the left side of the artboard, this option moves it there;
- Align curve to floor — if the curve doesn’t start at the bottom side of the artboard, this option moves it there;
- Generate back faces – for each segment of the curve, this option adds a similar segment pointing to the opposite side, effectively making the wall double–sided;
- Flip normals — helps fixing the “inverted” shape if the source curve is reversed. Does nothing if the back faces are generated using the option mentioned above;
- Flip texture mapping — helps fixing texture mapping direction if the curve is reversed;
- Hard vertical/horizontal edges – let you make hard edges instead of the smooth ones by default.
The last block lets you adjust the curve rotation parameters:
- Start/end angles — let you specify the start and stop rotation angles, if you don’t need a 360° rotation;
- Add side caps — tells Boxshot to generate side geometry to close the gaps if the curve doesn’t revolve completely.
Here is an example of non–360° rotation and side gaps closed with red material:
This is useful to show cross–sections of objects, or for other creative purposes.
Notes on Texture Mapping
Boxshot automatically generates texture mapping for Lathe objects. It uses two rules for that:
- Horizontal (U) texture mapping is always generated around the shape. It can be affected by non–360° rotation, but overall it always goes around;
- Vertical (V) texture mapping is generated from top to bottom and continues to the next segment as long as it uses the same material. If the next segment uses a different material, the mapping starts from the beginning.
This way you can make bottle labels by assigning the “Label” material to a specific segment (or segments) and Boxshot will start vertical mapping from the beginning so you get your label artwork displayed properly.
More Tutorials
Rendering
- Realistic Rendering — improving scenes visual appearance;
- Lighting — control environment and directional lighting;
- Saturated Reflection — make "rich" colorful reflections;
- Floor Reflection — reflecting scene objects in the floor;
- Job Manager — rendering jobs later;
- GPU Rendering — rendering scenes faster on GPU;
- Rendering Time and Quality — getting more control on rendering;
- Simple and Realistic Lighting — speeding up scene rendering.
Materials
- Texture Slots — how to use texture slots in Boxshot;
- Glass Materials — how to make semi–transparent objects look attractive;
- UV–Spot — how to make a UV–spot effect easily;
- Foil Effect — how to add foil–finishing to your shapes;
- Bump — adding relief to your materials;
- Copying Materials — how to copy materials to other shapes;
- Custom Materials — extend the materials library with your own ones;
- Semi–Transparent Labels — making semi–transparent and partial labels;
- Boxshot Materials — more details about Boxshot materials.
Features
- Boolean Operations — combining and subtracting shapes, making holes;
- Decals — applying decals and configuring them;
- Bump Decals — applying bump where it is needed;
- Depth Of Field — adding more realism to your renderings;
- Tools — read more about Boxshot tools;
- Managing Images — how to manage image files used by Boxshot projects;
- Shapes Instances — creating lightweight copies of other shapes;
- Model Editor — edit embedded models in many ways;
- Shrink Wrap — heat–shrink film simulation for objects wrapping;
- Physics Simulation — applying gravity to your scene;
- Palletize — arrange scene objects for the pallet;
- Snapshots — save scene state to re–use it later;
- Translation — teach Boxshot to speak your language;
- Vector Artwork — how to maintain the quality of vector artwork.
Shapes
- Lathe Objects — making symmetrical objects using revolving curves;
- Loft Objects — making custom objects with 2D cross–sections;
- 3D Text — making 3D text objects in Boxshot;
- Extruded Objects — how to make thick 3D object of your flat 2D curve;
- Conical Labels — making conical labels with distorted artwork;
- Dieline Box — a very realistic dieline–based box;
- Custom Shapes — adding custom shapes to the left panel;
- Solid Shapes — create boolean-friendly shapes;
- Script-Based Solids — create complex solid shapes with code;
- Third Party Shapes — importing third party shapes to Boxshot.