GPU Rendering
Boxshot supports GPU rendering on graphics adapters with hardware–accelerated raytracing.
On Mac it works on all the Apple Silicon processors. On Windows you need a graphics adapter that supports DirectX 12 raytracing feature (Nvidia RTX and AMD RX models).
Using GPU for Rendering
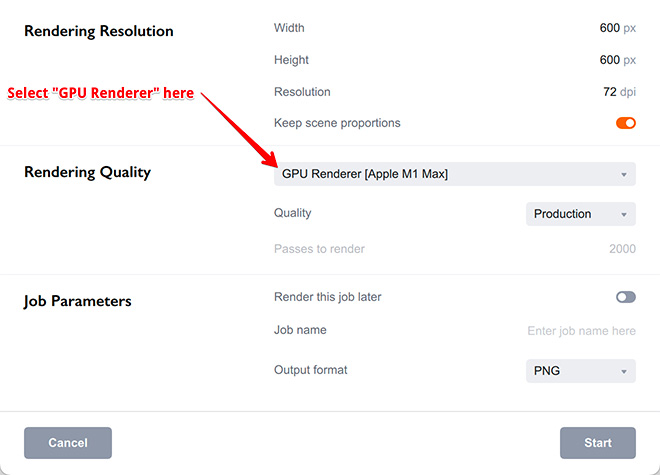
You can render using GPU by selecting it in the rendering settings window:

Select the “GPU Renderer [Your GPU here]” option to use the hardware–accelerated renderer.
If you don’t see the GPU option there, your hardware is probably not supported. See above for the hardware requirements for GPU rendering. If it matches, make sure you have an up–to–date operating system and the latest GPU drivers installed.
GPU Rendering Hints
GPU renderer uses a slightly different approach to rendering and although it can do the same number of passes as the CPU one, it is better used with time–based rendering option.
Sometimes the GPU renderer can take a little longer to render the same number of passes as the CPU ones, but the result will be much better due to the internal architecture features. Using time–based rendering mode helps making everything more predictable and usually gives better results compared to the CPU mode.
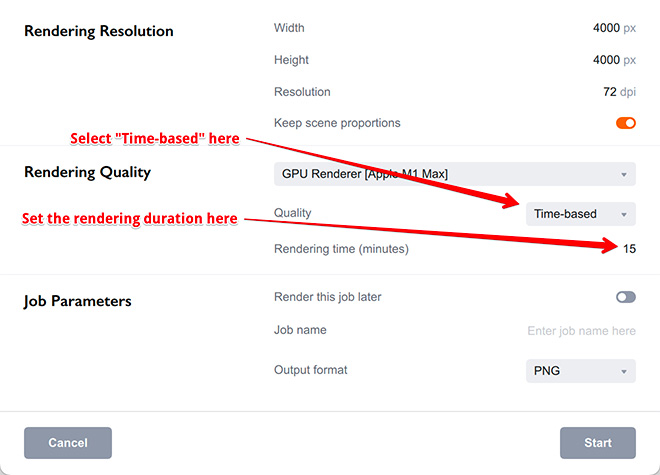
To use time–based rendering select Time–based in the Quality selector and set the number of minutes you want to render a frame:

Try being realistic about the possibilities of your GPU and do not ask to render a 8K image in one minute — you will hardly be happy with the result.
Give it a least 15 minutes for 4000x4000 images, 30–60 minutes for 8000x8000 ones, and so on.
Using the render later option is also a good idea for such resolutions.
GPU Rendering Issues
When rendering scenes on GPU some parts of the rendering pipeline are made in hardware and cannot be adjusted by Boxshot. That’s why you might have a slightly different results compared to CPU rendering.
This usually appears as z–fighting or weird shadows. Both issues are caused by very thin (zero thickness) double–sided geometry elements that hardware–accelerated renderers don’t like. Consider removing them, replacing by single–sided ones or add some thickness to them to sort the problem out. Otherwise, consider falling back to rendering that scene on CPU.
Using GPU Rendering for Drafts
You can still use GPU rendering for drafts and sometimes you get a better result for the same number of passes rendered, compared to the CPU renderer.
This highly depends on the scene, but if your scene is mostly made of opaque objects, give the GPU renderer a try in draft mode — you might get a production quality image in no time :)
More Tutorials
Rendering
- Realistic Rendering — improving scenes visual appearance;
- Lighting — control environment and directional lighting;
- Saturated Reflection — make "rich" colorful reflections;
- Floor Reflection — reflecting scene objects in the floor;
- Job Manager — rendering jobs later;
- GPU Rendering — rendering scenes faster on GPU;
- Rendering Time and Quality — getting more control on rendering;
- Simple and Realistic Lighting — speeding up scene rendering.
Materials
- Texture Slots — how to use texture slots in Boxshot;
- Glass Materials — how to make semi–transparent objects look attractive;
- UV–Spot — how to make a UV–spot effect easily;
- Foil Effect — how to add foil–finishing to your shapes;
- Bump — adding relief to your materials;
- Copying Materials — how to copy materials to other shapes;
- Custom Materials — extend the materials library with your own ones;
- Semi–Transparent Labels — making semi–transparent and partial labels;
- Boxshot Materials — more details about Boxshot materials.
Features
- Decals — applying decals and configuring them;
- Bump Decals — applying bump where it is needed;
- Depth Of Field — adding more realism to your renderings;
- Tools — read more about Boxshot tools;
- Managing Images — how to manage image files used by Boxshot projects;
- Shapes Instances — creating lightweight copies of other shapes;
- Model Editor — edit embedded models in many ways;
- Shrink Wrap — heat–shrink film simulation for objects wrapping;
- Physics Simulation — applying gravity to your scene;
- Palletize — arrange scene objects for the pallet;
- Snapshots — save scene state to re–use it later;
- Translation — teach Boxshot to speak your language;
- Vector Artwork — how to maintain the quality of vector artwork.
Shapes
- Lathe Objects — making symmetrical objects using revolving curves;
- Loft Objects — making custom objects with 2D cross–sections;
- 3D Text — making 3D text objects in Boxshot;
- Extruded Objects — how to make thick 3D object of your flat 2D curve;
- Conical Labels — making conical labels with distorted artwork;
- Dieline Box — a very realistic dieline–based box;
- Custom Shapes — adding custom shapes to the left panel;
- Third Party Shapes — importing third party shapes to Boxshot.