QR Code with Image
As you are here you probably want to put a logotype or some other artwork in the middle of a QR code. Although the QR codes were not designed to embed the artwork, their tolerance to errors makes it possible to replace some of the barcode elements with a custom graphics while keeping the barcode readable.
Before you proceed below, consider having a look at the Making QR–codes tutorial that explains the manual configuration of barcode size, error correction level and mask parameters. You will need this below.
So How To Add Image To QR Code?
Basically, you need to clean up the middle part of the QR code to make it empty and ready for your nice logotype. The only question is how many elements can be removed, so the barcode can still be scanned?
The answer is partially discussed at the QR Code tutorial mentioned above, but it ends up at the error correction level of the barcode. The more is the level, the more elements of the QR code can be “damaged” by your artwork.
Say, the QR code is created with 30% redundancy. Does it mean you can cover one third of the symbol with your logotype? No. The QR code contains some markers that are better to stay intact: the three large squares with dots, there are other elements, like the fourth square at the bottom right corner and some elements around them. The rest of the dots are encoded data and here you can make the changes.
So does the 30% redundancy means that you can change one third of the elements between the squares? Not really. In practice you can change just about a half of the “redundant” elements.
This sounds pretty complex, but fortunately Barcode does the math for you and automatically shows you the maximum area you can use for artwork for each QR code configuration.
Let’s Give It a Try!
Let’s start with a simple automatically–configured QR code and try making some space in the middle. Set everything to auto and enable the Empty space in the middle option:
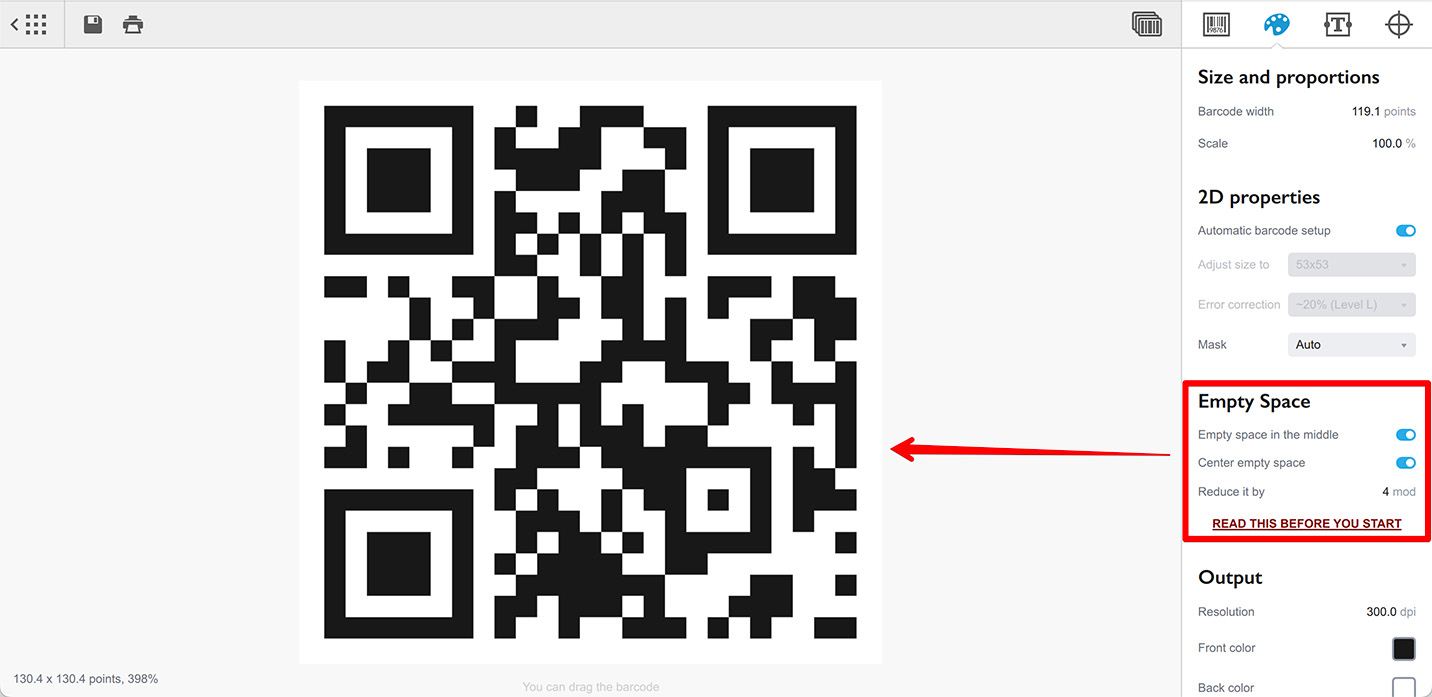
If you start with a new QR code, you will likely see no changes when you enable that option, exactly as you can see above.
The reason is that Barcode does not automatically adjust the QR code in order to fit the image there. Instead it tries to cut the hole in the middle, taking into account the error correction level and barcode size, and keeping the barcode readable. As the QR code we started with is automatically configured, it has a very little redundancy to get anything cut from it.
Let’s sort it out and the first thing we need is…
Switching To The Manual Mode
We need to turn the automatic barcode setup off. As we are going to cut barcode elements and replace them with our artwork, we need extra redundancy and extra modules (dots) in our barcode. There is no way we can get this in the automatic mode, so let’s switch to the manual one:
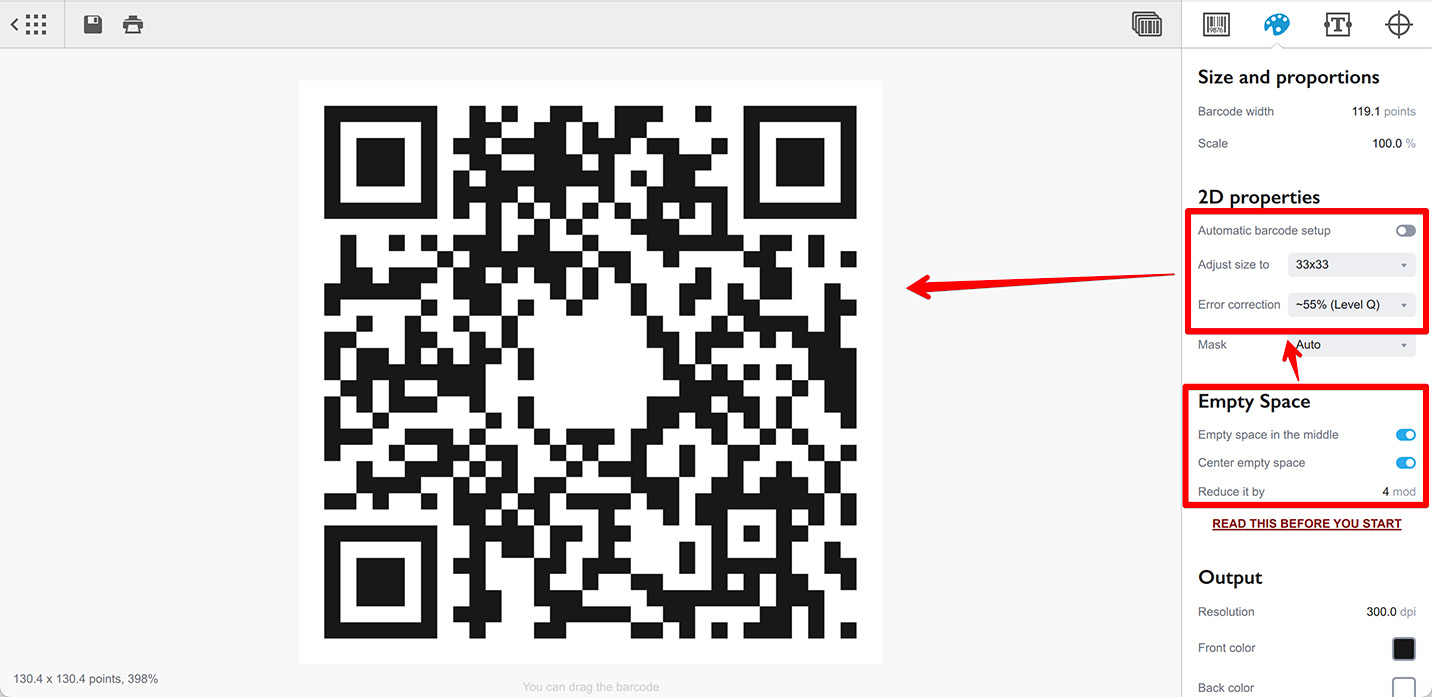
Here I turned off the automatic barcode setup, increased the barcode size to 33x33 modules and changed the error correction level to 55%. There is no right values here, the higher is resolution and error correction level, the bigger is the area that you can use for artwork. On the other hand, the higher the resolution, the smaller is the barcode elements and the harder is to scan them. So you need to find a balance.
Try this approach:
- Turn off the automatic barcode setup;
- Set a high error correction level (55% or more);
- Set the minimal barcode size: 21x21 or so;
- You will likely end up with a blank screen at this stage, as the content will not fit into the small number of barcode elements you configured;
- Start increasing the size until the barcode appears. You can do that by skipping some resolutions to speed the things up;
- Once you get the barcode back on the screen, consider increasing the resolution a bit more (1-2 steps) just in case.
As you see on the image above, there is a small empty space in the middle of the QR code, so we’re getting closer.
Configuring The Hole
There are two options you can configure: Center empty space and Reduce it by. We’ll leave the former for now and start with the latter one.
As explained above, we can only replace a limited number of barcode elements and the limit is error correction level. More, we cannot replace them all as in practice it doesn’t really work well. Unfortunately, there is no way to check at the generation time how well is the code scanned once it is printed, so although the software computes the maximum size of the artwork, it allows you to reduce it to keep more barcode elements intact. By default, the computed value is reduced by 4 elements. You can increase that and make the artwork area smaller, or reduce it and make it bigger.
Here I set the Reduce parameter to zero:
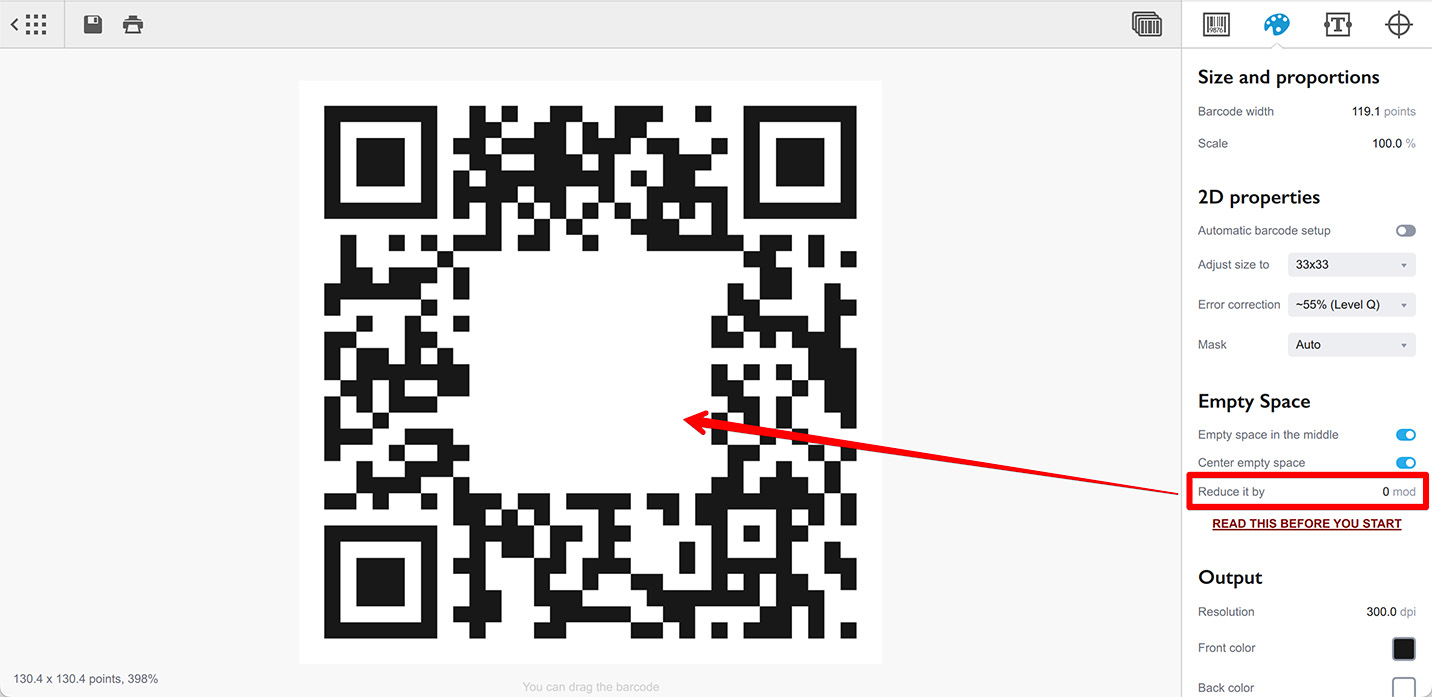
As you can see, the empty area for the artwork gets much bigger. The problem is that the barcode cannot be scanned anymore. That’s because even with all the redundancy of the QR code and extra precautions we still cannot cut that many elements.
That’s why you need the Reduce it by parameter: to adjust the hole, so the artwork fits and the barcode scans.
Here is the plan to set it all up:
- Start with the barcode you get using the plan above and check if the artwork fits in the area you get;
- If not, try reducing the Reduce it by parameter to see if you can fit it this way;
- If it doesn’t work, try returning to the plan above and increase the barcode resolution to a few steps, then reset the Reduce by to 4 and see if there is enough space now;
- Keep doing that until you get the artwork fit into the empty area;
- Once it is fit, increase the barcode resolution one more step just in case;
- Now try scanning the code with your mobile phone directly from the screen. Make sure it is easily scanned even from a distance. Compare it to a normal QR code without any holes. Your goal is to get it easily scanned as if there is no hole there at all;
- If you have any issues with the scanning, consider making the hole smaller by increasing the Reduce by parameter or consider adding more details to the barcode by increasing its dimensions. It might also help to use a higher error correction rate, if possible.
This is a process and it might take some time in order to find a proper configuration of all the parameters that works for you. You might even want to add some more details and reduce the empty area a little bit more to have some extra redundancy against the future issues like mis–printed details, dirt or scratches depending on where the code is about to be used.
Here is the QR code with a relatively large artwork area and still pretty readable. Note the parameters on the right that make this possible:
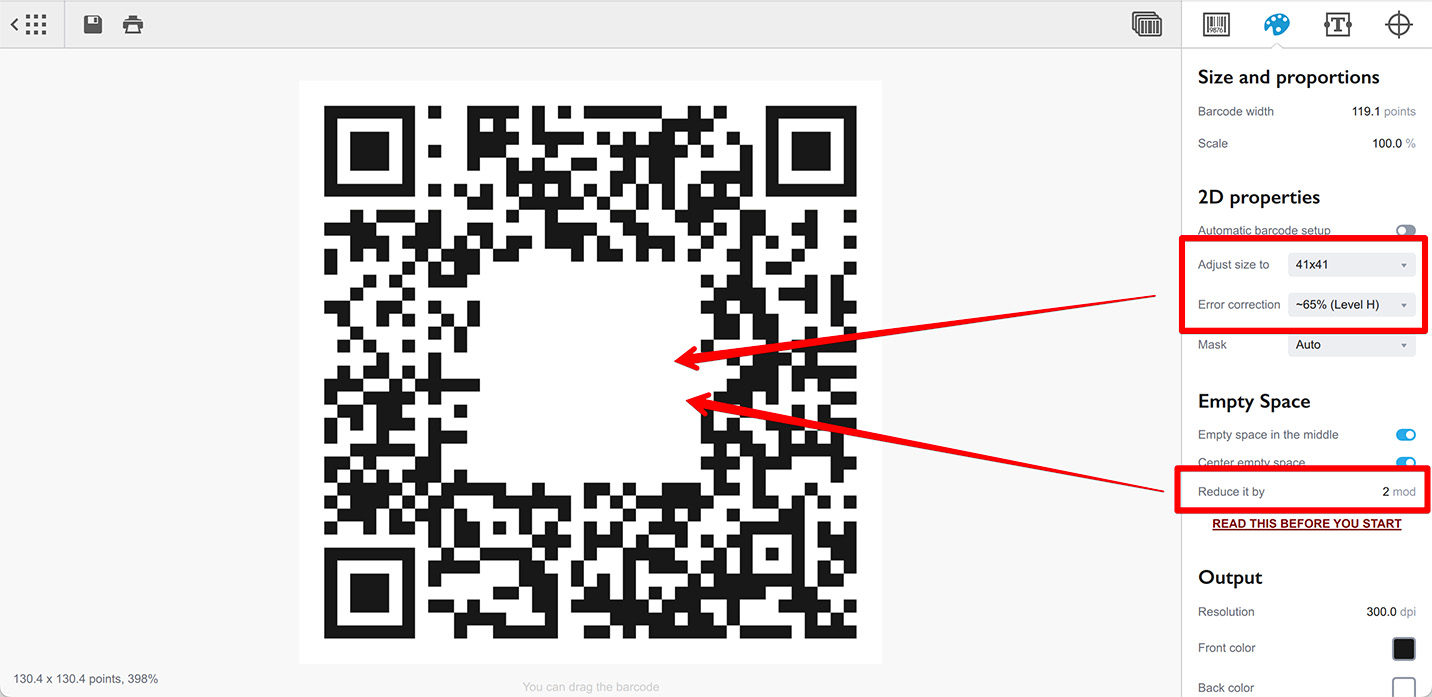
It really helps to test is further by printing it and testing in the real conditions to make sure that even with the artwork in the middle, the QR code can still be scanned in the environment it is designed for.
Center Empty Space
This one is somewhere between the technical specs and the design principles and requires some extra QR code implementation details. You need to know two things about QR codes:
- QR codes always have odd width and height (in modules);
- The data in the QR code are encoded in blocks and each block is two elements wide.
Although it looks like the rules above conflict with each other, the QR code structure has some other elements, so the 2-element blocks sum up to the odd number of total modules. It doesn’t really matter here, though.
What matters is that clearing a single element of the QR code basically “damages” the whole block that contains it. And as the block is already damaged we could easily place another pixel nearby and if it hits the same block we don’t really make more damage compared to what is already done by the first pixel.
This means that we’d better have our empty area to be even modules wide and aligned to the block in order to minimize the damaged blocks.
However, as the QR code itself has odd number of elements, that even–wide area cannot be placed symmetrically in the middle of the QR code. If it doesn’t matter to you — you can add some more redundancy by touching less blocks. However, if you really want to have everything centered — you can enable the Center Empty Space option which adds one more pixel to the left and top sides of the empty area making it perfectly centered at a price of damaging some more blocks.
Basically, you can keep it enabled most of the time and only consider turning it off if you are really tight with the empty space area and the level of barcode details.
Finally
The whole process is quite complex and you might ask: why that as some other generators offer one–click experience with the artwork?
The reason is that here you have all the control and might tune up any parameter if something goes wrong. This is impossible with one–click approach, as you have no control there is say the barcode is not scanned after printing.
Overall, it is really worth to get a little deeper in the topic to get a better results at the end.
Have a look here if you want to know more about modifying QR codes while keeping them readable: Drawing on the QR code.
More Barcode Tutorials
Installation
- Installation — how to install Barcode generator;
- License Activation — how to activate Barcode software with a license key.
Basics
- User Interface — Barcode user interface explained in details;
- Barcode Management — adding, renaming, cloning and deleting barcodes;
- Importing Barcodes — importing barcode images;
- Custom Texts — adding custom text elements to barcodes;
- Marks Panel — configuring border, margins and canvas of barcodes;
- Bar Width Reduction — adjusting barcodes to compensate for ink spread;
- Quiet Zone — making sure the barcodes can be scanned well;
- Using Colors — coloring up barcodes and texts.
EAN Barcodes
- Making EAN–13 Barcodes — standard point–of–sale barcodes;
- EAN–13 Calculator — how to compute EAN–13 check digits.
UPC Barcodes
- Making UPC–A Barcodes — learn to make UPC–A barcodes;
- Making UPC–E Barcodes — how to create UPC–E barcodes;
- UPC–A Calculator — compute check digits of UPC–A barcodes.
NDC Barcodes
- NDC Barcodes — learn about NDC barcodes and how to make them;
- NDC Barcode Check Digit Calculator — how to compute NDC check digits.
QR Code
- QR Code — how to make and configure the popular 2D barcodes;
- QR Code with Image — adding custom artwork to QR Code.
Other Barcodes
- ISBN Barcode Generator — how to make ISBN barcodes;
- BC412 Barcode — making barcodes for silicon wafers identification;
Export
- Transparent Barcodes — making barcodes with transparent background;
- PNG Barcodes — exporting barcodes to PNG format;
- Vector Barcodes — exporting barcodes to vector formats;
- Export.js — defining custom file names for exported barcodes.
Automation
- Batch Processing — how to batch–convert text data to barcodes;
- Command Line Processing — command line barcode generation.
Other
- Self–Drawing Barcode — drawing QR codes in browser with just an SVG file;
- Fake Barcodes — need a random barcode as a placeholder?
- Other Barcode Symbologies — history and features of lesser-known barcode formats;
- Translation — teach Barcode to speak your language.