Using Colors
By default, Barcode Generator draws everything — the symbol, the background,
and all texts — using the same black color. But you can override this and
apply custom colors to almost every element of your barcode. Colors can be set
manually through a visual picker, and they can also be automated for batch
processing using the same {variables} system you already know from custom
texts. This tutorial covers both approaches.
Changing Symbol Color
To change the color of the barcode symbol itself, open a barcode for editing and navigate to the second panel on the right side of the interface. Scroll down to the Output section, where you’ll find two color picker controls named Front Color and Back Color.

Click the Front Color control. This opens a color picker popup where you can specify the exact color you need using RGB sliders for on-screen work, or CMYK sliders for print projects. Both sets of sliders are available regardless of your project’s color mode.
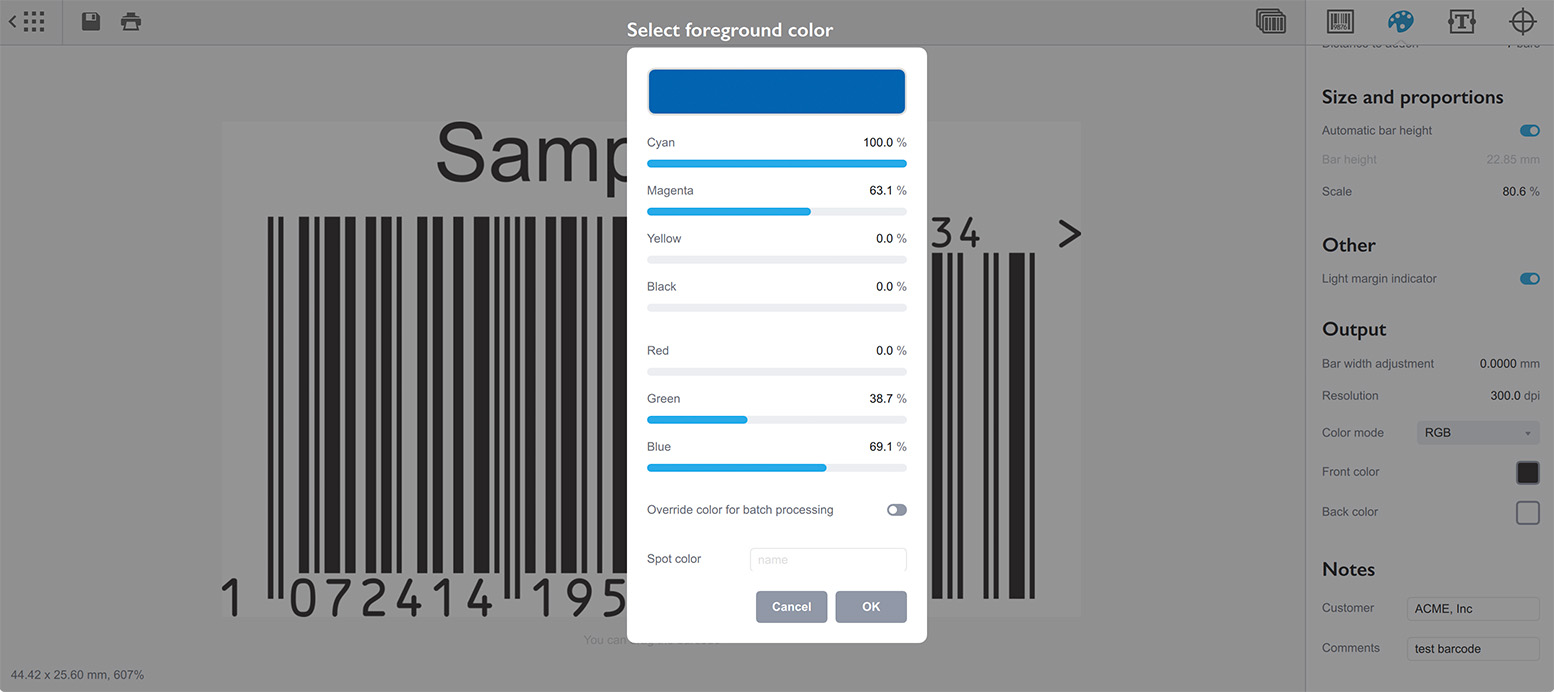
Once you’ve dialed in the color you want, click the OK button to commit it. The barcode symbol in the preview updates immediately to reflect your choice.
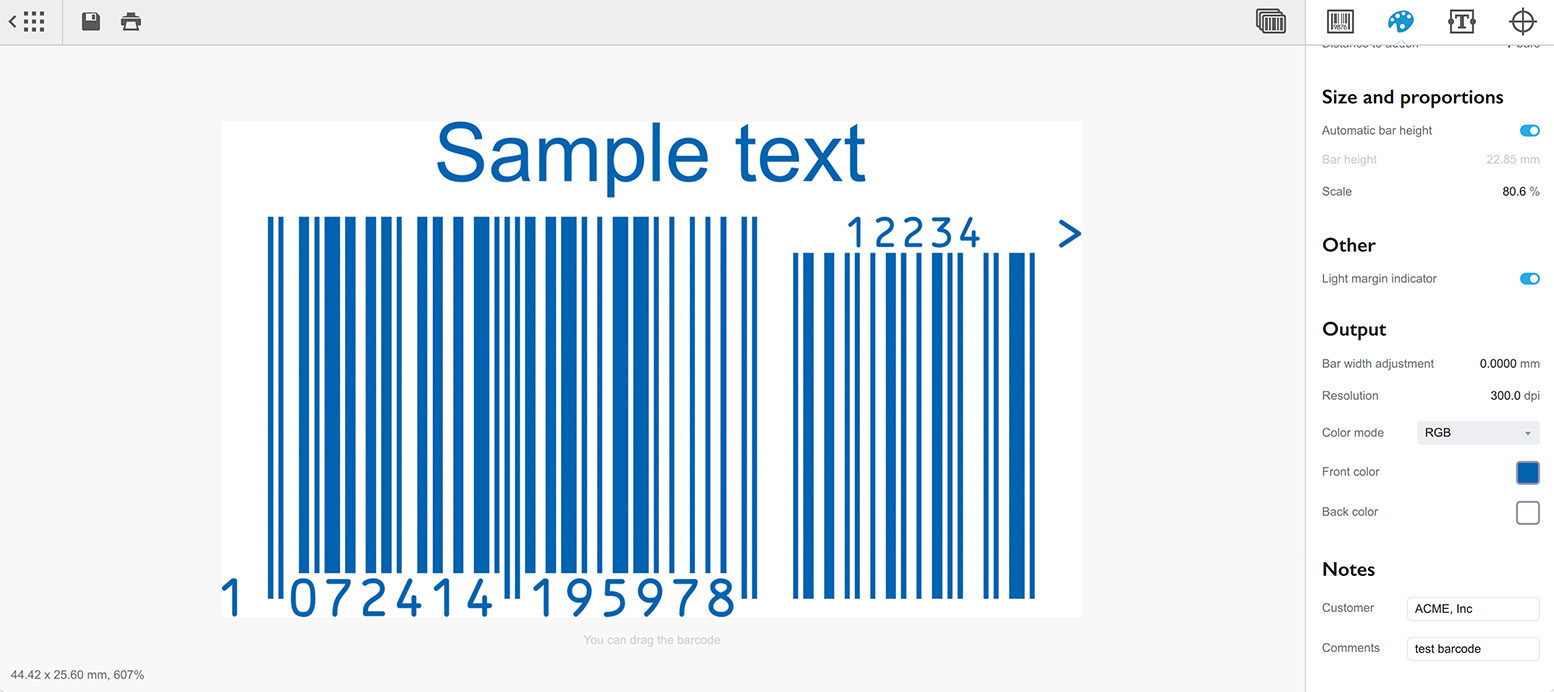
The background color is changed the same way: click the Back Color control to open its color picker. The key difference here is that the background color popup includes a Transparent background option. Enabling this completely disables the background fill — useful when you need to place the barcode onto an existing design without a white rectangle behind it. By default, the background is white.

This is how you color up barcodes. A few clicks are all it takes to move beyond the default black.
Text Color
Custom texts added through the Texts panel inherit the barcode’s front color by default. But you can override this and give each text element its own independent color.
To do so, navigate to the third panel on the right side of the interface — the Texts panel. Select the text element you want to recolor from the list at the top, then scroll down its properties until you see the color overriding control.
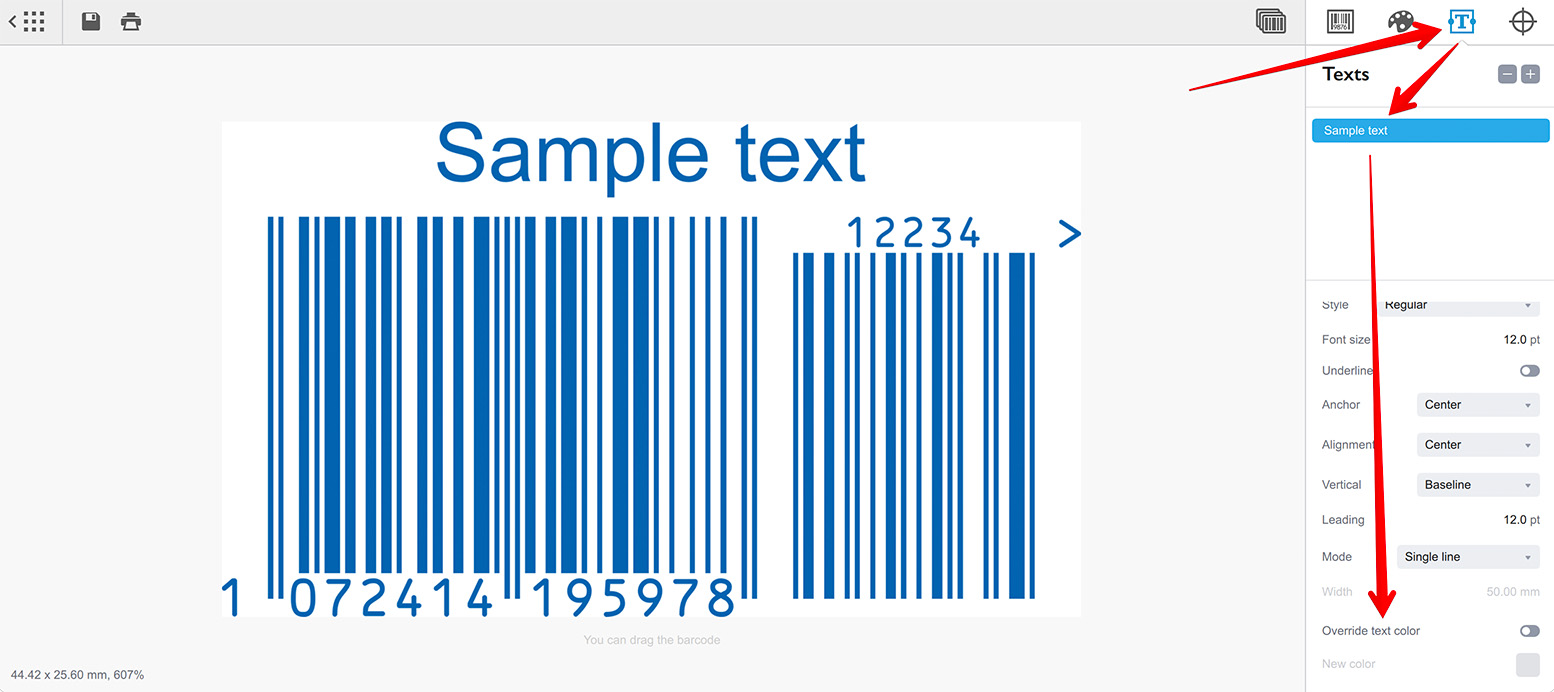
Check the Override Text Color box. This enables the New Color control, which works exactly like the barcode front color picker. Click it to open the color popup.
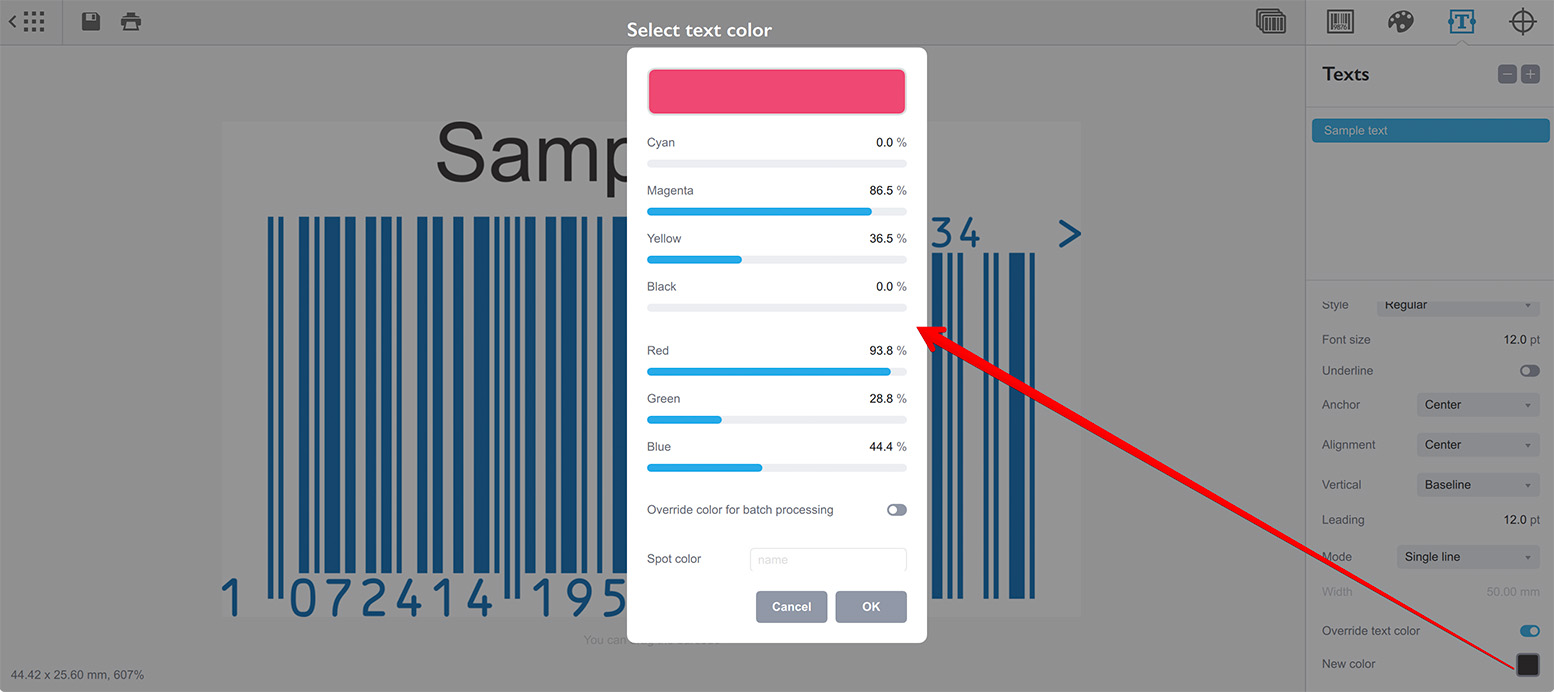
Choose your color and click OK. The selected text element updates in the preview to show its new color, independent of the barcode symbol and any other text elements.

Texts can be colored this way individually. Each custom text element can have its own color, so you can configure different texts with different colors within the same barcode design.
CMYK vs RGB
Barcode Generator lets you switch your entire project between CMYK and RGB color modes. All colors are automatically converted to match the selected mode, regardless of which sliders you used in the color picker. For example, if your project is in CMYK mode and you set a color using the RGB sliders, the software converts that color to CMYK using standard color profiles.
The software uses the sRGB color space in RGB mode, and U.S. Web Coated (SWOP) v2 in CMYK mode. This ensures consistent and predictable color output whether you’re designing for screens or for professional printing.
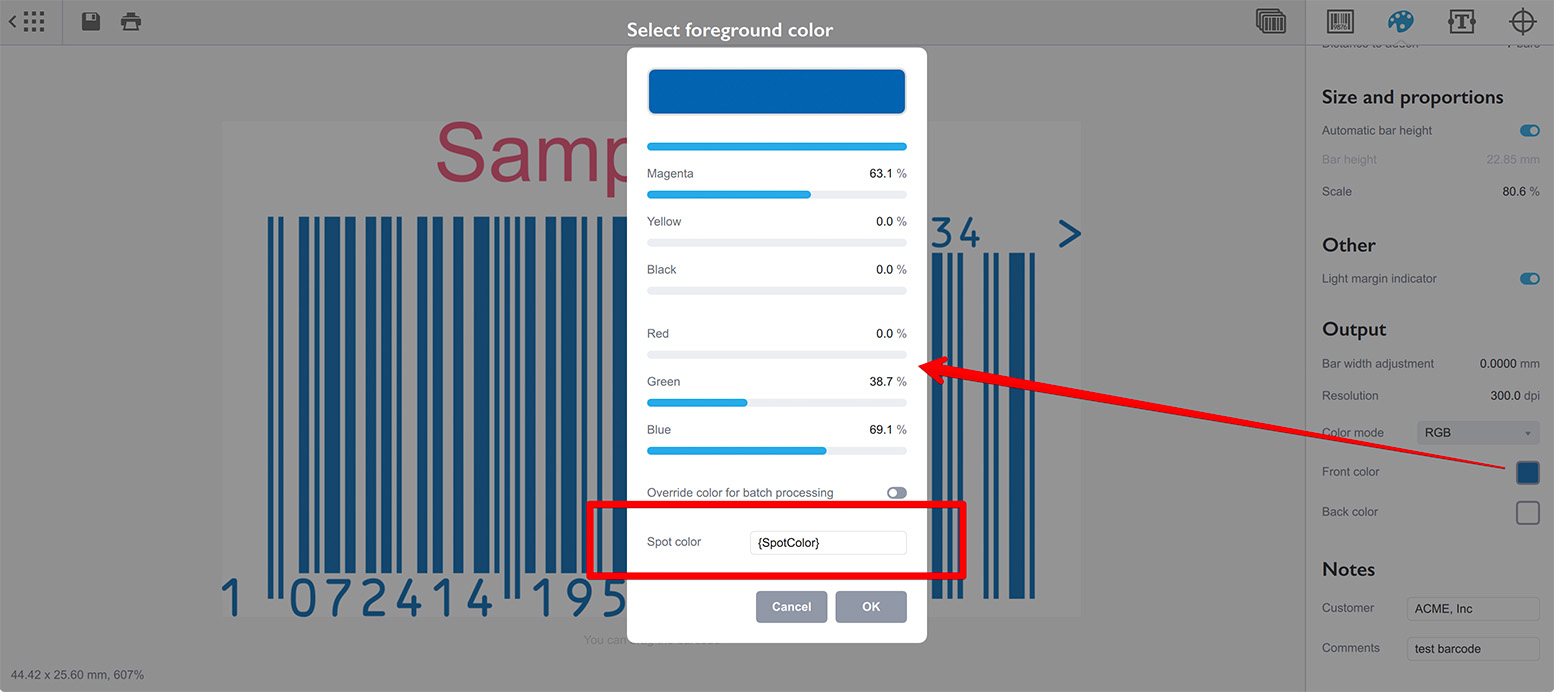
Spot Colors
Every color picker popup in the software includes a Spot Color field where you can type a spot color name — for example, “Pantone 185 C” or any name your print workflow recognizes.
Spot colors are not rendered in the on-screen preview. The preview always shows the RGB or CMYK fallback color you’ve selected. However, spot color names are preserved and exported correctly when you save your barcode to EPS or PDF formats. If your printing process requires spot colors, you can define them here.
Spot colors can be defined independently for the barcode front color, the background color, and for each custom text element’s overridden color. In every case, the RGB or CMYK color you set in the picker serves as both the preview color and the fallback color for systems that don’t support the spot color.
Overriding Colors in Batch Mode
Colors don’t have to be static. In batch processing mode, you can assign
different colors to each barcode you generate — for both the symbol and the
texts. This works the same way as custom text
variables: you add
extra columns to your CSV or Excel data source, and bind them using {variable}
placeholders.
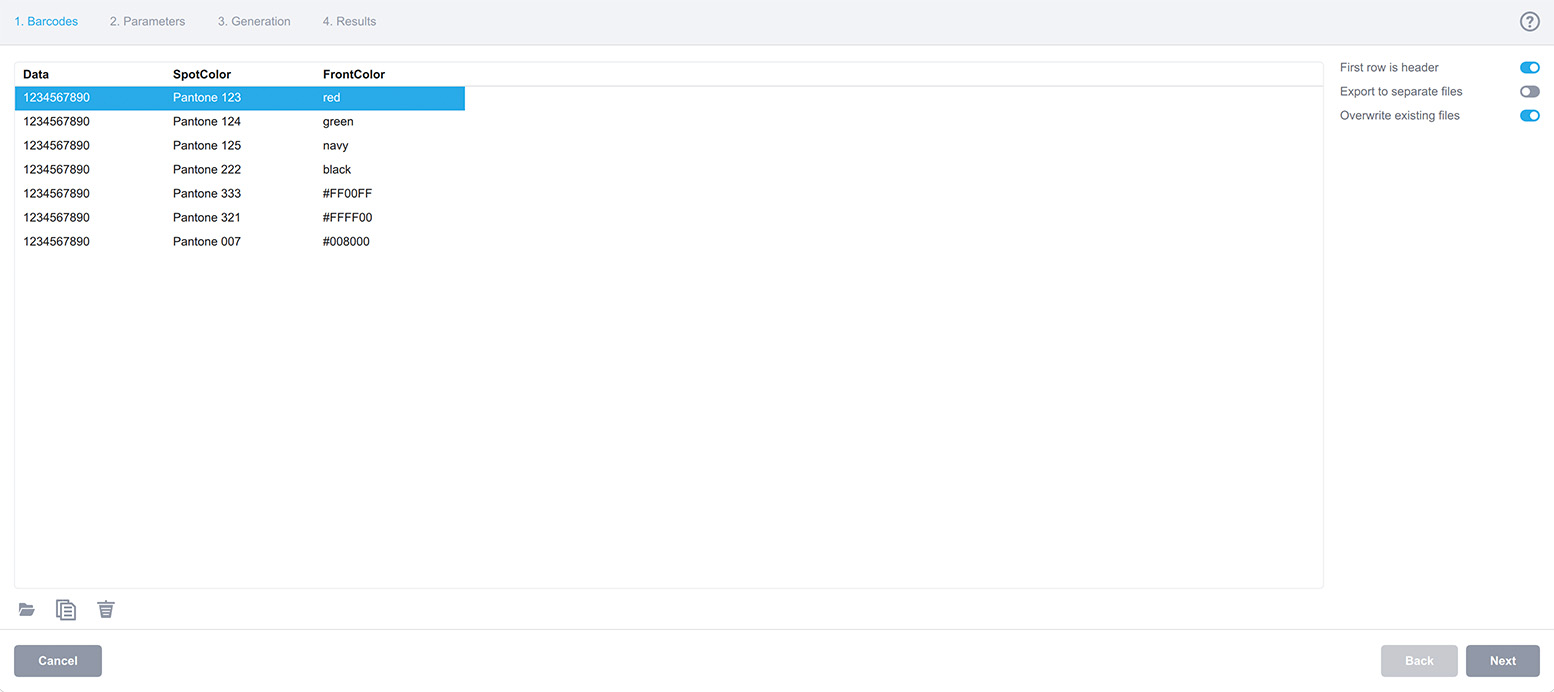
To make a spot color dynamic, place the name of your data column in curly braces
directly into the Spot Color field of any color picker. For example, if your
source file has a column called “SpotColor”, you would enter {SpotColor} in
that field. During batch generation, each barcode will get the spot color name
from the corresponding row.
For regular RGB or CMYK colors, open the color picker and check the Override
Color for Batch Processing option. A text field appears below the checkbox.
Enter your {variable} there — for instance, {FrontColor} — to bind it to
a data column.
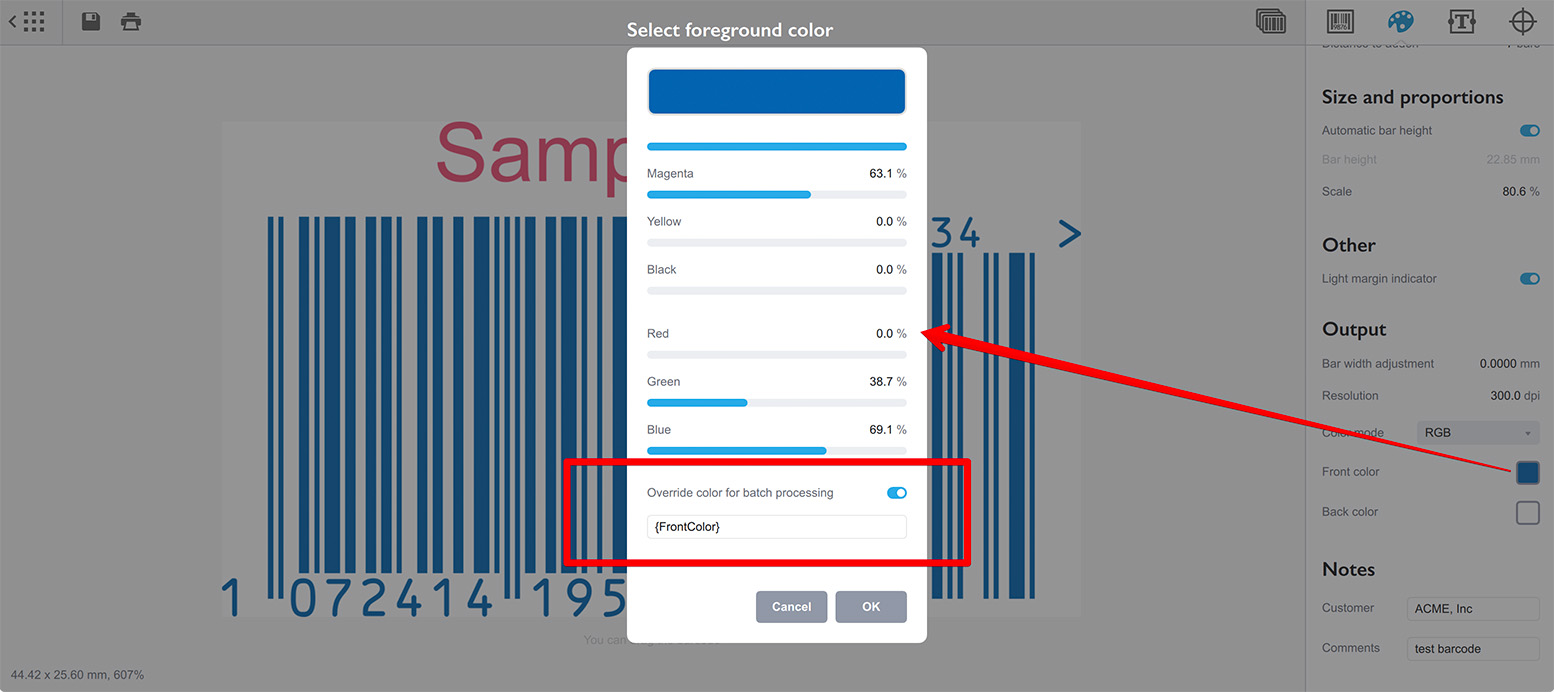
Unlike spot colors, which require exact names, the override field for regular
colors accepts human-readable color names like red, green, or navy, as
well as hex color codes like #ff00ff for pink.
Note, when variable-based color is used in the Override color for batch processing control, the preview might display the barcode or text in black instead of the color you configured with RGB/CMYK sliders. That’s normal.
This way, you can batch-produce barcodes and text elements in a full range of colors without manually editing each one. You now know how to color up barcodes and texts manually, how to work with spot colors for professional print workflows, and how to automate color application in batch mode using variables.
More Barcode Tutorials
Installation
- Installation — how to install Barcode generator;
- License Activation — how to activate Barcode software with a license key.
Basics
- User Interface — Barcode user interface explained in details;
- Barcode Management — adding, renaming, cloning and deleting barcodes;
- Importing Barcodes — importing barcode images;
- Custom Texts — adding custom text elements to barcodes;
- Marks Panel — configuring border, margins and canvas of barcodes;
- Bar Width Reduction — adjusting barcodes to compensate for ink spread;
- Quiet Zone — making sure the barcodes can be scanned well;
- Using Colors — coloring up barcodes and texts.
EAN Barcodes
- Making EAN–13 Barcodes — standard point–of–sale barcodes;
- EAN–13 Calculator — how to compute EAN–13 check digits.
UPC Barcodes
- Making UPC–A Barcodes — learn to make UPC–A barcodes;
- Making UPC–E Barcodes — how to create UPC–E barcodes;
- UPC–A Calculator — compute check digits of UPC–A barcodes.
NDC Barcodes
- NDC Barcodes — learn about NDC barcodes and how to make them;
- NDC Barcode Check Digit Calculator — how to compute NDC check digits.
QR Code
- QR Code — how to make and configure the popular 2D barcodes;
- QR Code with Image — adding custom artwork to QR Code.
Other Barcodes
- ISBN Barcode Generator — how to make ISBN barcodes;
- BC412 Barcode — making barcodes for silicon wafers identification;
Export
- Transparent Barcodes — making barcodes with transparent background;
- PNG Barcodes — exporting barcodes to PNG format;
- Vector Barcodes — exporting barcodes to vector formats;
- Export.js — defining custom file names for exported barcodes.
Automation
- Batch Processing — how to batch–convert text data to barcodes;
- Command Line Processing — command line barcode generation.
Other
- Self–Drawing Barcode — drawing QR codes in browser with just an SVG file;
- Fake Barcodes — need a random barcode as a placeholder?
- Other Barcode Symbologies — history and features of lesser-known barcode formats;
- Translation — teach Barcode to speak your language.