Selecting Paths by Name
Ai Toolbox lets you quickly select all the paths containing a specific word. We often use this feature for dielines to quickly adjust multiple crease lines at once.
To start selecting, click Select → Select by Name… from the Illustrator main menu. A selection window of Ai Toolbox will pop up:

At the top there is a filtering field that lets you narrow down the search. If you type something in, Ai Toolbox will only show the items containing this text and their parents. This helps to hide some unneeded items. You can also close down some tree nodes for the same reason.
Then goes the document layers and paths tree, exactly as you see it in Illustrator. Each element can be highlighted by clicking it, but this does not affect selection. Highlighting is just the way you select items in Ai Toolbox, not in Illustrator. The real selection mark for Illustrator is the check box on the left of the item’s name. You can see one at the “CORRECTED FOR ORIGAMI” item on the image above. Every item that has this box checked will be selected in Illustrator once you commit the changes.
Filtering Elements
You can temporary hide some elements by filtering them out. Start typing something to the Search query field and see that the list gets shorter. Ai Toolbox will only display items containing the symbols from the text you typed and their parent elements. Here we typed “<P” and the list updated to show just unnamed paths:
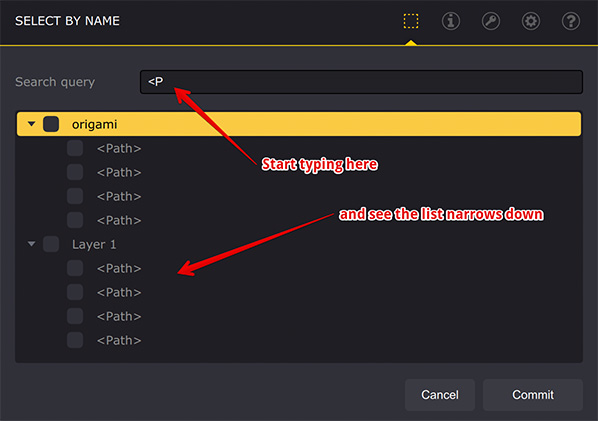
Note that filtering items out does not affect their selection status. Everything that was selected before filtering out will be kept selected even when hidden. Use the filter to temporary narrow down the list, not for unselecting unwanted items.
Highlighting and Selection
When you click an item in the list it gets highlighted. You can highlight multiple items using Control/Command and Shift keys:
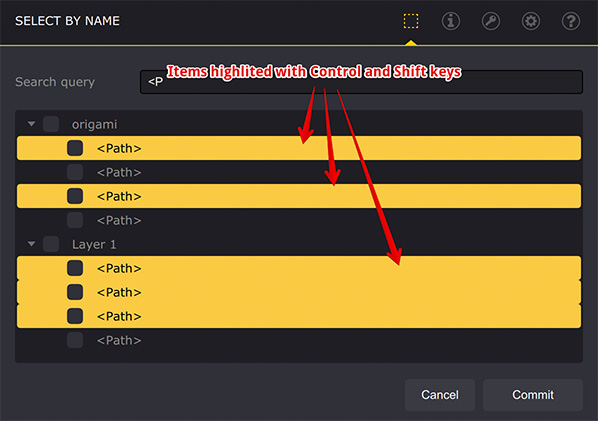
Once again, highlighting an item doesn’t mean it gets selected in Illustrator. It is just a way to select them in Ai Toolbox. What matters for real selection is the checkbox at the left of the name. Try checking the box of one of the items you highlighted:
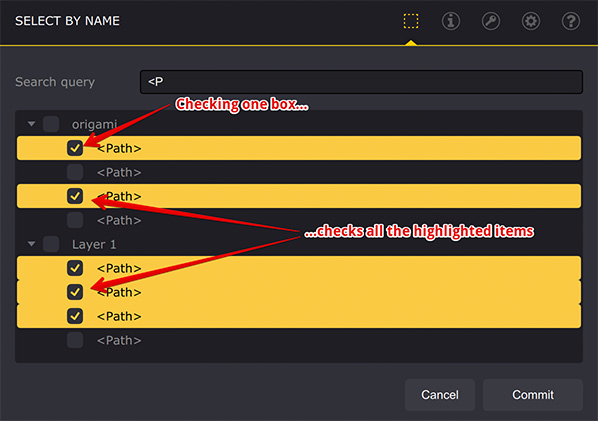
As you may see, checking one box checks all the other highlighted items. That’s how you tell Ai Toolbox to select the items in Illustrator.
Uncheck the box and all the highlighted items will get unchecked.
Highlight, Select, Repeat
You can use highlighting many times to select and unselect paths. For instance you can highlight the whole layer and check it for selection, then use filter to show some of the names in that layer, highlight them and remove the selection.
Use highlighting and selection as many times as needed to get everything properly selected.
Keyboard Shortcuts
Here are some keyboard shortcuts that saves your time while selecting items in Ai Toolbox:
- Press Up/Down keys to move from the Search query field to the list and start highlighting items;
- Press Space key to toggle the selection checkbox of the currently highlighted items;
- Press Ctrl/Command+A key to highlight all the currently visible items.
To unselect all the items make sure the Search query field is empty, then press Ctrl/Command+A to highlight all the items, then press Space. This will toggle the selection and all the items will either be selected or unselected. If the items are selected, press Space again to remove the selection. Then press Up or Down key to remove the highlighting from all the items.
Finally
Once you are happy with the selection checkboxes, click the Commit button at the bottom of the window to change the selection in Illustrator.
Note that sometimes Illustrator does not update the Layers window with the new selection, it might help to switch to a different document and back, or slowly scroll the layers window.
More Ai Toolbox Tutorials
Installation
- Installation — how to install the plugin;
- License Activation — how to activate the plugin with a license key.
Renaming and Creating Elements
- Bulk Rename in Illustrator — rename multiple elements at once;
- Create Artboards from Selection — make artboards from selected elements.
Selection Operations
- Selecting Paths by Name — bulk selection by name in Illustrator;
- Select → Same → Font — selecting objects with the same font in Illustrator.
Text Operations
- Merging Texts in Illustrator — combine text elements, keeping lines intact;
- Dynamic Texts — add dynamic information to text elements in Illustrator.
Files Operations
- Collect Resources — package multiple files at once, including the nested ones.
Conical Labels
- Conical Label from Selection — making the label from the selected artwork;
- Conical Label from Artboard — making the label from the artboard content.
Color Bars
- Making Color Bars — how to make color bars in Illustrator in a few clicks;
- Color Bar Appearance — customizing color bars to display the data you need;
- Color Patches — color bars that display the inks you want;
- Reusing Color Bars — how to copy color bars to another project.
Adobe and Adobe Illustrator are either registered trademarks or trademarks of Adobe Systems Incorporated in the United States and/or other countries.