Color Bars in Illustrator
Ai Toolbox lets you easily add color bars to Illustrator projects with just a few mouse clicks. Color bars display inks used by the document and get automatically updated to reflect the changes you make. You can customize color bars in many ways and this tutorial shows how to do that.
Let’s start with a simple project:
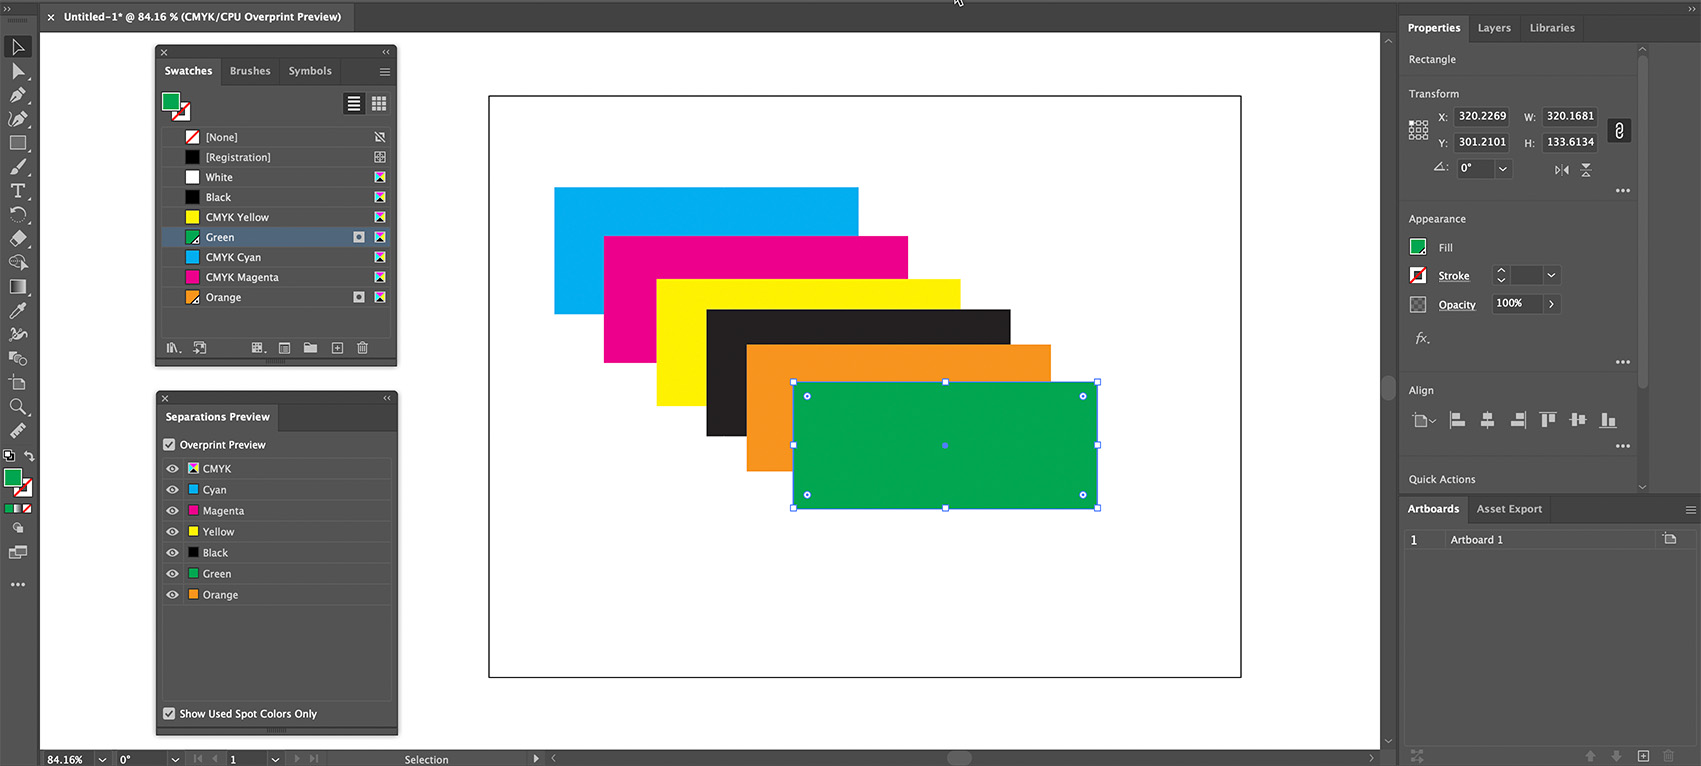
Here we have rectangles for all the CMYK process colors and two spot colors called “Orange” and “Green”. Let’s add a color bar to this project.
Adding a Color Bar
Click the Object menu in Illustrator, then navigate to Color Bar sub–menu and click Create Simple Color Bar item there. You will get this:
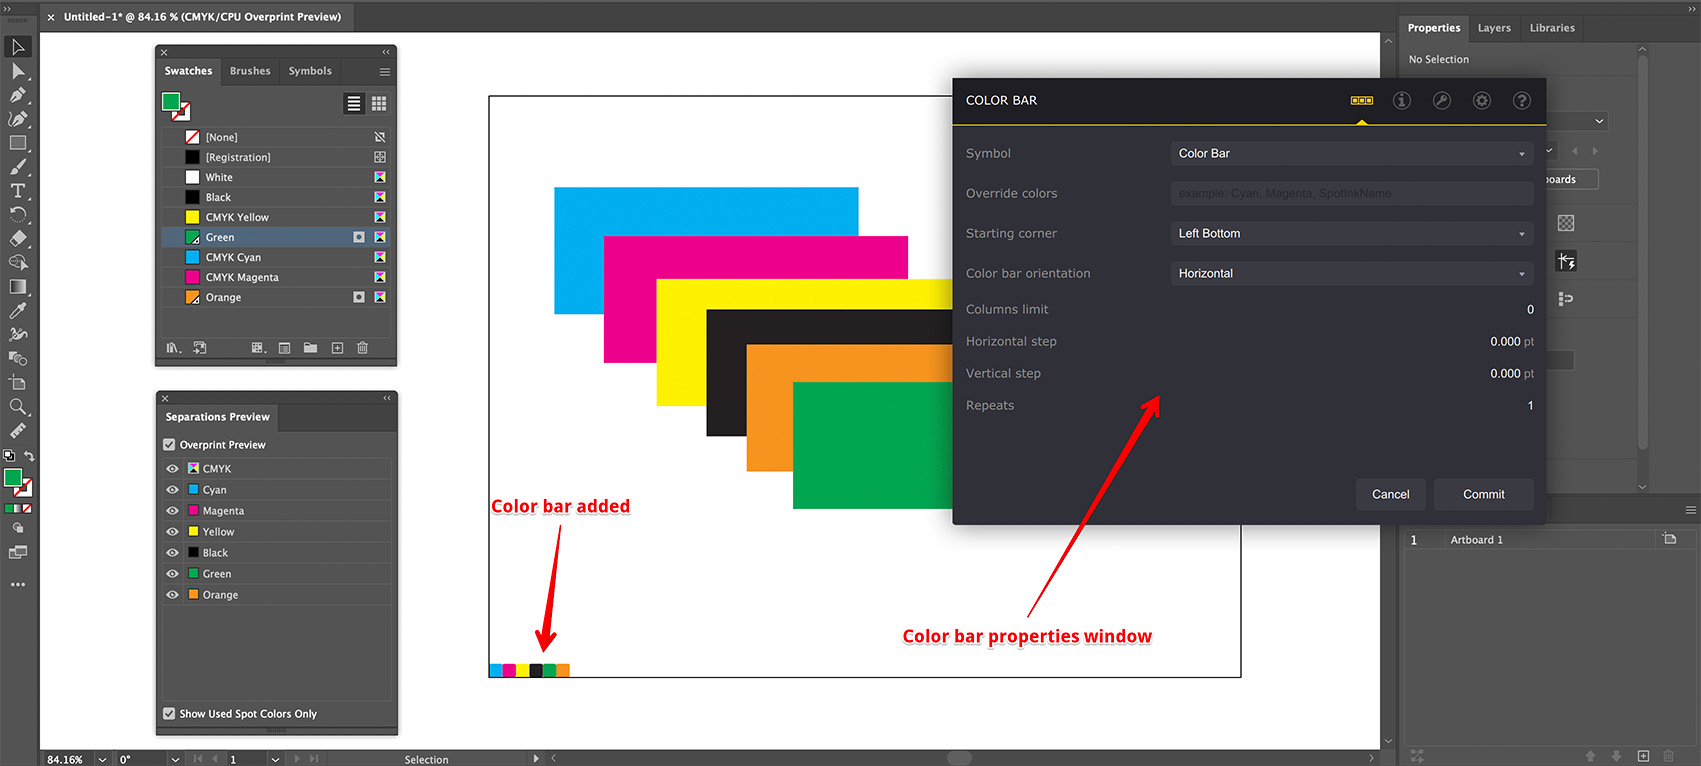
A color bar with all the inks used by the document is added to the bottom left corner of the current artboard. The popup window allows you to adjust the color bar parameters, but for now you can simply click Commit to commit the changes.
Automatic Updates of Color Bars
Once the color bar is added you can move it somewhere and maybe even lock to prevent accidental changes. Ai Toolbox keeps the color bar updated while you working on the document, so it displays the colors you really use:
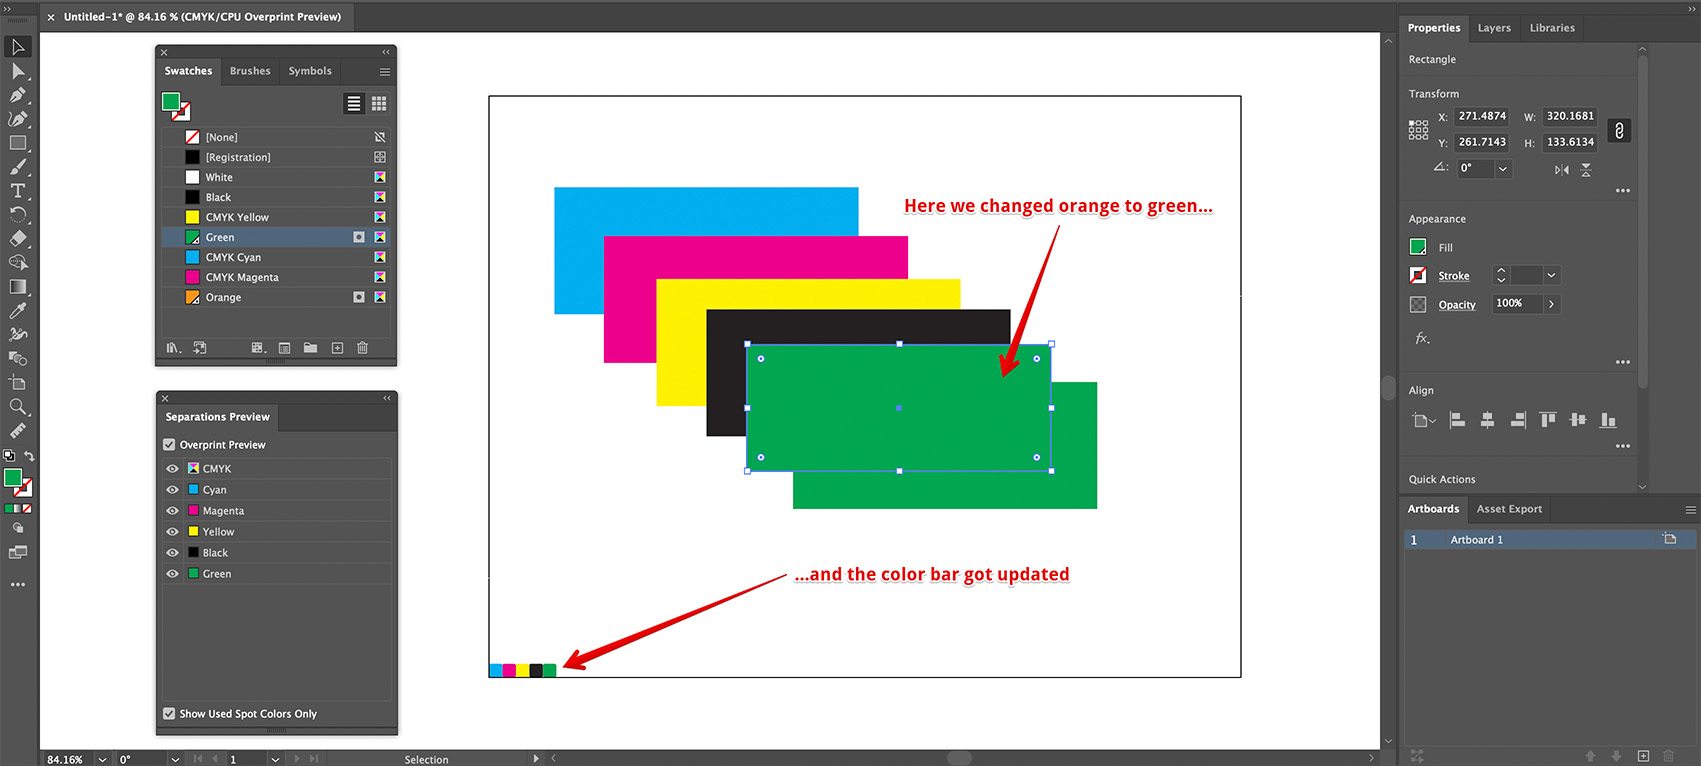
Here we filled the orange rectangle with green and the color bar does not show the orange color anymore.
Updating color bars is a time–consuming operation, so Ai Toolbox doesn’t do this every time you make a change. Instead, (as with dynamic texts) it updates color bars in three cases:
- every 5 minutes;
- when you switch to a different document;
- when you save the document.
This way you get more or less accurate color bars almost all the time you work on the project without slowing your process down. If you need an instant color bar update you can use Object → Color Bar → Update All Color Bars menu item, or switch to a different tab and back, or save the project.
Ai Toolbox does not preserve color bars rotation and scaling when updating them. Use the color bar properties to change its direction, use custom color bar symbols to change its scale.
Note that you need a licensed copy of Ai Toolbox installed in order to automatically update color bars in background. The color bars are still visible without the plugin, but they will not reflect the changes you make.
Color Bar Properties
You can adjust the color bar settings by selecting it and clicking Object → Color Bar → Color Bar Parameters… item in the Illustrator main menu. The same window will pop up:
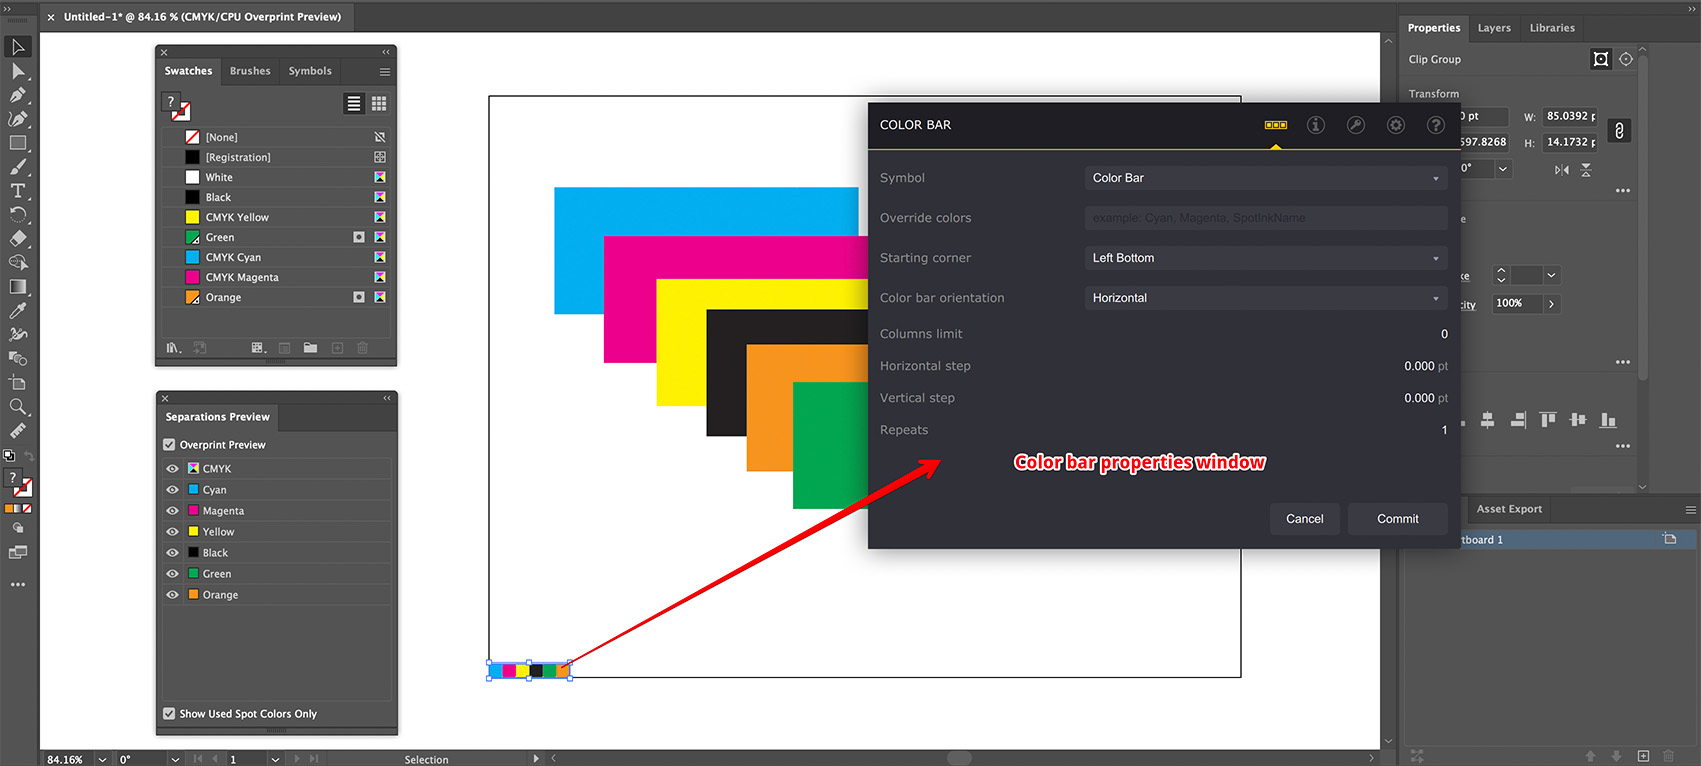
From top to bottom the parameters are:
- Symbol — which Illustrator symbol to use for color bars, see the color bars appearance tutorial;
- Override colors — which colors to display in the color bar. Leave it empty for displaying the document’s color, see the color patches tutorial;
- Starting corner — lets you define the anchor point of the color bar;
- Color bar orientation — controls the color bar elements flow;
- Columns/rows limit — let you break color bar into multiple lines;
- Horizontal/Vertical step — define the distance between color bar elements;
- Repeats — lets you repeat each color multiple times in the color bar.
Ai Toolbox immediately updates the color bar in preview when you edit these parameters, so you can visually check what you do. Let’s discuss the options in more details.
Regardless of its parameters, color bar is effectively a rectangular object with some graphics inside. When the list of used colors changes, the color bar needs to be updated and it may grow or shrink depending on the number of colors being used. In order to control the position of the color bar with these updates, the Starting corner option is used. It effectively defines the anchor point of the color bar that doesn’t move when the color bar is updated.
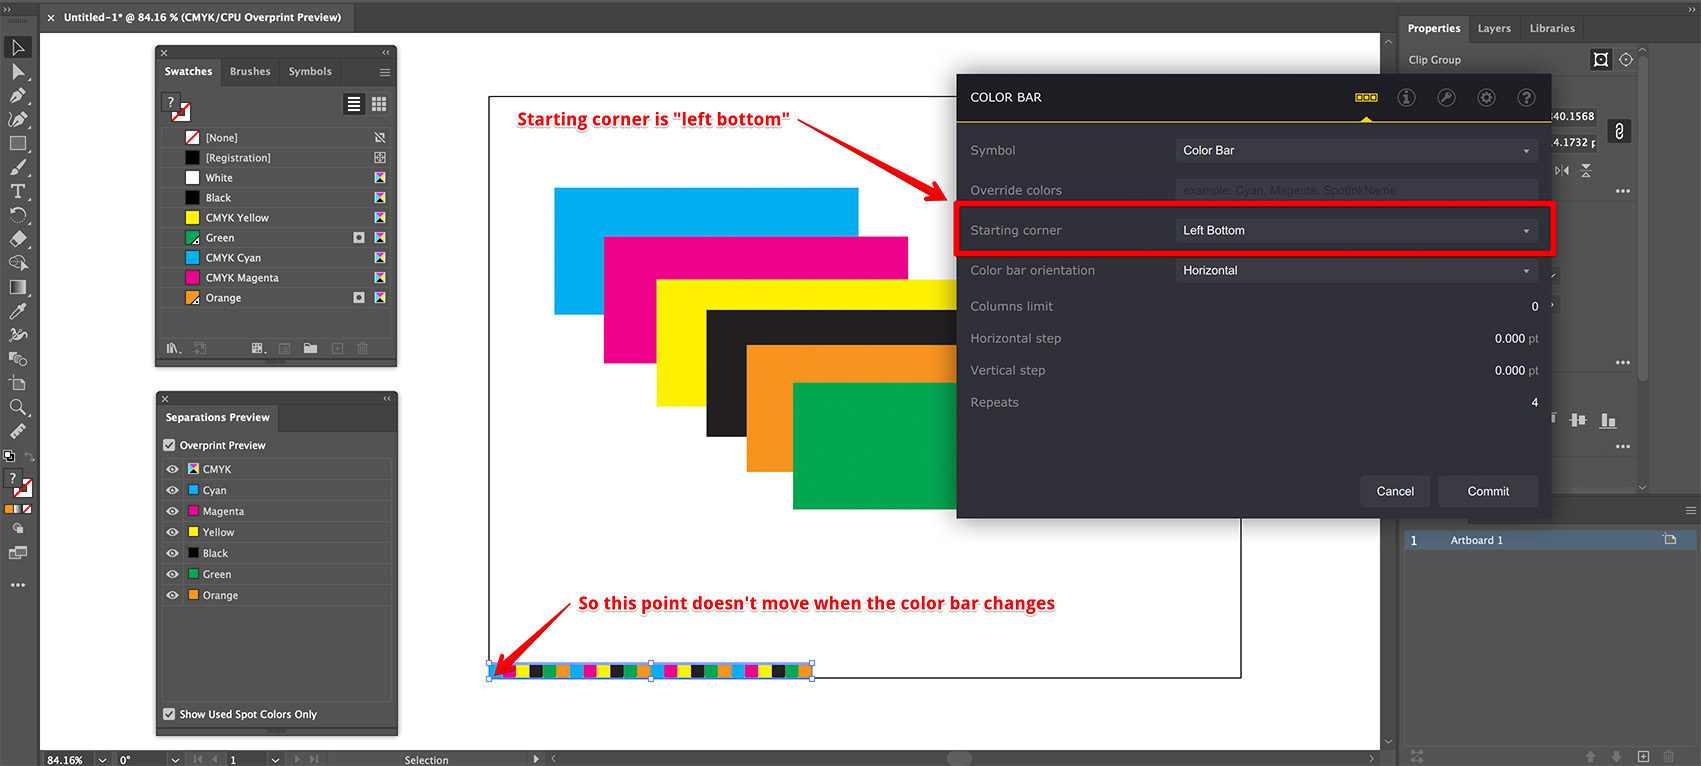
Here I used the Repeats field to make the color bar longer, but as the Starting corner is set to “Left bottom”, the bottom left point of the color bar stays at the same place.
Besides the anchor point, the Starting corner parameter defines the color bar flow direction, as the color bar is constructed from the starting point in the direction defined by the Color bar orientation parameter. On the image above the starting corner is bottom left and the color bar orientation is horizontal, so the color bar is constructed horizontally from the bottom left corner, so to the right.
Here’s what happens if the Color bar orientation parameter is changed to “Vertical”:
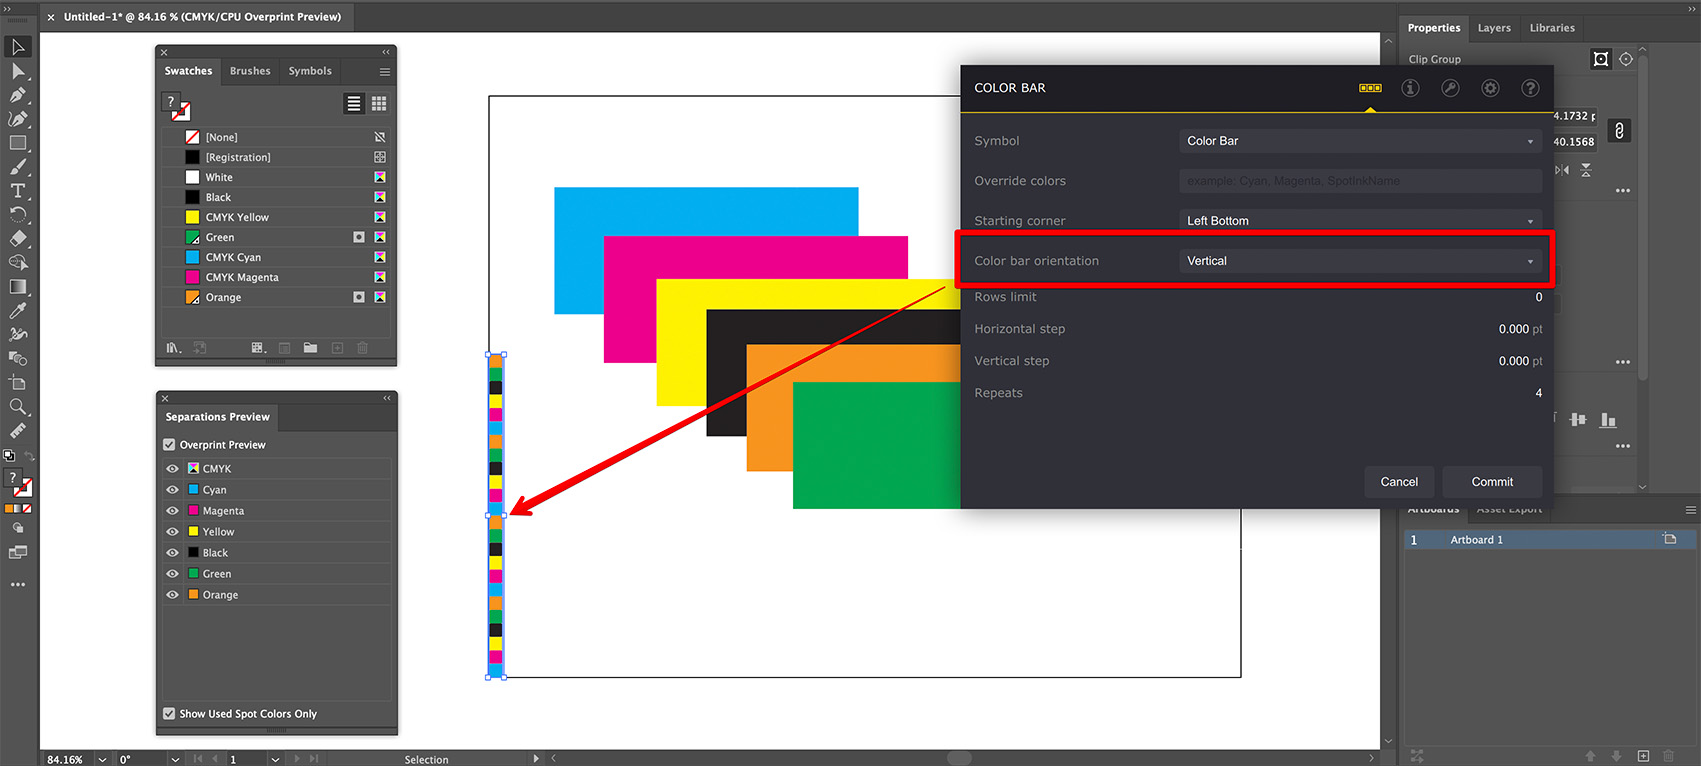
The color bar now goes up from the same bottom left point defined by the Starting corner parameter.
In a similar manner, if you want the color bar to go right–to–left, you need to select “Right Top” or “Right Bottom” starting corners and use the “Horizontal” color bar orientation. If you want the color bar to go top-to-bottom, you need the “Left Top” or “Right Top” starting corners and use the “Vertical” color bar orientation.
Lets now switch back to the horizontal color bar orientation and change the Columns limits field:
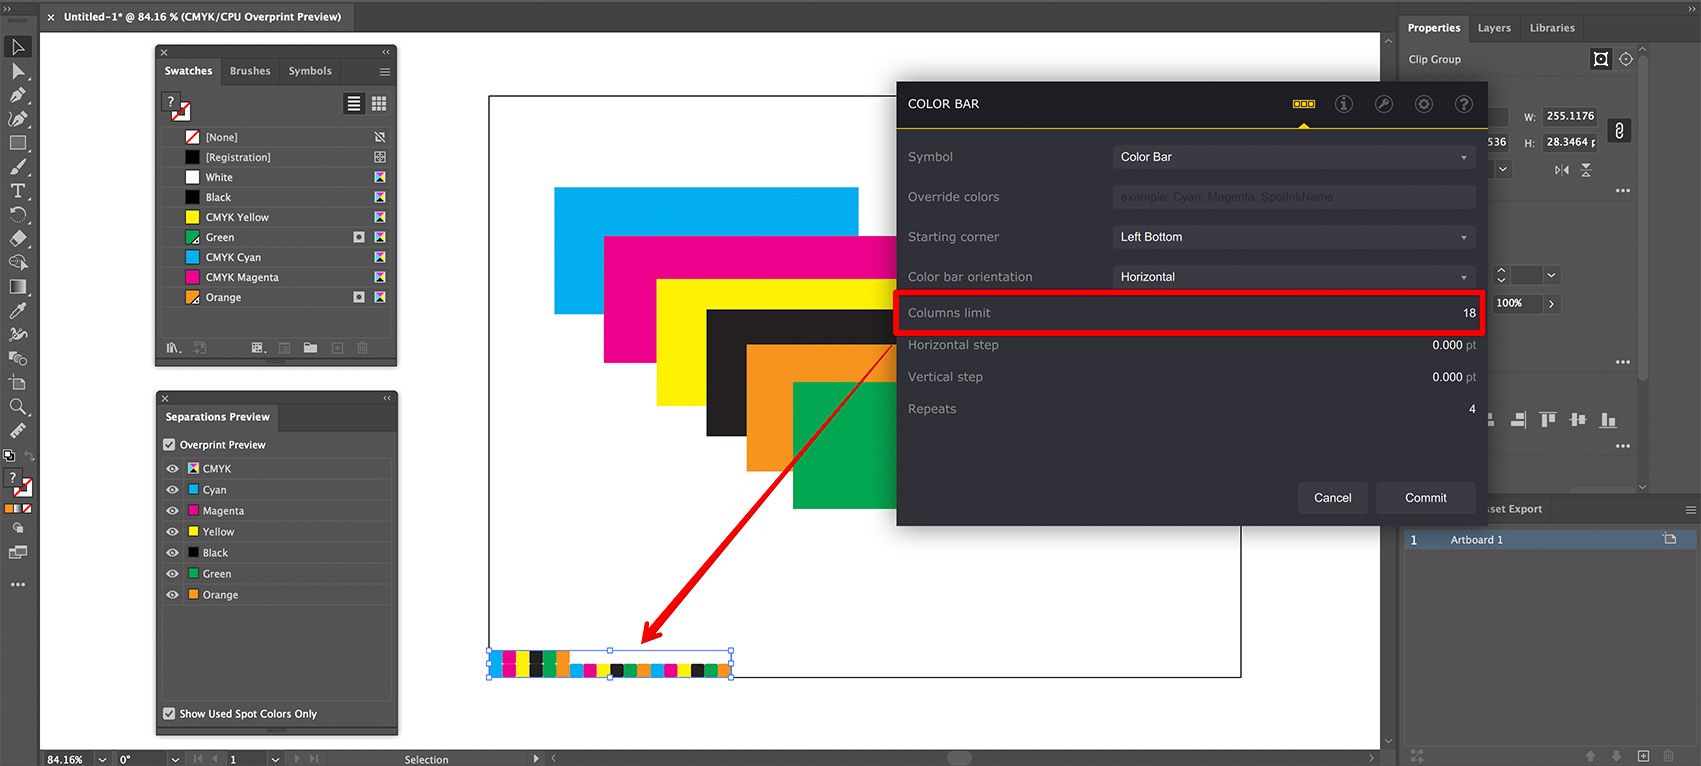
The document has 4 CMYK and 2 spot colors, 6 colors total. We set the Repeats field to 4, so the color bar has 24 elements total. Before we changed the Columns limit field they were displayed as a single row (or column, when the color bar was vertical). The Columns limit lets you break the color bar down into a few lines. Here we set the Columns limit field to 18, so the first 18 elements are on the bottom row and the rest 4 are on the top one.
Again, exactly as with single–line color bars, the construction direction is defined by the Starting corner parameter. As it is set to “Left Bottom”, the color bar is constructed from the bottom left corner to the right (as the color bar orientation is horizontal), then once the number of elements reaches the Column limit parameter, the new line is added on top (away from the starting corner) and the construction continues left to right.
If you want the color bar lines to break towards bottom, you need to use the “Left Top” or “Right Top” starting corners and so on.
For vertically–oriented color bars the parameters is called Rows limit and works exactly the same, effectively limiting the number of vertical elements of the color bar.
The Horizontal Step and Vertical Step parameters let you configure the gaps between the color bar elements:
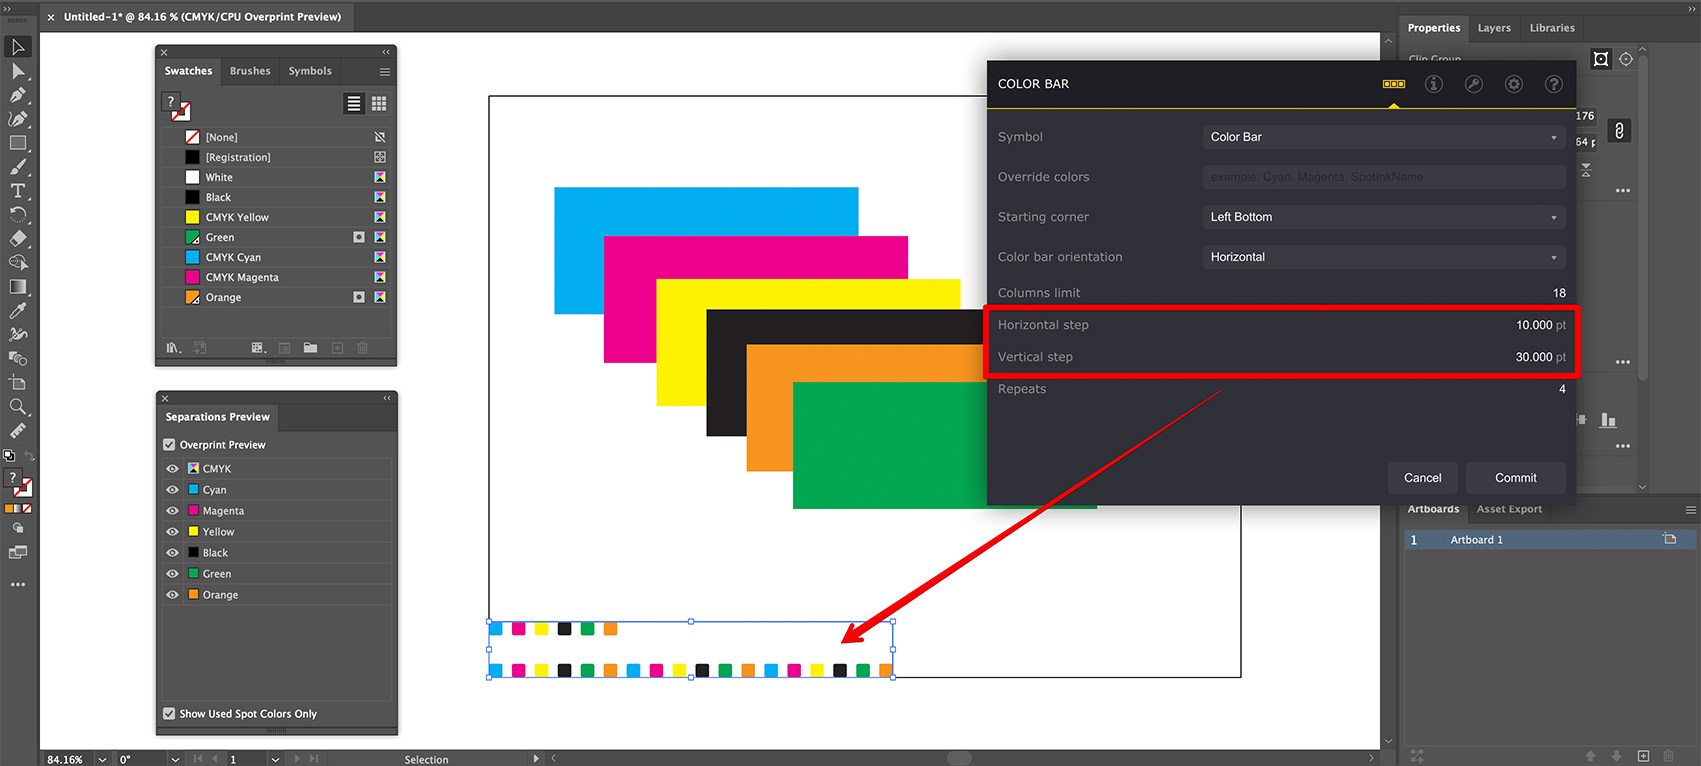
Finally, the Repeats field allows you to repeat the color bar elements, say to fill up the length of the page.
More Color Bar Options
That’s the very basic options of color bars in Ai Toolbox. To get the most of the plugin, consider visiting the links below:
- Customizing color bar appearance — making custom color bars by adding color shades and dynamic texts;
- Displaying custom colors — making “color patches” by coloring marks with given ink(s);
- Reusing color bars — how to copy color bars from one project to another.
More Ai Toolbox Tutorials
Installation
- Installation — how to install the plugin;
- License Activation — how to activate the plugin with a license key.
Renaming and Creating Elements
- Bulk Rename in Illustrator — rename multiple elements at once;
- Create Artboards from Selection — make artboards from selected elements.
Selection Operations
- Selecting Paths by Name — bulk selection by name in Illustrator;
- Select → Same → Font — selecting objects with the same font in Illustrator.
Text Operations
- Merging Texts in Illustrator — combine text elements, keeping lines intact;
- Dynamic Texts — add dynamic information to text elements in Illustrator.
Files Operations
- Collect Resources — package multiple files at once, including the nested ones.
Conical Labels
- Conical Label from Selection — making the label from the selected artwork;
- Conical Label from Artboard — making the label from the artboard content.
Color Bars
- Making Color Bars — how to make color bars in Illustrator in a few clicks;
- Color Bar Appearance — customizing color bars to display the data you need;
- Color Patches — color bars that display the inks you want;
- Reusing Color Bars — how to copy color bars to another project.
Adobe and Adobe Illustrator are either registered trademarks or trademarks of Adobe Systems Incorporated in the United States and/or other countries.