Bulk Renaming Items in Illustrator
Ai Toolbox lets you rename multiple elements at once. This includes artboards, paths, layers, symbols, gradients, spot colors, swatches and patterns. You can rename all the elements or just the selected ones. So select what you want to rename if needed, then click Edit → Rename Everything in Illustrator’s main menu.
Ai Toolbox “Rename Everything” window will pop up:
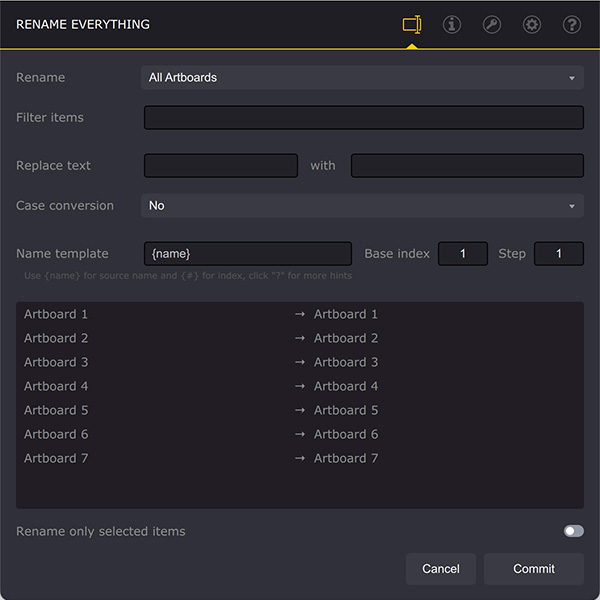
From top to bottom you see:
- Rename — lets you select what exactly you want to rename. The list is slightly longer than the one above, as some items like artboards or layers come in “all” and “selected” options. Select the items to rename and you will see they listed at the bottom of the window;
- Filter items — if you enter any text there, Ai Toolbox will only show you items that contain this text. This helps to hide the items you want to leave intact;
- Replace text/with text — these two fields let you replace some text with another in all the names;
- Case conversion — lets you convert names to upper case, lower case or title case;
- Name template, Base index, Step — see below;
At the bottom there is a list of items to be renamed. On the left you see the old names, on the right — the new names after applying all the rules.
Finally, at the very bottom there is a Rename only selected items checkbox. If enabled, Ai Toolbox will only rename the items you selected in the list. Not in Illustrator, but in the list of Ai Toolbox. This lets you fine–tune the items for renaming.
Filtering Items
Here I switched the Rename selector to All Paths and the list displays all the path names of the currently opened document. It is an Origami project with a dieline and say I want to rename all the unnamed paths:
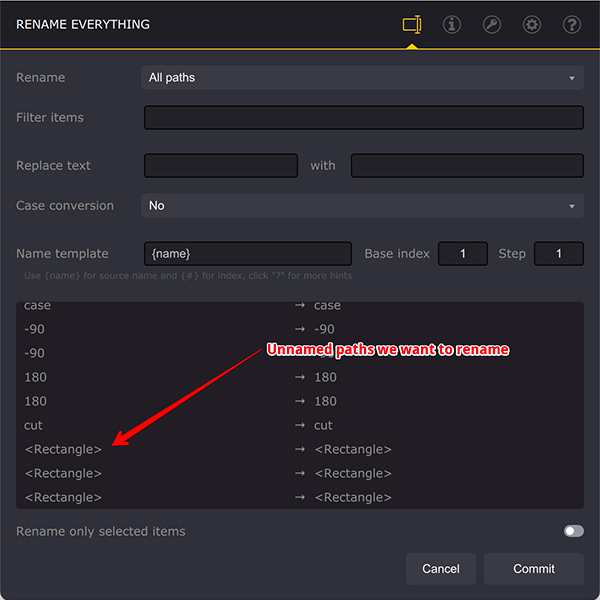
In order to rename just them, we need to filter them out first. Let’s type "<Rect" into the filter field, then press Enter and see what happens:
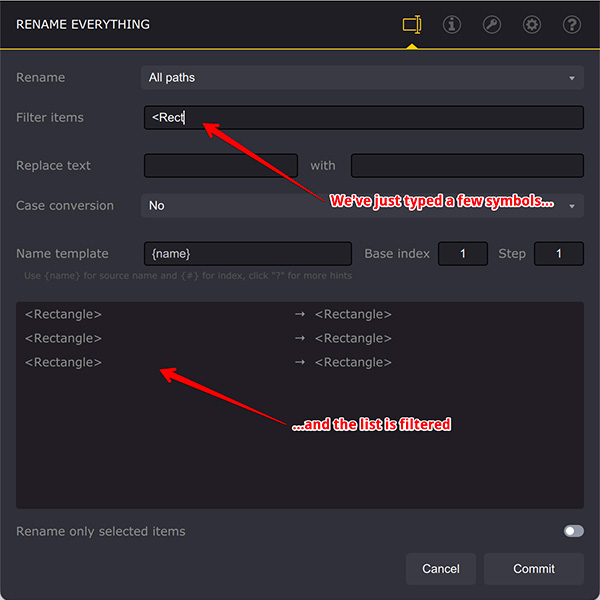
The list at the bottom of the window becomes shorter and only contains the items with the text you typed. This way you can easily shorten the list of items to rename, so you can hand–pick the right ones later.
Replacing Text
Let’s continue with the unnamed paths we started and try changing their names somehow. Type “Rectangle” in the Replace text field and type “Hello” in the with field. Then see what happens with the list:
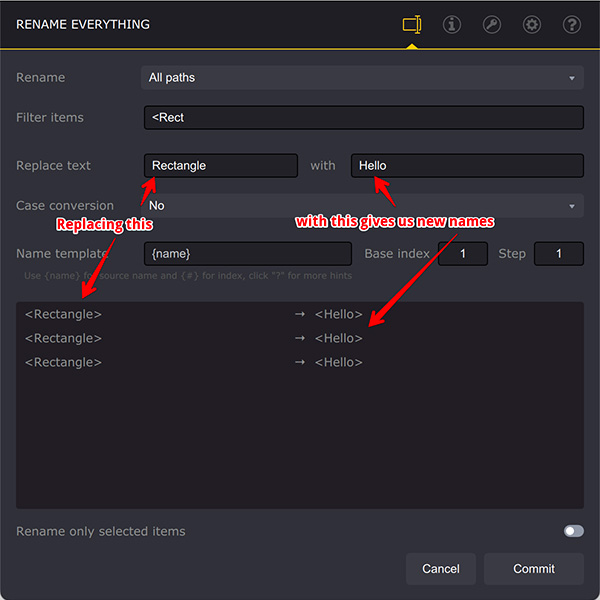
The plugin finds all the names with “Rectangle” and replaces it with “Hello”. Note that the search is case–sensitive, so if you type “rectangle” instead of “Rectangle” nothing will be changed.
If the name does not contain the source text, it is left intact. If the Replace text is empty, no replacing happens even if the with field is not empty.
Case Conversion
You can change the text case of the renamed items to lower, upper or title using the Case conversion drop–down list. Here is an example of making artboard names uppercase:
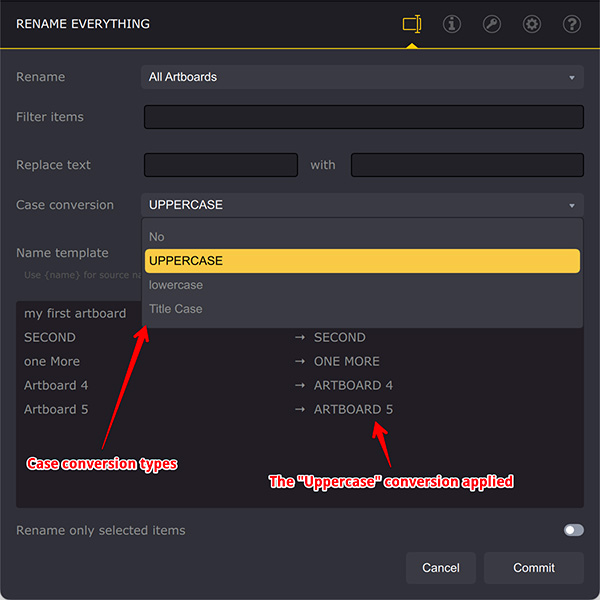
Case conversion happens after replacing text elements, so it affects the replaced texts, as well.
Name Template
The last field is called Name template and it is the main field of the renaming tool of Ai Toolbox. Basically, if you put any text there, all the items will be named like that. Try it yourself with the unnamed paths we used above:
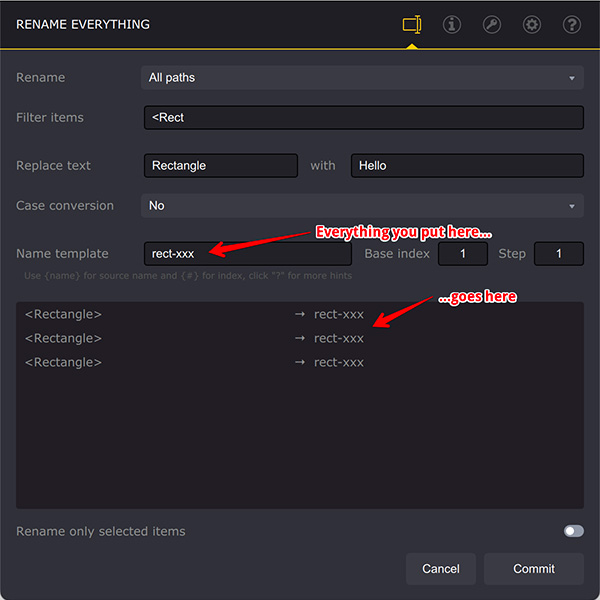
As soon as you type something in the Name template field, the right side of the list is changed to what you typed. All the source and replaced texts are ignored. Sometimes this is exactly what is needed, but not always so there are some other options.
Name Template — Numbering
Try typing “test-xxx {#}” in the Name template field and see what happens:
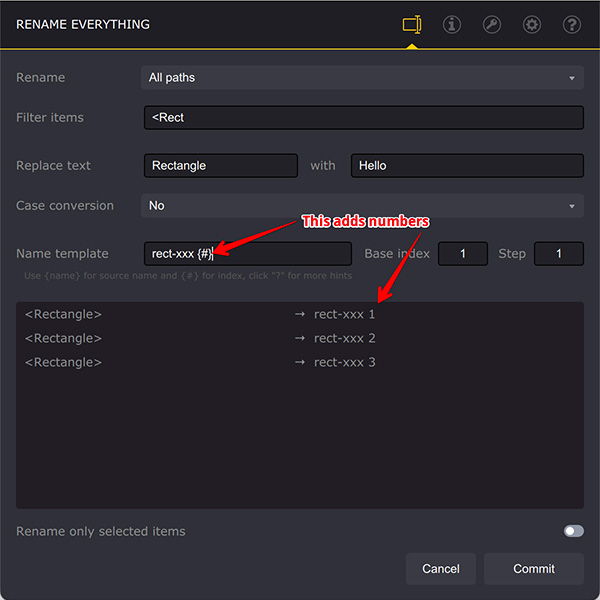
Ai Toolbox replaces all the “{#}” with auto–incrementing number, so you can get unique names for all the renamed elements.
If you have more than 10 elements (or more than 100) you might want adding extra zeroes at the beginning, so you get “Item 09”, “Item 10” instead of “Item 9”, “Item 10”. To do so simply use “{##}” for 2–digit numbers, or “{###}” for 3–digit numbers and so on:
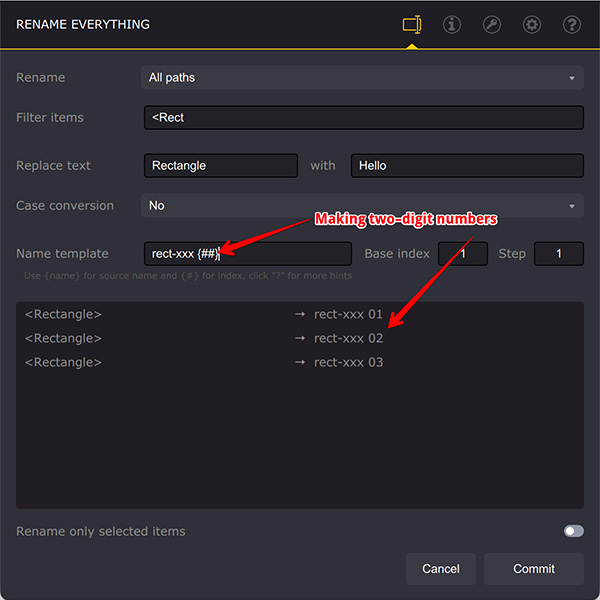
You can put the numbers in front or in the middle of the name like this: “{#} hello”, “new {##} name”.
Name Template — Advanced Numbering
There are two more fields on the right of the Name template one, called Base index and Step. Both are used for numbering and let you configure the way the items are numbered.
The Base index parameter defines the initial value of the counter when the renaming is started. It lets you number the items starting from a given value:
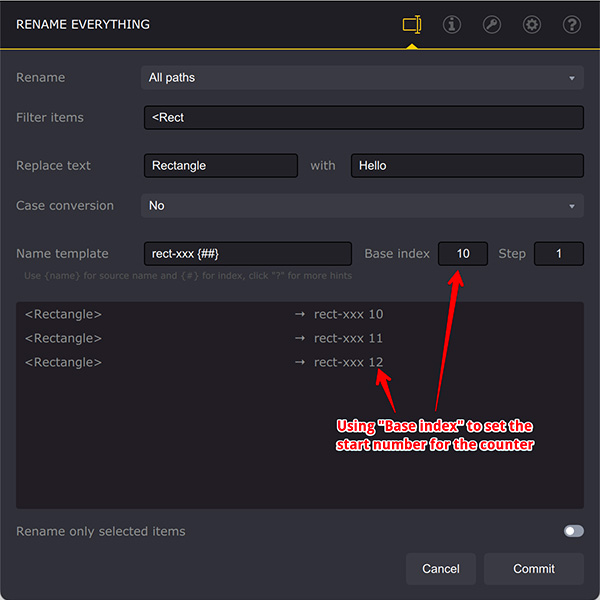
The base index is set to 10 above, so the elements are numbered as 10, 11 and 12 accordingly.
The Step parameter lets you do two things: the first is numbering with skip count:
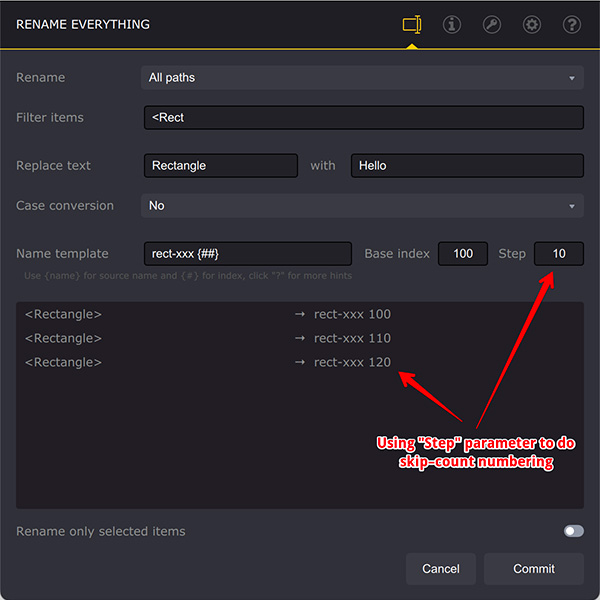
Here the base index is set to 100 and the step is 10, so the items are numbered as 100, 110 and 120.
The second thing the Step parameters allows you is backward or negative numbering. Set the base index to some value, then set the step to “-1” and see the result:
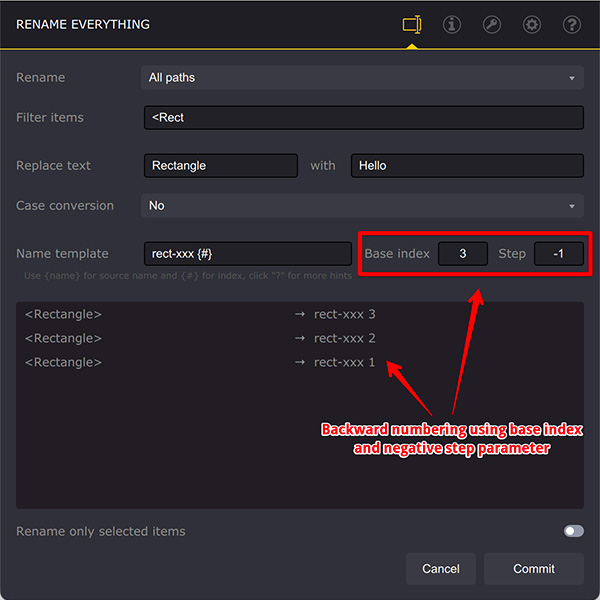
Here we have three elements, so the base index is set to 3, the step is -1 and the items are numbered as 3, 2, 1.
Name Template — Source Name
Finally, you can use the original name in the template by using “{name}” element. Try setting the Name template parameter to “Hello {name} {##}”:
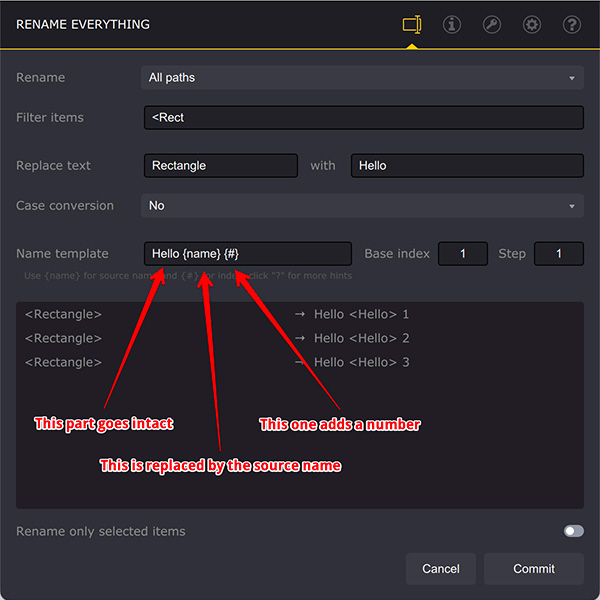
Every time Ai Toolbox meets the “{name}” placeholder in the template, it replaces it with the original name processed with “Replace text with” and “Case conversion” parameters, if any. That’s why the default name template is always “{name}”, so it simply passes the current name on.
You can make complex name templates by combining your own custom texts and both name and number placeholders like this: “{##} {name} reviewed”, “{name} vs {name} {#} by John” etc.
Rename Selected
The checkbox at the bottom lets you pick the items for renaming. If you check that box and then click the item in the list, the result might be surprising:
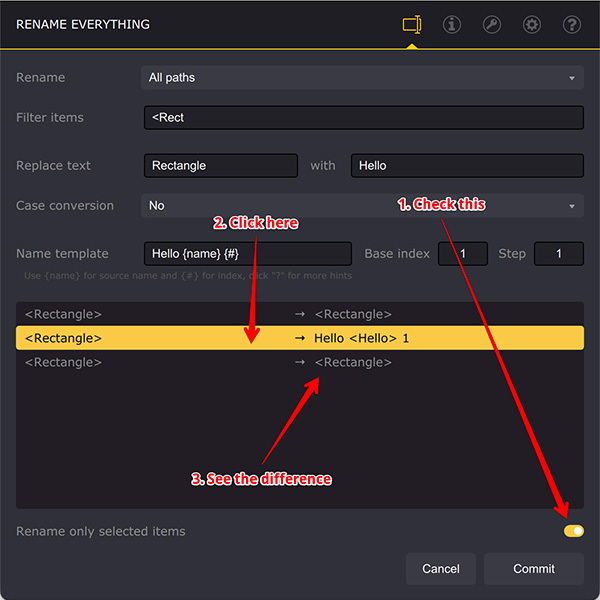
As the checkbox says, Ai Toolbox only renamed the items you selected. As you selected just one item, only that item is renamed. Note that it has nothing with your current Illustrator selection. It is just about the items selected in the list of the Ai Toolbox renaming window.
It is not worth renaming just one item with the plugin, so you can select multiple items by holding Control/Command and Shift keys (as you normally do multiple selection in other applications):
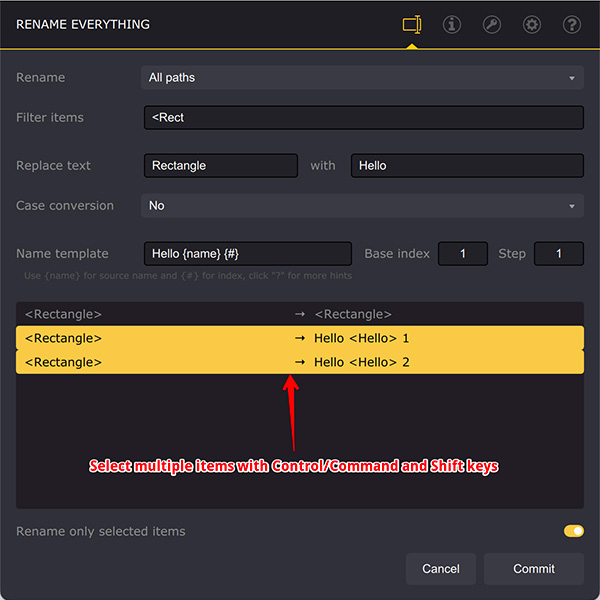
Note that only the selected items are renamed, the unselected one is left intact.
Manual Editing
You can manually adjust the names that come from Illustrator by double–clicking the left column:
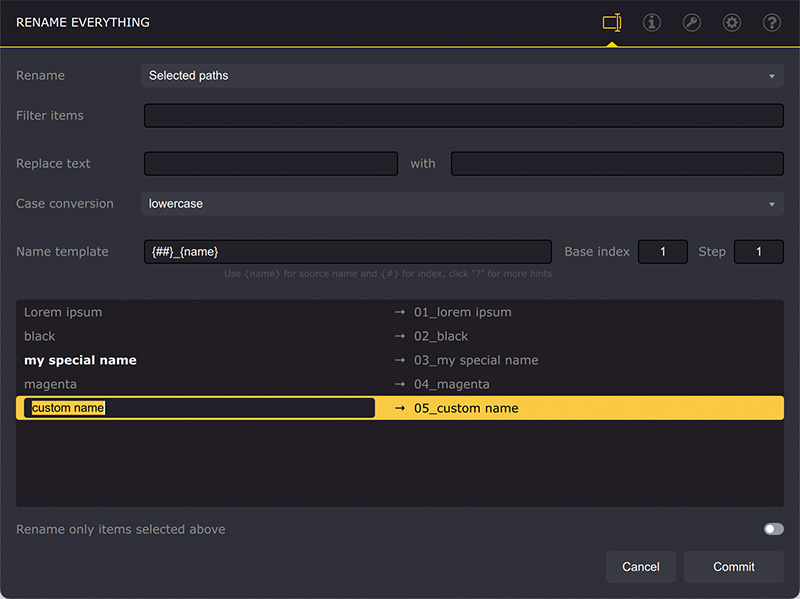
Once you do that, the editor will be shown and you can manually override the name that comes from Illustrator. Press Enter when done to commit the changes.
The overridden elements are highlighted with white and bold, you can see the my special name is being highlighted on the screenshot above.
Press Delete or Backspace to revert to the original name. You can also double–click the item and clear the text you entered to return to the original name.
Note that you can press Enter or F2 to start the editing instead of double–clicking the items.
The overridden name is used instead of the original one and is processed exactly the same way with all the renaming, renumbering etc. See the screenshot above, where the custom names got the same numeric prefixes as the original ones.
Finally
Once done, simply click Commit to perform the renaming. Simple :)
More Ai Toolbox Tutorials
Installation
- Installation — how to install the plugin;
- License Activation — how to activate the plugin with a license key.
Renaming and Creating Elements
- Bulk Rename in Illustrator — rename multiple elements at once;
- Create Artboards from Selection — make artboards from selected elements.
Selection Operations
- Selecting Paths by Name — bulk selection by name in Illustrator;
- Select → Same → Font — selecting objects with the same font in Illustrator.
Text Operations
- Merging Texts in Illustrator — combine text elements, keeping lines intact;
- Dynamic Texts — add dynamic information to text elements in Illustrator.
Files Operations
- Collect Resources — package multiple files at once, including the nested ones.
Conical Labels
- Conical Label from Selection — making the label from the selected artwork;
- Conical Label from Artboard — making the label from the artboard content.
Color Bars
- Making Color Bars — how to make color bars in Illustrator in a few clicks;
- Color Bar Appearance — customizing color bars to display the data you need;
- Color Patches — color bars that display the inks you want;
- Reusing Color Bars — how to copy color bars to another project.
Adobe and Adobe Illustrator are either registered trademarks or trademarks of Adobe Systems Incorporated in the United States and/or other countries.